 , and select the folder you desire or click the Make New Folder button to create a new storage. The current protocol name will then be displayed in Protocol name.
To access the TEMPEST Options menu, go to the Tools menu and select Options.
You will notice that there are three tabs: Dispense Options Tab, Chip Configuration Tab, and Advanced Options Tab. Advanced Options should be used by support technicians only. Please do not alter the options under the Advanced tab unless you are under guidance of a FORMULATRIX support person.
The tutorial covers the following sections:
To access Dispense Options settings, go to the Tools menu, select Options and click on the Dispense Options tab.
You can browse and locate the data configuration files by changing the root path location in the User Data Location box of the Dispense Options tab. Click the browse button  , and select the folder you desire or click the Make New Folder button to create a new storage. The current protocol name will then be displayed in Protocol name.
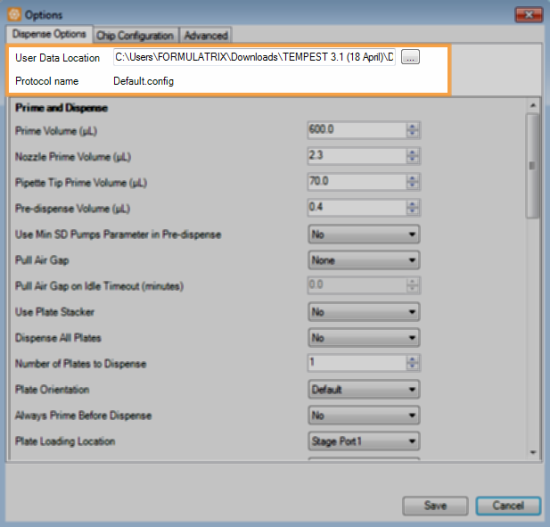
User Data Location and Protocol Name
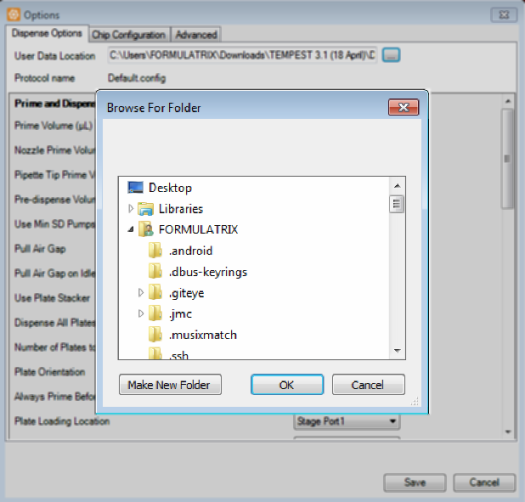
Browse For Folder Window
The Dispense Options tab consists of four group of settings which contain various options: Prime and Dispense, Recovery and Wash, Recirculate, and Scan Barcode and Dispense.
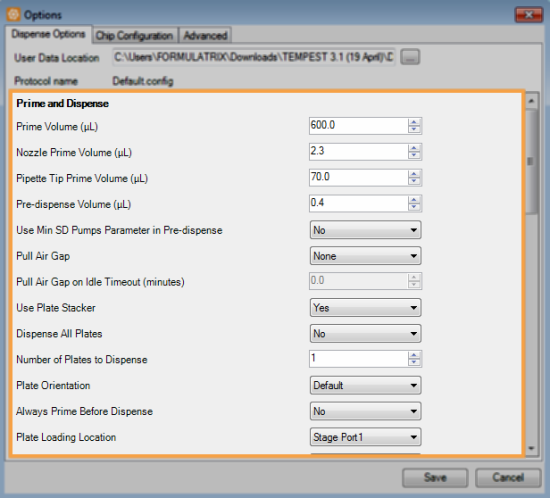
Prime and Dispense Settings
*Available only for TEMPEST with plate stackers.
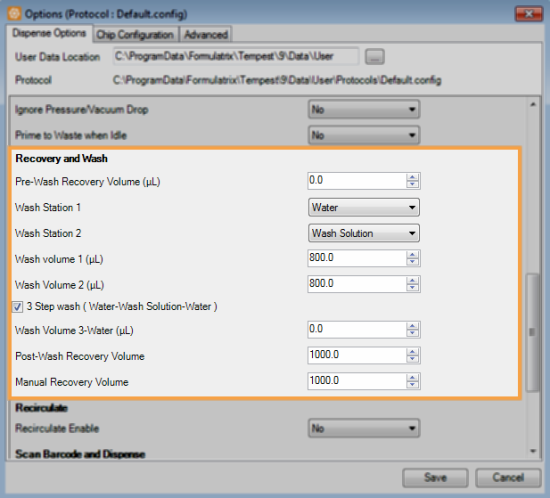
Recovery and Wash Settings
| Option | Default Setting | Description |
|---|---|---|
| Pre-Wash Recovery Volume (µL) | 0.0 | Determines the recovery volume used before the washing process. |
| Wash Station 1 | Water | Determines the liquid used for Wash Station 1. You may choose either Water or Wash solution. |
| Wash Station 2 | None | Determines the liquid used for Wash Station 2. You may choose either Water or Wash solution. For best results, use water in Wash Station 2.
Note: Some TEMPEST hardware V1 builds may not support dual column wash stations. |
| Wash Volume 1 (µL) | 800.0 | Determines the wash volume (in microliters) for Wash Station 1 to be used during the washing process. |
| Wash Volume 2 (µL) | 800.0 | Determines the wash volume (in microliters) for Wash Station 2 to be used during the washing process. |
| 3-Step wash (Water-Wash Solution-Water) | Determines whether or not the TEMPEST washes its liquid lines with water, then wash solution, then again with water. | |
| Wash Volume 3-Water (µL) * | 0.0 | Determines the volume used for the final water wash for the 3-step wash process. |
| Post-Wash Recovery Volume | 1000.0 | Determines the recovery volume used after the washing process. |
| Manual Recovery Volume | 1000.0 | Determines the recovery volume (in microliters) to be used for the manual reagent recovery process. |
*Select 3-step Wash option to enable the feature.
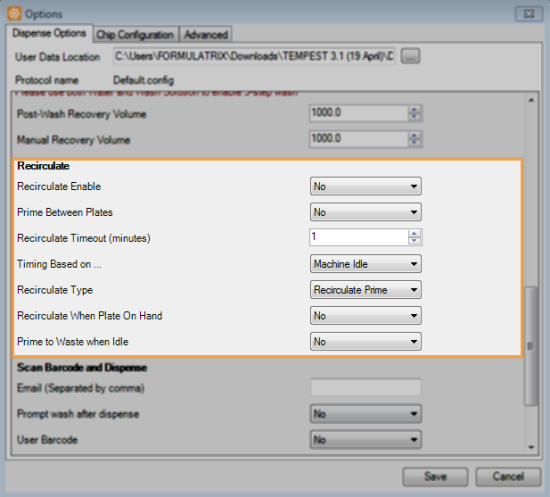
Recirculate Settings
*Hidden unless Recirculate Enable is set to Yes.
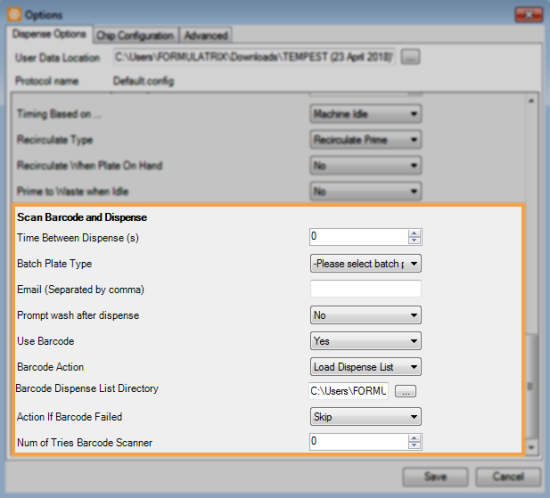
Scan Barcode and Dispense Settings
| Option | Default Setting | Description |
|---|---|---|
| Time Between Dispense (s) | 0 | Determines the time interval (in seconds) the TEMPEST will wait after a dispense has finished before the next one begins. Note: The Time Between Dispense (s) option is available to TEMPEST with plate stackers only. |
| Batch Plate Type | Determines the plate type to be used in your experiment. Note that this option is only used when your plates have barcodes and you are using plate stackers. | |
| Email (Separated by comma) | Determines the email address to which the dispensing report will be sent after the dispensing process is finished or aborted. | |
| Prompt wash after dispense | No | Determines whether TEMPEST will prompt you to wash all of the inputs after the scan and dispense process completes, eliminating the need to manually execute the Wash All inputs function. |
| Use Barcode | No | Determines whether or not the barcode scanner is active on the TEMPEST. Note: The Use Barcode option is only available for TEMPEST instruments with barcode scanners. |
| Barcode Action* | Load Dispense List | Determines how the TEMPEST interprets a barcode. If "Load Dispense List" is selected, the TEMPEST will open the dispense list associated with the barcode. If "Log Barcode" is selected, the TEMPEST will record barcodes in the dispense log file. |
| Barcode Dispense List Directory* | Determines the file path the TEMPEST should look in when attempting to load dispense lists based on the barcode reading result. | |
| Action If Barcode Failed* | Skip | Determines the action to be performed by the TEMPEST when a scanning error occurs. The TEMPEST can either skip to the next plate in the stacker or abort the scanning process. |
| Num of Tries Barcode Scanner* | 3 | Determines how many times the barcode scanner will attempt to read a barcode label before announcing an error. |
*Hidden unless Use Barcode is set to Yes.
To access Chip Configuration settings, go to the Tools menu, select Options and click on the Chip Configuration tab.
You must input the chips’ information, such as serial number, installation date, and chip type in the Chip Configuration tab. You can view the Small Diaphragm, Large Diaphragm, Output Cycles, Prime Cycles, and Dispense Cycles information that are automatically updated after dispense.
_550x501.png)
Chip Configuration Tab
In this tab, you can also view the chip(s) usage information in the Chip History tab. The history information include the chip(s)’ Purge Cycles, Fill Cycles, Small Diaphragm Cycles, Large Diaphragm Cycles, and Output Cycles.
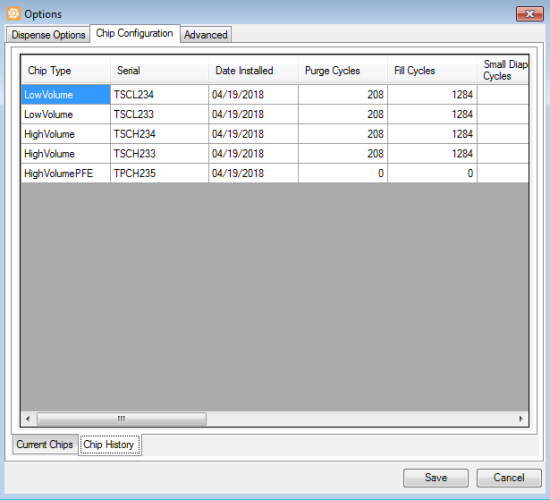
Chip History Window
Important: Advanced Options should be used by support technicians and advanced users only. Please do not alter the options under the Advanced tab unless you are under guidance of a FORMULATRIX support person.
To access advanced settings, go to the Tools menu, select Options and click on the Advanced tab.
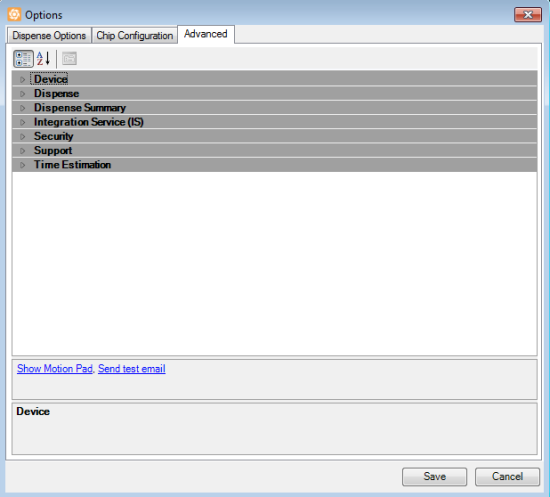
Advanced Tab
Click the topics below to see more detailed explanations.
| Option | Description |
|---|---|
| Pressure Alarm | Determines the pressure limit value. If the current pressure value is less than the default limit value, the TEMPEST will sound an alarm and abort the dispensing process. |
| Vacuum Alarm | Determines the vacuum limit value. If the current vacuum value is less than the default limit value, the TEMPEST will sound an alarm and abort the dispensing process. |
| Is Pressure Vacuum Alarm Enable | Determines whether the pressure and vacuum alarms are enabled or disabled. Set into True to enable the alarms. |
| Min Travel in X Axis | Determines the minimum travel value of the X axis. |
| Max Travel in X Axis | Determines the maximum travel value of the X axis. |
| Min Travel in Y Axis | Determines the minimum travel value of the Y axis. |
| Max Travel in Y Axis | Determines the maximum travel value of the Y axis. |
| Min Travel in Z Axis | Determines the minimum travel value of the Z axis. |
| Max Travel in Z Axis | Determines the maximum travel value along the Z axis. |
| Wash Station Position | Determines the wash station position in the first column. This position is configurable depending on the wash station type (single or double column) and can be set by entering necessary numbers into each axis field. The list provides Get the current position and Move to position options. |
| Waste Station Position | Determines the waste position in the first input column. The waste station is used to hold the pre-dispense, nozzle prime, and prime to nozzle (if a pipette tip is used) waste volume. |
| Wash Station Z Drop | Determines the height clearance necessary for the wash inputs to safely move to the next input column. This will ensure that the TEMPEST will properly wash the chips. |
| Port 1 Position | Determines the position of the plate holder when it is at stage port 1. StagePort1 is located on the left. |
| Port 2 Position | Determines the position of the plate holder when it is at stage port 2. StagePort2 is located on the right. |
| Plate Stacker 1 Position* | Determines the position of the plate stacker 1 position. Stacker 1 is located on the left. Note: Available only for TEMPEST with plate stackers. |
| Plate Stacker 2 Position* | Determines the position of the plate stacker 1 position. Stacker 2 is located on the right. Note: Available only for TEMPEST with plate stackers. |
| Option | Description |
|---|---|
| Prime Volume µL (prime to nozzle) | Determines the reagent(s) volume (in microliters) to be used to prime to nozzle. |
| Stacker Loading Location | Determines where the TEMPEST picks up a plate from the defined stacker. To define the plate load position, click Stacker Loading Location and select the desired stage port from the list. |
| Update Sequence Editor During Dispense | Controls the software user interface when running sequences. Select “True” if you want to view each sequence process. Select “False” if you want to hide the process. |
To enable dispense summary:
Go to the Tools menu, click Options.
Choose Advanced.
On the Dispense Summary option, select True to enable the feature.
Click Save.
To open the dispense summary folder:
Go to the Tools menu.
Click to open the Dispense Summaries Folder.
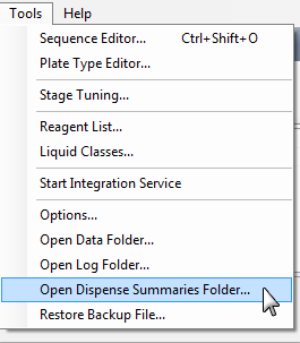
Open Dispense Summary Folder
| Option | Description |
|---|---|
| Integration Service Base Address |
The API Service host address. Define the Integration Service Base Address by manually changing the port number on your computer. |
| Service Remote Start |
Determines the setting for the integration service to run as a background process. The default setting is Deny.
|
| Option | Description |
|---|---|
| Password protected settings | Determines whether the security mode will be activated. |
| Password | Determines the security password used. |
| Backup Email Address | Determines the email address for the security backup. |
| Option | Description |
|---|---|
| MailTo | Determines the email address to which error notifications will be sent. |
| MailFrom | Determines you to fill in the field with your email address. The system will use the specified email address to send Scan and Dispense log. |
| IsNotifyImmediately | Determines whether the system will automatically send an email notification to FORMULATRIX team support, in the event of an error. |
| SMTPServer | Determines the SMTP server associated with your email address. |
| SMTPPort | Determines the SMTP port number associated with your email address. |
| SMTPUserName | Determines the SMTP user name associated with your email address. |
| SMTPPassword | Determines the SMTP password used. |
| SMTPEnableSSL | Enables you to choose if your SMTP server supports SSL. |
| AttachLogFile | Enables the system to send zipped log files via email. |
| ShowSMTPWarning | Shows the SMTP warning in the event of an error. |
| Option | Description |
|---|---|
| Infinite Time Threshold (ms) | Displays the time limit (in milliseconds) used when running an infinite dispense test. |
Note: Click Save when you are finished managing your data configuration setting on the Options menu.

|
|
| TEC-V311R018
|