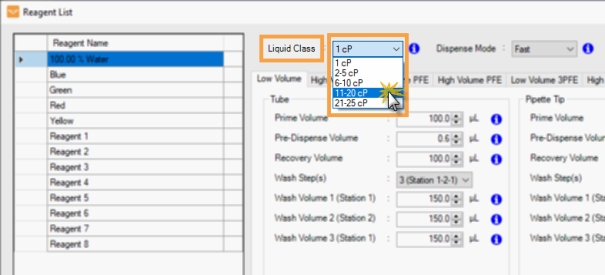
On the Tools menu, click Reagent List.
In the Liquid Class option, specify the liquid class for your selected reagent. If your reagent is viscous, choose from the following:
- 11-20 cP if you are using LV chips.
OR
- 21-25 cP if you are using HV chips.

The MANTIS is capable of dispensing reagents with viscosities up to approximately 20 cP for Low Volume (LV) chips and 25 cP for High Volume (HV) chips. without requiring custom software settings. Working with reagents with viscosities above 20 cP can cause hanging drops as well as inaccurate dispense volume and coefficient of variation (CV). To prevent those issues, both pressure and timing settings need to be adjusted when dispensing reagents with viscosities of around 20 cP (see the list of reagents below).
Note: These procedures will not work for PFE chips. It is recommended to use silicone or 3PFE chips to dispense viscous reagents. For more information about chemical compatibility with FORMULATRIX chips, click here.
List of reagents with viscosities approaching to 20 cP (20 oC):
PEG 1000, 40%
PEG 3350, 28%
PEG 4000, 25%
PEG 8000, 18%
Glycerol, 60%
Selecting the correct liquid class for your reagent results in more precise dispenses, as viscous liquids require different dispense and delay times from non-viscous liquids. The MANTIS has been programmed to handle liquids of different viscosities according to their specific properties.
On the Tools menu, click Reagent List.
In the Liquid Class option, specify the liquid class for your selected reagent. If your reagent is viscous, choose from the following:

Selecting Reagent Viscosity in the Reagent List
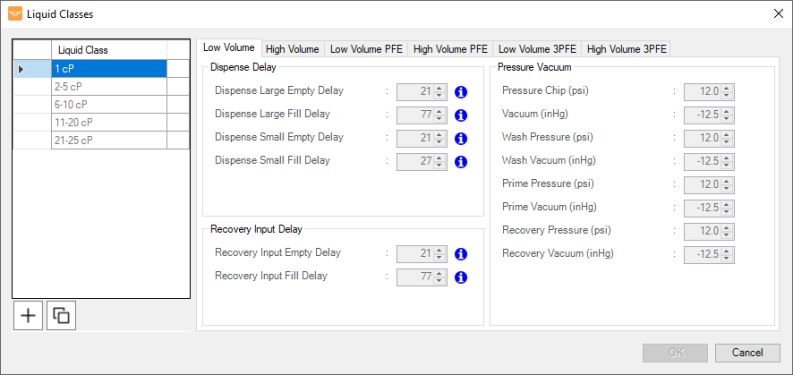
You can adjust the pressure and vacuum values used for each type of chip during dispense, wash, prime, and recovery processes.
Note: The Pressure Vacuum settings can only be adjusted when using a MANTIS V3 or later instrument.
Important: The Pressure Vacuum settings should be adjusted by Advanced Users only. The settings should not be altered unless you are directed by FORMULATRIX support to do so, as it may adversely affect dispense accuracy.
Go to the Tools menu and select Liquid Classes.
Choose from the following options:
Select the desired chip type by clicking on the related Chip Type tab.

MANTIS Liquid Class Menu
For diaphragm dispensing, adjust the Pressure Vacuum settings by increasing pressure and decreasing vacuum, until the reagent is dispensed without hanging drops. If needed, you can also modify the Dispense Delay and Recovery Input Delay settings to get a more accurate dispensing result.
Note: Each reagent may require slightly different Pressure Vacuum settings as well as the Dispense Delay and Recovery Input Delay settings. For more information, see Liquid Classes.
Important: DO NOT exceed 21 psi for Pressure Chip or -18 inHg for Vacuum.
Tip: Using a pipette input is better for viscous dispensing.
Important: DO NOT exceed 18 psi for the Pressure Bottle. The pressure difference between chip and bottle pressure must be a minimum of 5 psi. For example, the default value for chip pressure is 12 psi. If the bottle pressure exceeds 7 psi, you must increase the chip pressure accordingly.
Note: You should recalibrate the Continuous Flow (CF) chips whenever you change the bottle pressure. For more information on calibrating the CF chips, see Calibrating Continuous Flow Chips.
When you're done, click OK to save the configuration.

|
|
| MAC-V45R721 |