Adding and Editing Plate Types

Your plates must be defined in the NT8 software before they can be used in an experiment. NT8 comes preloaded with most common plate types, but you can create definitions for other types of plates that you want to use. When you add a new plate to the plate type library, a wizard will guide you through the process and provide a common plate type as a starting point to help you define your new plate type. You can also edit existing plate types if you need to make any adjustments. Alternatively, you can request a new plate definition from support@formulatrix.com.


Prerequisites


Creating a Plate Definition

  1. Right-click on any plate in the Plate Type Library and select New Plate Type. The Plate Type Editor dialog box appears.
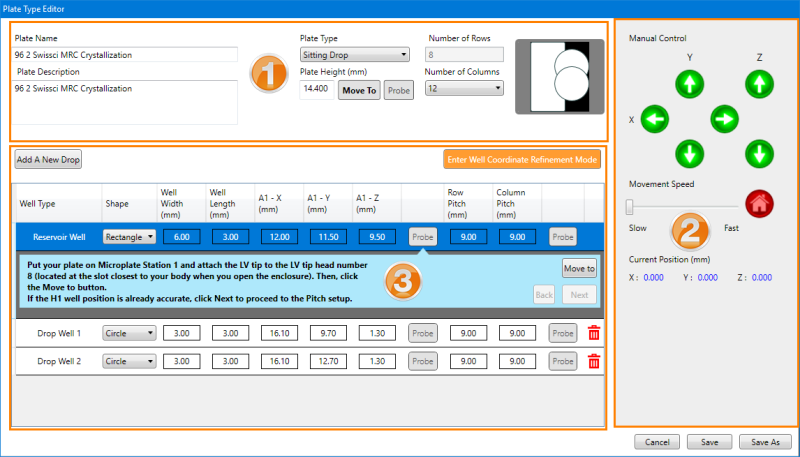
The Plate Type Editor Wizard

 
  1. Define or edit the settings in the Plate Type Editor accordingly.
    The table below explains in detail each section of the Plate Type Editor, including the Plate Definition, Manual Control, and Drop Table group.
NumberGroup NameDescription
Plate Definition
  • Plate Name — Type a name for the plate in the Plate Name box.
  • Plate Description — Type some descriptive information about the plate in the Plate Description box, if desired.
  • Plate Type — Select the type of plate you’re using from the Plate Type list. The plate type options include Sitting, Hanging, LCP, or DeepWell.
  • Plate Height (mm) — Type the plate height in millimeters (mm).
    OR
    If you do not know the height of your plate, click the Move To button to move the NT8 head over the left side of the plate in the microplate station 1. Then, click the Probe button to measure the plate height using the NT8. The height in millimeters will automatically populate the Plate Height box field.
 

Important: When probing, ensure that the tips touch the flat surface of the plate, and not any engraved or embossed features like branding, or column or row labeling.

  • Number of Rows — This field shows you the row number of your plate. This field cannot be edited because NT8 only supports plate types with a row pitch of 9 mm.
  • Number of Columns — Select the number of columns of your plate from the list.
Manual Control

This panel contains several buttons that can control the movement of the NT8 head and deck, control the movement speed, and home the NT8 motors. The current X, Y, and Z position of the NT8 hardware is also displayed. See below for more information:

  • Manual Control Pad — Use the X, Y, and Z arrow buttons to move the NT8 head left, right, up, and down, and the NT8 deck back and forth.
  • Movement Speed — Control the velocity of the NT8 hardware’s movement by dragging the button to the right or left. Drag the button to the right to increase the speed, or to the left to reduce the speed.

Tip: When refining the NT8 head position, it is recommended to use lower speeds for greater precision.

  • Home button — Use this button to home the NT8 motors. When a confirmation message appears, click Yes to home all motors including the LCP motor, or click No to home all motors except the LCP motor.

The Home All Motors Confirmation Message

  • Current Position (mm) — Display the NT8’s current position.
Drop Table

This table contains more detailed information about your plate specifications, including the Well Type, Well Shape, Well Width, and Well Length. It also shows you the plate coordinates for the X, Y, and Z for the A1 well offset position and the Pitch value. For more information, see below:

The Drop Table as Seen in the Plate Type Editor

  • Add a New Drop — Click this button if you want to add a new drop or well location to your plate definition.
  • Enter Well Coordinate Refinement Mode — Modify the existing X, Y, and Z coordinates for each of the different well types and get the ideal aspirate and dispense positions. This feature is currently available for round-bottom crystallization plates.


    Important: Please contact support@formulatrix.com for help using this feature.

  • Well Type — If you want to edit the Well Type, double-click the corresponding row under the Well Type column and type the desired name.


Note: By default, you will find three well types listed under the Well Type column if you are creating a new plate type: Reservoir Well, Drop Well 1, and Drop Well 2. However, you can always add a drop, or delete a drop as needed.

  • Shape — Select the correct shape for your plate’s well or drop from the list. There are three options available: Rectangle, Ellipse, or Circle. See the drop overview that is located above the Drop Table in the Plate Definition group (shown in the orange box next to the Number of Rows field below).

Note: This information is only used to construct the Well Overview image.

The Well Overview Image

  • Well Width (mm) — To edit the Well Width value, double-click the corresponding row under the Well Width column, then type the desired value. The default value for a Reservoir Well is 6.00 mm, while for a Drop Well the default value is 3.00 mm.
  • Well Length (mm) — To edit the Well Length value, double-click the corresponding row under the Well Length column, then type the desired value. The default value for both Reservoir Wells and Drop Wells is 3.00 mm.
  • A1 - X (mm), A1 - Y (mm), and A1 - Z (mm) — The A1 - X (mm), A1 - Y (mm), and A1 - Z (mm) fields contain the X, Y, and Z offset position values of the A1 well of your plate.

    To edit these values, double-click the corresponding field and type the desired value. If you don’t know these values for your plate, you can use the X, Y and Z Arrow buttons in the Manual Control to manually move the NT8 head closer to the plate, and refine the X and Y positions of the selected drop. When the tip is positioned directly over the center of the sub-well, click the Probe button, located next to the A1 - Z (mm) column in the corresponding row, to automatically lower the NT8 tip to the bottom of the drop. The values in the A1 - X (mm), A1 - Y (mm), and A1 - Z (mm) fields will automatically populate after you click Probe.

Tip: If you have the offset position coordinates for the X and Y positions of your drop, you can manually input the values to the corresponding fields, and click the Move to button to move the plate to those coordinates. Then, click Next to proceed.

  • Row Pitch (mm) — This field displays the distance between two horizontally adjacent wells. This field cannot be edited because NT8 only supports plate types with a row pitch of 9 mm.

    Note: The 384-well plates can still be defined as having two groups of sub- wells with 9 mm row pitches and A1 offsets being different by 4.5 mm in Y direction.

  • Column Pitch (mm) — This field displays the distance between two vertically adjacent wells. If you know the column pitch for your plate, double-click the corresponding field and type the desired value. If you do not have this information available, you can use the arrow buttons in the Manual Control to manually move the NT8 head above the last (right-most) column of your plate. Then, click the Probe button located next to the Column Pitch field to lower the tip to the bottom of the well. Using this well’s position and the X, Y, and Z values you previously defined for your A1 well, NT8 can calculate the column pitch for your plate automatically.
  • Click here to Add Drop — Click this button to add a new drop or well location.

Note: The Click here to Add Drop button is not available for Deep Well plates.

  • Add Predispense LCP — Click this button to add a predispense area for LCP use.

Note: The Add Predispense LCP button is only available for LCP plates.

  • Delete button — Click this button to remove the corresponding drop. Please note that the Reservoir Well drop cannot be deleted.
  1. When you are done, click Save to save your changes.

    OR

    Click Save As, type a name for your plate, and click Save.

Tip: It is recommended to use the Save As function when refining a plate definition, so that you can save the altered definition with a different name from the original plate definition. This enables you to easily revert to the original version should you encounter any problems with the new plate definition.


Related Topics

NTC-V3R119

10 DeAngelo Drive

Bedford, MA 01730 USA

+1-781-788-0228


support@formulatrix.com

publications@formulatrix.com