Important: You must specify the desired solution's volume and its volume range levels if the liquid level sensors are not active.
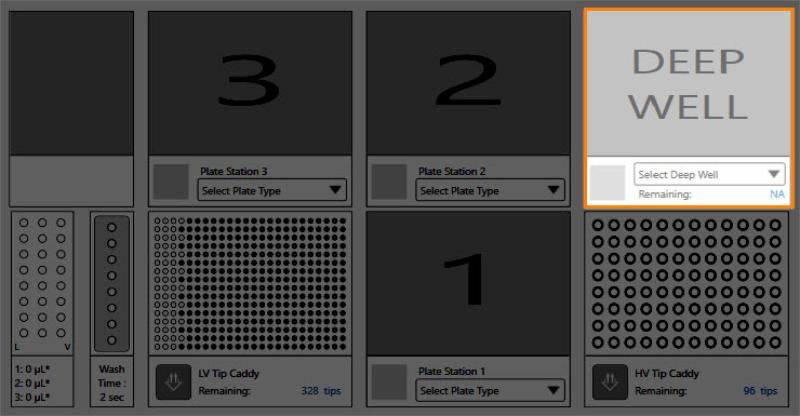
The deep well station on the software enables you to specify dispense, volume, and aspirate settings for deep well blocks necessary for plate copy experiments.

Deep Well Station
Deep well setup is required for plate copy experiments. You must first specify the initial solution level and its volume range levels (see Setting the Solution Levels and Setting the Solution Volume Range Levels). This helps you to determine the heights at which the tips will stop prior to aspirating.
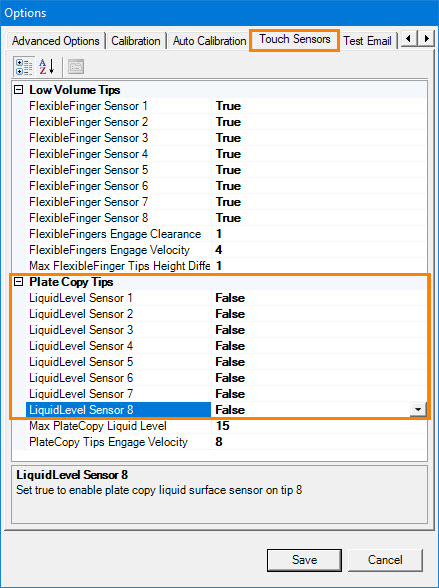
You have set the values for LiquidLevelSensor 1 through 8 under the Plate Copy Tips settings on the Touch Sensors tab of the Options menu to False. See the image below for reference.

Setting the LiquidLevel Sensors 1 - 8 to False
If the liquid detection sensors are not active, you must manually specify the solution levels on the well columns before running the plate copy experiment.
On the NT8 Control Software, click the down-arrow under the deep well station and select MASTERBLOCK 96 Deep Well from the Plate Type Library. The Deep Well Levels Setup dialog box appears as shown below. There are 12 graphics that represent the well columns and each of them has 20 level numbers. Level #1 is located at the bottom and level #20 is at the top.

Deep Well Level Setup Dialog Box
Important: The specified volume in the software should be the same as the actual deep well microplate volume.
Set the well volume to aspirate by clicking the desired level numbers (#1 through #20) on every column/graphic as necessary or by typing a new level value in the All Levels box then clicking Set, and then clicking OK to confirm. The specified level numbers will be reflected on the Deep Well Volume Range (see Setting the Solution Volume Range Levels).
At this point, we assume that you have already set the solution levels.
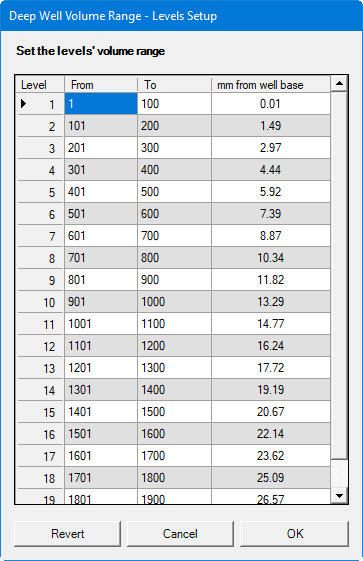
Right-click the deep well station and select Set Volume Range Level. The Deep Well Volume Range - Levels Setup dialog box appears as shown below.

Deep Well Volume Range Dialog Box
| Item | Description |
|---|---|
| Level | The deep-well level number. Level #1 is the closest level to the plate surface (located at the bottom) and level #20 is located at the top. |
| From | The starting point of the volume range levels on each deep-well level number. |
| To | The end point of the volume range levels on each deep-well level number. |
| mm from well base | The clearance (in millimeters) between the HV tips and the deep-well plate surface. |
Double click the From and To columns in the desired Level number.
Type a new value in each column.
After you have specified the solution levels and the solution volume range levels, you can then create the deep-well aspirate and dispense commands, explained below.
Click the Repeat button on the Task List to tell the NT8 that you want to repeat this task for all columns.
Make sure you have added the Pick Tip command for the HV tips to the Task List.
Click the down-arrow in the Select Plate Type field under the deep well station and select the appropriate deep well type, i.e. matching the hardware setup.
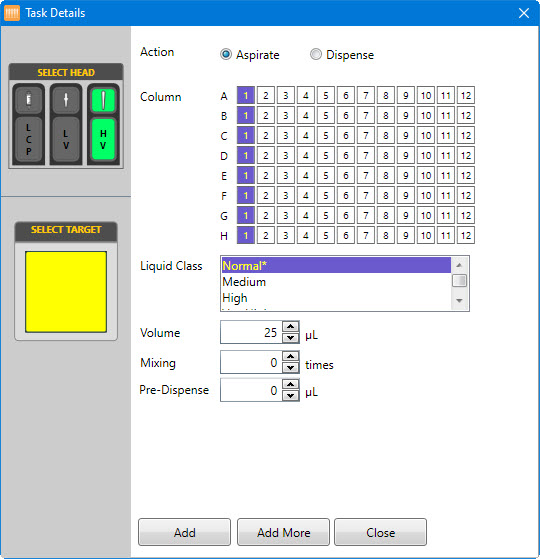
Double-click the deep well plate. The Task Details window appears.

Task Details Window
| Item | Description |
|---|---|
| Action | Provides two options: Aspirate and Dispense. Select Aspirate (left) if you want the NT8 to aspirate and select Dispense (right) if you want the NT8 to dispense. |
| Black Arrow | Specifies the direction of a specific Action. The normal direction (column 1 to column 12) is indicated by the right-arrow. |
| Column | Represents the well column numbers. Select the desired well column number as needed by clicking on the corresponding number. For multiple selection, hold the Shift key and click the desired well column number. The NT8 will perform the action to the selected columns. |
| Liquid Class | Provides four liquid class options: Normal (N), Medium (M), High H), and Very High (V). You have to select the appropriate reagent liquid class. If you are selecting Repeat command on the Task List Panel, you can apply a different liquid class to each column by selecting the corresponding button next to Liquid Class. |
| Volume | Sets the liquid volume to be aspirated or dispensed by typing a new value into the corresponding field, or clicking the up and down-arrows to increase and decrease the volume. |
| Mixing | Sets the desired mixing cycles to be performed by NT8. This option determines the number of times the NT8 will mix the solution before aspirating it from the deep well block. |
| Add | Enables you to add the specified settings to the Task List and close the Task Details dialog. |
| Add More | Enables you to add the specified settings and add more commands as needed to the Task List. |
| Close | Exits the Task Details dialog. |

|
|
| NTC-V4R020 |