Exporting and Importing Inspections
If you need to migrate your images to a different database, or send them to a colleague who uses a different ROCK MAKER database, you'll need to export your images from ROCK MAKER, and your counterpart will have to import them.
Exporting Image Inspections
In Images view, you can export selected inspections in the form of an .XML file called an export package.

Import/Export Tab
If you are exporting an inspection, you will primarily use the Add Images and Save Images buttons. Add Images adds images to the inspection package, and Save Images exports the package so that you may send it to a colleague.
Adding Inspections to the Export Package
Select the wells that contain images you want to export, and then click Add Images.
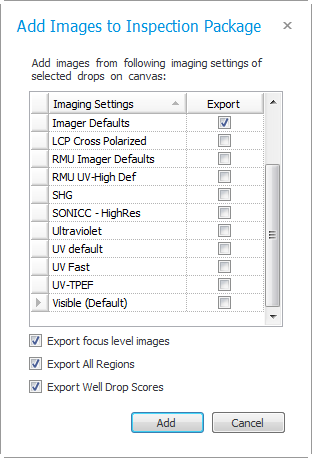
Select the Imaging Settings you want to include in your export package. By default, ROCK MAKER will include all focus levels, regions, and scores for the wells you selected. Clear those selections if you would prefer not to include them.

Add Images to Inspection Package Window
After you have made your selections, click Add to add the inspections to the export package. Once you have added inspections to the export package, you can add more inspections by repeating the same steps. You may add inspections from multiple plates, and even inspections from multiple experiments, to the same export package.
Click the Save Images button to save your export package to your PC.
Send the export package to your colleague.
Importing Inspections
To import an inspection, the experiment design must include a protein, and it must be marked as dispensed.
On the Import/Export tab in the Images tab set, click Import. If this menu option is disabled, it means that either you have read-only access to this plate or there are no drop available on the plate for image import.
Browse to the location of the inspection package file. Select the file and click Open. ROCK MAKER will unpack and validate the package.
Once unpacking and validation is done, a message is displayed with a preview of images inside the package.
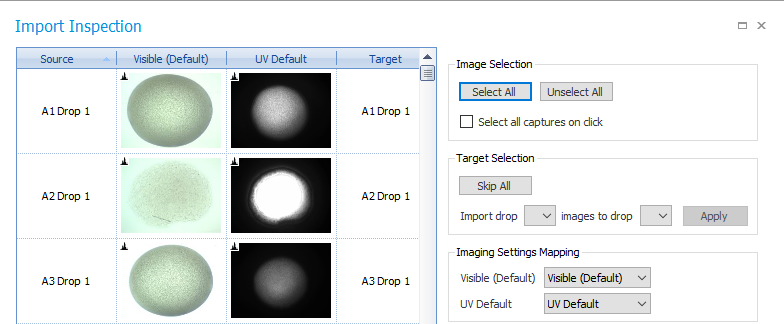
A row of images is shown for each drop found in the package, with each column displaying an image from a different image setting. A Target column is displayed at the right to allow you to set the target drop for the images in each row. The target drop is automatically set if a valid drop with the same location is found in the current plate.
If no match is found, the row’s target is set to Skip. Images of a row with its target drop set to Skip do not get imported.Select the images that you want to import by clicking each of them individually. You can deselect an image by clicking it again.

Import Inspections
- If you want to select all images, click the Select All button at the bottom-left. If an image is selected and its target drop is set to Skip, it is still ignored, but at least one image should be selected from a row whose target drop is not set to Skip.
- You can also deselect all images by pressing the Unselect All button. If you have a scenario in which you always have to import images of all available imaging settings of a drop, you should select the Select all imaging settings on click. This will automatically select or clear all images of a row whenever you click an image. You can also toggle selection of all images of a specific imaging setting by clicking its column header.
- If you have two different drops location, you can visually change their position either from drop 1 to drop 2 or drop 2 to drop 1. In the Target Selection area, select the drop target you want to import (e.g. 1) and then select a different drop number in the second list (e.g. 2), and click Apply.
Click Import to start the import.
Related Topics
 | |
| RMC-V317R221 |