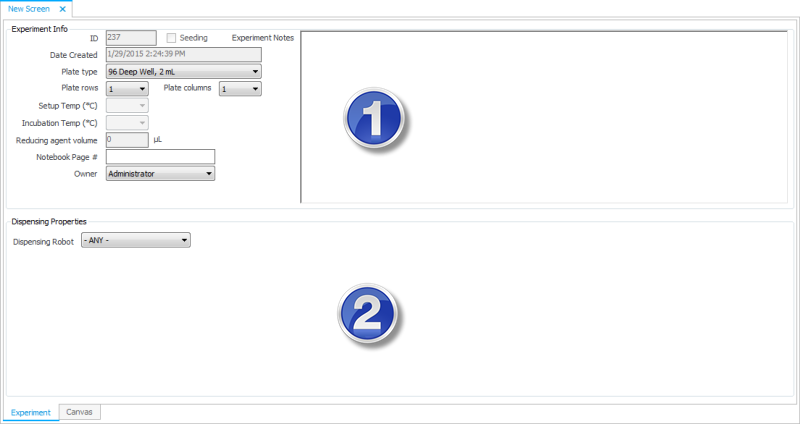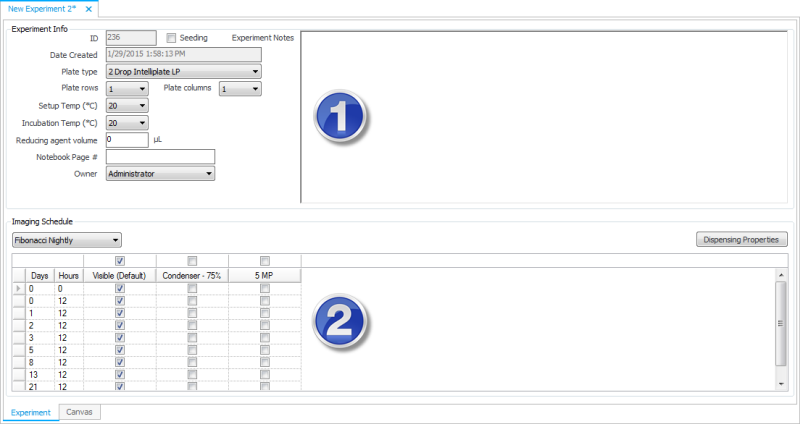
Rock Maker allows you to create new screens and experiments once you have created a project.
A screen generally does not include proteins and is used to help fill wells on smaller plates. Screens are usually available from third party vendors; Rock Maker comes pre-populated with most commercial screens. You can also make your own screens for internal use and apply them to experiments with a screen layer. Screen Lots are used to track the volume that you have in one or more deep well blocks that you have prepared or purchased.
If you were to create, save and dispense an experiment without selecting a screen lot in the screen layer, the liquid handler would try to set up the experiment from stock ingredients. Chances are you do not want to do this. Selecting a screen lot ensures that the liquid handling robot only needs to copy over the well solutions from the screen lot, rather than mix every condition individually from stock ingredients.
An experiment includes proteins and is photographed by an imager to show you whether or not the experiment formed crystals. An experiment can include a screen, but a screen can not include an experiment.
Although screens and experiments are different by definition, the way you define and use them in Rock Maker is very similar. As you'll see below, both experiments and screens are manipulated in the canvas, and each is defined via your input through two main panels.
Since experiments can contain images, the experiment page has a third panel for the Experiment Navigator.

New Screen setup page

New Experiment setup page
| Number | Description |
|---|---|
| 1 | This area is where you fill out info about the experiment or screen, such as plate type and number of rows and columns of plates (if creating a multi-plate experiment), setup and incubation temperatures, reducing agent volume (if any) and owner. The experiments page also has a field for an imaging schedule and a check box for whether or not it's a seeding experiment. The image schedules are defined at the project level; you can customize it for individual experiments here by pressing F3 (which hides the information tabs) and displays the details of the schedule. |
| 2 | If you're creating a screen, this area is where you select the dispensing robot. If you're creating an experiment, this area is where you define your Imaging Schedule. If you will be dispensing with a robot, click the Dispensing Properties button to select the dispensing robot. |
An additive experiment is one to which one or more additional layers containing small amounts of additive ingredients have been added.
To design an additive experiment, you would create a separate layer that overlaps the other layers of the experiment. Additives can be dispensed into both wells and drops by selecting the appropriate target from the Layer Target list on the Layer Tab.
System Properties are how you change behind-the-scenes Rock Maker behaviors.
| System Property | Default Setting | Explanation |
|---|---|---|
| Experiment: Add lot during convert to screen | TRUE | Determines whether a screen lot is automatically created when the user right-clicks an experiment or plate on the explorer and selects Convert to Screen. |
| Experiment: Allow convert to screen experiment from tree | FALSE | Determines whether the Convert to Screen Experiment option appears when the user right-clicks an experiment or plate on the explorer or not. |
| Experiment: Allow convert to screen from tree | TRUE | Determines whether the Convert to Screen option appears when the user right-clicks an experiment or plate on the explorer or not. The default setting is False. |
| Experiment: Allow Editing of Readonly Experiment | TRUE | Allows/disallows the user from making changes to a dispensed, or locked, experiment. |
| Experiment: Allow experiment plate deletion | TRUE | Allows/disallows the ability to delete plate type definitions. |
| Experiment Default: Imaging schedule (override) | Fibonacci Nightly | Specifies the name of default imaging schedule assigned to an experiment. |
| Experiment Default: Incubation temperature | 20 | The default incubation temperature applied to each new experiment. |
| Experiment Default: Paste Conditions External Delimiter | \t | The form of character that will separate the pasted condition. |
| Experiment Default: Plate Column Count | 1 | The default number of columns of plates when creating new experiment. |
| Experiment Default: Plate Row Count | 1 | The default number of rows of plates when creating new experiment. |
| Experiment Default: Setup temperature | 20 | The default setup temperature applied to each new experiment. |
| Experiment: Name Protein Layer using PF Name | TRUE | If set to TRUE, the name of a new protein layer will match the name of the protein formulation. |
| Experiment: SignificantDigits (Concentration) | 5 | The number of significant digits for a concentration value. |
| Experiment: SignificantDigits (pH) | 4 | The number of significant digits for a pH value. |
| Experiment: SignificantDigits (Volume) | 5 | The number of significant digits for a volume value. |
| Screen: Allow screen experiment repair | FALSE | Determines whether the screens can be modified or not after they have been used in an experiment. |
| Screen: Export: Allow Rock Maker XML export | TRUE | Determines whether screens can be exported to Rock Maker XML from the Explorer. |
| Screen: Export: Allow server basic XML export | FALSE | Determines whether users can export screens in regular XML format. |
| Screen: Export: Allow text file export | FALSE | Enables or disables the menu option allowing the export of a screen as a text file. |
| Screen: Import: Allow Fluidigm CSV file import | FALSE | Determines whether the “Import Fluidigm CSV Screen” context menu option appears when a user attempts to import a CSV file. |
| Screen: Import: Allow Rock Maker XML import | TRUE | Determines whether screens are imported using Rock Maker XML format. |
| Screen: Import: Allow server basic XML import | FALSE | Determines whether screens are imported using a basic XML format. |
| Screen: Import: Allow text file import | FALSE | Enables or disables the menu option allowing the import of a screen as a text file. |
| Screen: Import: Rock Maker XML: Add incoming ingredient long name as an alias | TRUE | If set to TRUE, the incoming ingredient's long name will be added to the existing ingredient's list of aliases when you decide to keep the existing ingredient during an ingredient merge. This will prevent a conflict the next time that ingredient is imported. |
| Screen: Import: Rock Maker XML: Include vendor name and part number in stock comparison | TRUE | If set to TRUE, Rock Maker will match the vendor name and part number of stocks from an XML import and current stocks of same ingredient in system. |
| Screen: Import: Rock Maker XML: Use the next higher concentration stock if a matching stock not found | TRUE | If set to TRUE, when you import an ingredient stock with a concentration less than the existing ingredient stocks, the incoming ingredient stock will not be added to the existing ingredient. If the incoming stock has a higher concentration, however, it will be added to the ingredient. |
| Experiment plate: Custom node name | <plateNum>, <plateID>, <barcode> | Specifies the format name of the plate node on the Explorer. |
| Experiment plate: Number of batches in memory | 3 | The number of memory batches. |
| Experiment: Show Close Button with Tab | TRUE | If set to TRUE, each tab in the workspace will have a close button [x] next to the name of the tab. |
 | |
| RMC-V36R116 |