Go to the File menu and select Concentration Normalization.
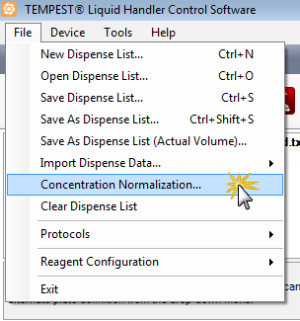
The Concentration Normalization Option
Click the Browse button next to the Input File box and locate the file you want to import.
In the File Settings option:
-
The Column Delimiter determines the separator between values in the .CSV file. Type the separator used in your file.
-
If your reagent names are in the first row, select the Reagent names are in the first row box. If not, deselect the option.
-
Select or type the row number you want to start with in the Start Row box.
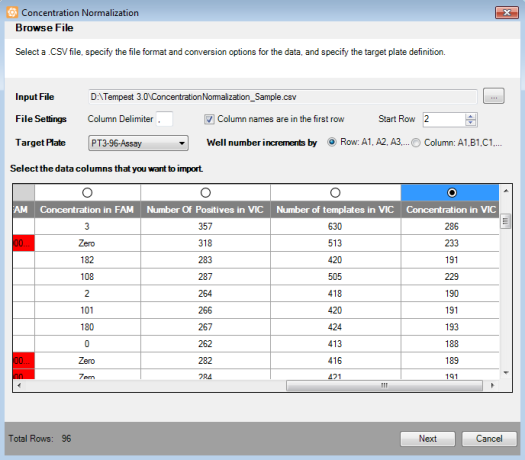
Modifying the File Settings
In the Target Plate option:
-
Select the plate type you want to use for dispense from the plate list.
-
Determine the well numbering convention by selecting either the Well number increments by Row: A1, A2, A3 or by Column A1, B1, C1 option.
-
Well increments by Row: A1, A2, A3 means that the wells in your plate design are numbered left-to-right in rows. For example, wells A1 through A12 are numbered 1 to 12 and are represented by the first 12 data rows of your .CSV file. Wells B1 through B12 are numbered 13 to 24 and so on.
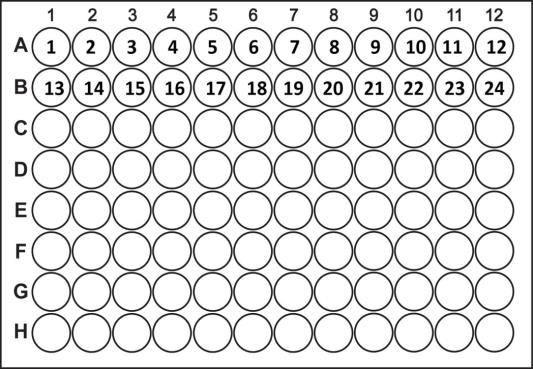
Well Number Incrementing by Row
-
Well increments by Column: A1, B1, C1 means the wells in your plate design are numbered top-to-bottom in columns. For example, wells A1 through H1 are numbered 1 to 8 and are represented by the first 8 data rows of your .CSV file. Wells the next column A2 through H2 are numbered 9 to 16 well, and so on.
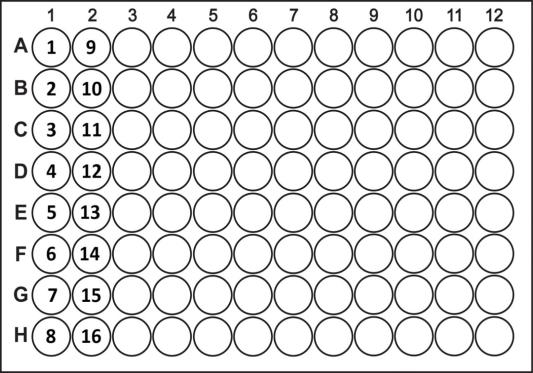
Well Number Incrementing by Column
-
Select the concentration data that you want to import in the data columns list. Then, click Next.
Note: If the data column contains error(s), you will not be able to select the column. Errors could occur because a column contains negative values, or invalid characters such as letters. If you want to normalize based on the data in this column, you must correct the errors in the .CSV file and upload it again.
Determine the value in the Data Preview:
-
Specified Concentration: By default, the Specified Concentration value is taken from the well with the lowest concentration. You can also set a different target concentration value by typing the desired value in the box. Any wells with concentration lower than the Specified Concentration will be excluded from the normalization process.
-
Well Capacity: Determines the maximum well volume for your plate.
-
Starting Volume: Determines the concentration volume of each well in your experiment plate, before normalization.
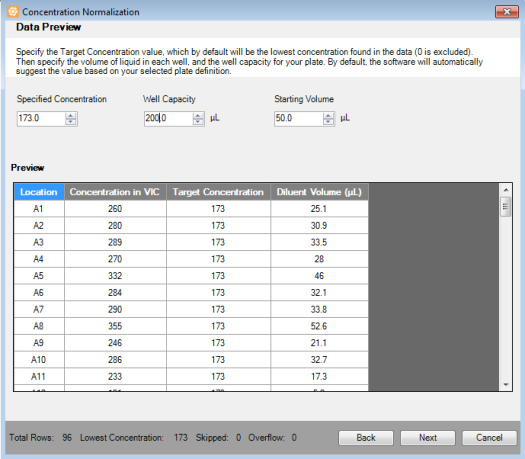
Modifying the Plate Data
Note: You cannot continue to the next step if your current settings cause diluent volume overflow, which is shown in red in the bottom right of the wizard. To fix this, you can adjust either the Specified Concentration value or the Well Capacity value until no overflow is detected. Well Capacity as defined in the TEMPEST software should not exceed the actual maximum well volume for your plate.
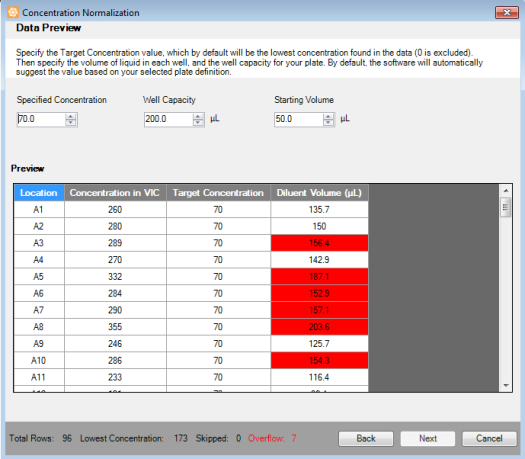
The Overflow Diluent Volume in Red
Type the Diluent name in the Diluent Name box and click the Load button to load the data into a Dispense List.
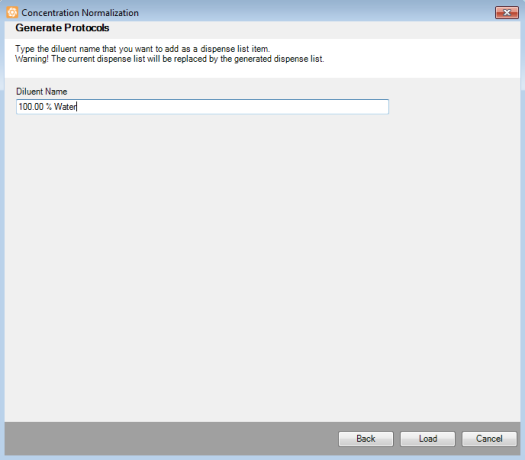
Type the Diluent Name
OPTIONAL: Go to the File menu, and select Concentration Normalization if you are not satisfied with the way your current experiment was imported. The software will remember the choices you have made during the import process and allow you to modify them as necessary. This option is applicable only if you have not restarted the TEMPEST software.
Click the Run Dispense button ![]() .
.
OR
Press F5.
