
|
|
Next to the Experiment Designer tab is the Rock Maker Integration tab. This tab is only enabled when you set Rock Maker to enable in the Advanced Options. Here is where you can import and run an experiment as defined in Rock Maker.
For further information on how to create an experiment in Rock Maker, please see the "Experiment Design" section of the Rock Maker help file.
Rock Maker Integration tab
The Rock Maker Integration tab consists of two parts:
| No | Area | Description | ||
|---|---|---|---|---|

|
Toolbar |
|
||

|
Experiment Properties Panel |
Shows the detailed experiment properties as defined in Rock Maker. There are three different tabs in experiment properties: the Instruction tab, Canvas tab, and Experiment Info tab. The experiment properties display after the experiment's barcode is validated. The next section explains this area in detail. |
The Rock Maker experiment information appears after your experiment barcode is validated. The Rock Maker Experiment Properties Panel then has three different tabs:
Each of these is explained below.

|

|

|
| Instruction tab | Canvas Tab |
Experiment Info tab |
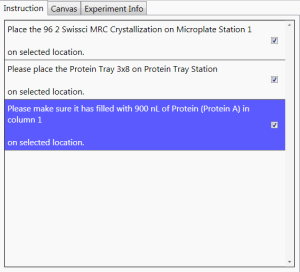
The Instruction tab shows the detailed and required instructions that must be conducted to execute the experiments. You must check the checkbox next to the instruction before performing another task.
The Canvas tab has two different sections: experiment panel and plate view.
- Experiment Panel
| Item | Configurable? | Description |
|---|---|---|
| Experiment | N/A |
|
- Plate View
The plate graphic represents the plate in use, providing the selected stock/protein volume information as defined in Rock Maker.
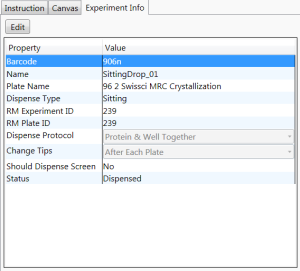
The Experiment Info tab shows the selected options and properties for your experiments, as shown in the following table.
| Item | Configurable? | Description |
|---|---|---|
| Barcode | N/A | The experiment barcode number. |
| Name | N/A | The experiment name as defined in Rock Maker. |
| Plate Name |

|
Provides various plate types. You can select the desired plate type from the Plate Name list. |
| Dispense Type | N/A | Displays the dispense type. The dispense type will change accordingly, depending on the Plate Name that you choose. |
| LCP Predispense Volume (nl) |

|
Displays the LCP predispense volume (only available for LCP dispense). You can change the volume accordingly from the Rock Maker software. |
| LCP Predispense Cycle |

|
Provides the information about how many predispense cycles will be done (only available for LCP dispense). You can change the number of predispense cycles as needed through the Rock Maker software. |
| RM Experiment ID | N/A | Rock Maker experiment ID number. |
| RM Plate ID | N/A | Rock Maker plate ID number. |
| Dispense Protocol |

|
Provides various dispense protocols, as follows:
|
| Change Tips |

|
This is where you instruct the NT8 when to wash the LV tips. Options include:
|
| Should Dispense Screen |

|
This property is only available for systems with the Plate Copy feature. You can select whether you want to dispense to a screen by using the Plate Copy or not. |
|
Status |
N/A | Tells you the current experiment status. If you have run the dispensing process the status will be marked as "Dispensed", otherwise it will be blank. |

|
|
|
NTC-V28R016
|