The Profile screen allows you to create and save hardware setup configurations for Priming/Rolling, Thermocycling, and Imaging tasks. These configurations are saved as a profile, which can be loaded from the Edit Protocol window when setting up experiment tasks on the Task screen. The Priming/Rolling, Thermocycling, and Imaging configurations can be accessed from the Prime-Roll, Thermocycler, and Imager tabs on the right-side of the screen. Tap the corresponding section to see what you can do on the Profile screen.

The Profile Screen
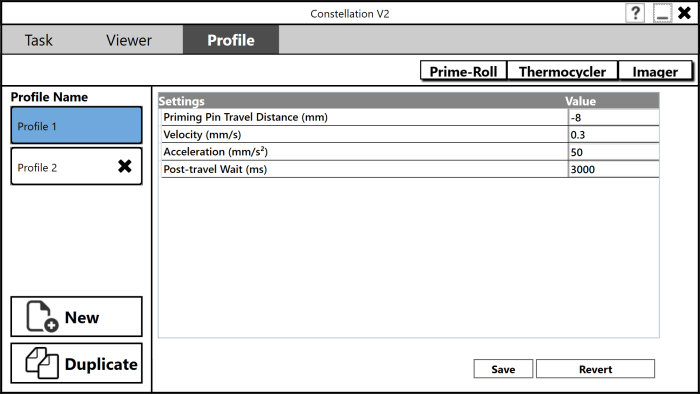
The Prime-Roll tab consists of priming and rolling settings that will be used by the CONSTELLATION instrument when running the Priming/Rolling task on the Task screen.
Priming Pin Travel Distance (mm) — Determines the distance the priming pin will go inside of the wells.
Velocity (mm/s) — Determines the velocity at which the priming pin will travel.
Acceleration (mm/s2) — Determines the acceleration for the priming pin.
Post-Travel Wait (ms) — Determines the wait time before the priming pin returns to its original position, after priming the wells.

The Prime Roll Tab
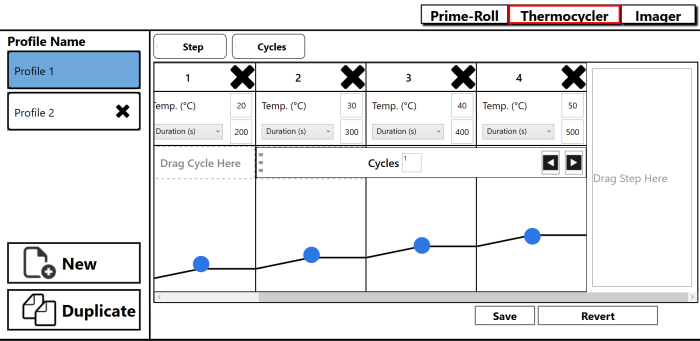
The Thermocycler tab allows you to configure the thermocycler settings that will be used by the CONSTELLATION instrument when running the Thermocycling task on the Task screen. Thermocycler settings consist of sequence(s) that you can modify, if necessary.
Tap the Thermocycler tab.
Specify each sequence in the step column.
Temperature (C) — Determines the target temperature for your plate(s) in Celsius.
Delay (s) — Determines the amount of time in seconds the CONSTELLATION will stay constant at the chosen temperature, before moving on to the next cycle.
Drag the Cycle option to its corresponding box under the Delay (s) menu in the step column. Type the desired cycle number in the Cycles box to repeat sequences.
To add a new step, drag the Step option to its corresponding column on the right-side of the screen. Then, repeat steps 1 and 2, if necessary.

The Thermocycler Tab
The Imager tab consists of imaging settings that will be used to image a microplate. On this tab, you can define the reference filter, five data filters, and the imaging settings for each filter you want to use. It is recommended to use ROX as a reference filter and FAM, VIC, and others as reporter dye filters.
Reference filters are used to determine which partitions have been filled with an assay. Setting the threshold for the reference filter allows the analysis software to distinguish between partitions that contain an assay from those that have not been properly primed. Reporter dye filters are used to determine which partitions have successfully amplified. Setting the threshold for the reference filter allows the analysis software to determine what proportion of partitions for a given well contained a DNA template before amplification.
Filter — Specifies the filter(s) that will be used to image a microplate.
Gain — Controls how sensitive the camera is to light. A higher number results in a brighter image, but more susceptibility to other effects, such as sensor noise.
Exposure — Controls how much time the camera will spend imaging each individual well. A higher number results in a brighter image, but slower total imaging time.
Thresholds — Controls the default value used to distinguish between positive and negative reactions for each filter. If this is your first time imaging don’t worry about this setting for now; you can come back to it after imaging.
Preview — The Preview option on the right side of the Filter Settings menu allows the settings to be changed while viewing the effects on the imaging results in real-time.

The Imager Tab
Take the following steps:
Tap the New button in the lower-right of the Profile screen. The new profile will be added to the Profile Name list.
Specify the desired hardware configurations in the Prime-Roll, Thermocycler, and Imager tabs.
Tap Save in the lower-right of the profile screen. Saved profiles will be available in the Edit Protocol window on the Task screen.
To duplicate a profile, select a profile that you wish to copy, and then tap the Duplicate button.

|
|
| COC-V20R018 |