| Input Toolbar |
The Input Toolbar provides you with seven dedicated buttons to perform specific MANTIS operations, explained below.  Auto Prime — Clicking the Auto Prime button primes the chip with a fixed amount of reagent, controlled by the Input Option settings (see item 4). Priming brings reagent through the chip so that when you begin a dispense the chip is not dispensing air. Auto Prime — Clicking the Auto Prime button primes the chip with a fixed amount of reagent, controlled by the Input Option settings (see item 4). Priming brings reagent through the chip so that when you begin a dispense the chip is not dispensing air.
 Manual Prime — Clicking the Manual Prime button will display the Manual Prime window. Here, you can click and hold the Manual Prime button to prime the chip to the desired prime volume. When you’re finished, click Done. Manual Prime — Clicking the Manual Prime button will display the Manual Prime window. Here, you can click and hold the Manual Prime button to prime the chip to the desired prime volume. When you’re finished, click Done.
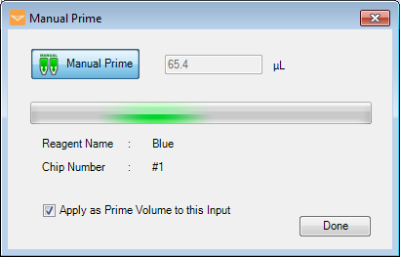
Manual Prime Window  Prime All Inputs — Clicking the Prime All button will prime every chip that has a reagent listed in the Reagent Input Field. Prime All Inputs — Clicking the Prime All button will prime every chip that has a reagent listed in the Reagent Input Field.
 Wash Input — Clicking the Wash Input button will wash the chip currently stationed at the MANTIS hand. Wash Input — Clicking the Wash Input button will wash the chip currently stationed at the MANTIS hand.
 Wash All Inputs — Clicking the Wash All Inputs button will wash every chip that has a reagent listed in the Reagent Input Field. Wash All Inputs — Clicking the Wash All Inputs button will wash every chip that has a reagent listed in the Reagent Input Field.
 Recover Input — Clicking the Recover Input button runs the reagent recovery process on the chip currently stationed at the MANTIS hand. Recovering a reagent will return most of the liquid in the chip and tubing to the source container. Recover Input — Clicking the Recover Input button runs the reagent recovery process on the chip currently stationed at the MANTIS hand. Recovering a reagent will return most of the liquid in the chip and tubing to the source container.
 Recover All Inputs — Clicking the Recover All Inputs button runs the reagent recovery process on every chip that has a reagent listed in the Reagent Input Field. Recovering a reagent will return most of the liquid in the chip and tubing to the source container. Recover All Inputs — Clicking the Recover All Inputs button runs the reagent recovery process on every chip that has a reagent listed in the Reagent Input Field. Recovering a reagent will return most of the liquid in the chip and tubing to the source container.
In addition to the above buttons, MANTIS also provides you with the two check bottle leak buttons, which only appear when Continuous Flow is active. 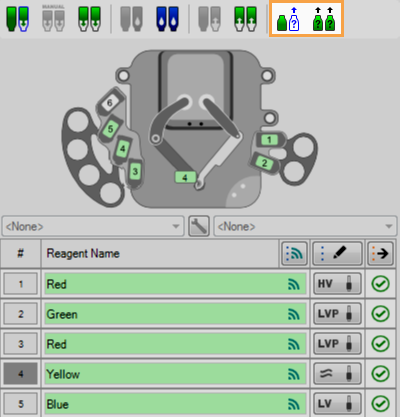
Check Bottle Leak Buttons on the Input Control Panel  Check Bottle Leak on Mantis Arm — Clicking the Check Bottle Leak on Mantis Arm button checks for possible pressure leaks for the particular bottle attached to the chip on the MANTIS hand. Check Bottle Leak on Mantis Arm — Clicking the Check Bottle Leak on Mantis Arm button checks for possible pressure leaks for the particular bottle attached to the chip on the MANTIS hand.
 Check All Bottle Leak — Clicking the Check All Bottle Leak button checks all bottles for pressure leaks. Check All Bottle Leak — Clicking the Check All Bottle Leak button checks all bottles for pressure leaks.
|
| Device View |
Device View displays the MANTIS hardware in use. In the image displayed above, chip 1 is on the MANTIS hand. Double-clicking one of the chips will cause that chip to be picked up by the MANTIS hand. Double-clicking a second time will return the chip from the MANTIS hand to the chip changer station. In the image above, you will also see the LC3 attached on the left side of the MANTIS. It will only appear if you have the LC3 instrument in your system.
To add a reagent from the Dispense List to the Device View, drag it from the Dispense List to the reagent's chip changer station. OR click the Assign To Input button
 to assign all reagents from the Dispense List at once. to assign all reagents from the Dispense List at once.
|
| Input |
The Input tells you which reagent is assigned to which chip station. To the right of each input field is a symbol or an abbreviation that represents the type of chip attached to that chip station. Options include:LV — Low Volume Chip. HV — High Volume Chip. HVP — High Volume PFE Chip. LVP — Low Volume PFE Chip. HV3P — High Volume 3PFE Chip. LV3P— Low Volume 3PFE Chip.  High Volume Continuous Flow Chip. High Volume Continuous Flow Chip.
You can see the status of your input through the Input Status box, whether it is defined in the Dispense List or not. This means that your input has been properly defined in the dispense list. You should check and define your reagent in the Dispense List if you find this image means that your input has been properly defined in the dispense list. You should check and define your reagent in the Dispense List if you find this image in your Input Status box. in your Input Status box. To move the chips between inputs, you can drag the chips on the Input panel. The chip information will also be automatically updated. Note: Before you drag the chip on the Input panel, make sure that you move the chip on the chip changer first. 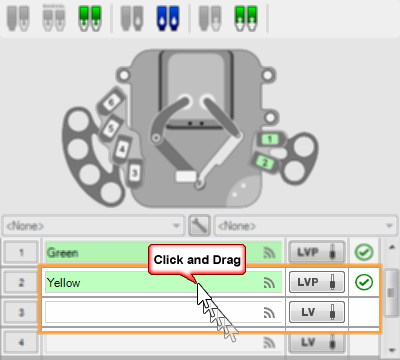
Drag and Drop to Move the Chips |
| Input Source Type |
You can configure your input source type in various ways.
Clicking the Input button  enables you to change the input source type (tube or pipette tip), chip type (Low Volume, High Volume, Low Volume PFE, High Volume PFE, Low Volume 3PFE, High Volume 3PFE, or High Volume Continuous Flow), and configure the prime volume, wash volume, recovery volume, and pre-dispense volume. enables you to change the input source type (tube or pipette tip), chip type (Low Volume, High Volume, Low Volume PFE, High Volume PFE, Low Volume 3PFE, High Volume 3PFE, or High Volume Continuous Flow), and configure the prime volume, wash volume, recovery volume, and pre-dispense volume.
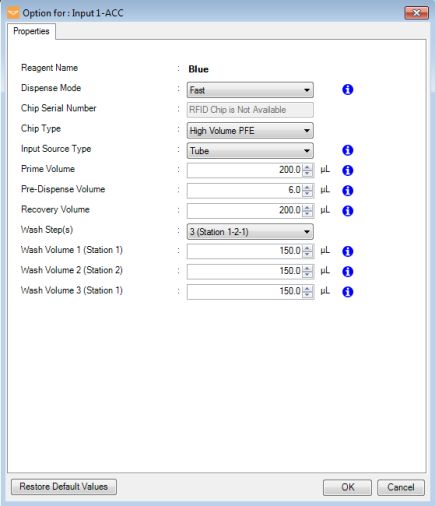 HV PFE with the Tube Input Source Options | 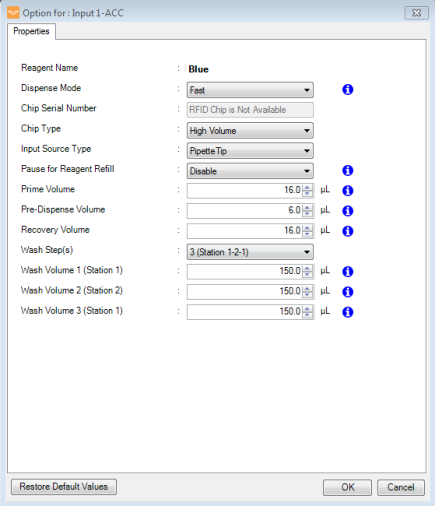 HV with the Pipette Input Source Options |
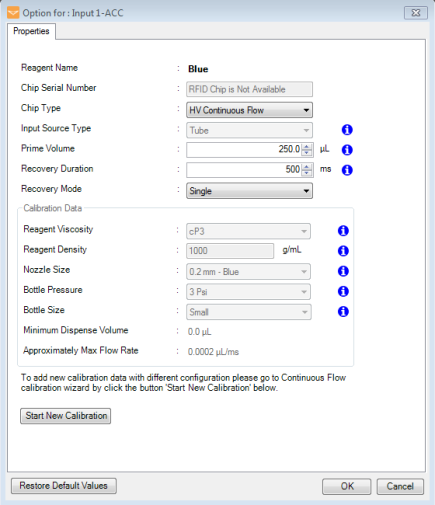
HV Continuous Flow Options Chip Type — Click the Chip Type list and select the desired chip type (Low Volume, High Volume, Low Volume PFE, High Volume PFE, Low Volume 3PFE, High Volume 3PFE, or HV Continuous Flow) that you want to use. The actual chip should match the chip type selected. Input Source Type — Click the Input Source Type list and select the desired input source type (Tube or Pipette Tip) for your experiment. The recommended length for tubing is 450 mm. The HV and LV chips use a slightly different tubing. The HV tubing is green while the LV tubing is white. Please make sure you have matched the tube and chip accordingly. Prime Volume — Type the desired volume to fill your tubing and/or chip channels in the Prime Volume box. The MANTIS typically primes the chip only once at the beginning of the dispense to make sure all of the liquid channels are full. You will know the channels are full once reagent starts dispensing from the chip nozzle. Pre-Dispense Volume — Type the desired reagent volume that you would like to dispense to waste before dispensing into your plate in the Pre-Dispense Volume box. Recovery Volume — Type the desired reagent volume that you would like to return to your source container (pipette tip or tube) in the Recovery Volume box.
Wash Step(s) — Select the wash steps you want to execute. 1 (Station 1) — This option enables MANTIS to wash the chip using only the wash liquid available in Wash Station 1. 2 (Station 1-2) — This option enables MANTIS to wash the chip using liquid in Wash Station 1 and rinse the chip using wash liquid in Wash Station 2. 3 (Station 1-2-1) — This option enables MANTIS to do the 3-step wash. You must fill the Wash Station 1 with water and Wash Station 2 with wash solution. MANTIS will wash the chip using water in the Wash Station 1, then wash solution in Wash Station 2 and rinse the chip using water in Wash Station 1. For more information, see Sterilizing MANTIS Chips.
Wash Volume 1 (Station 1) — Type the desired wash volume to use during the chip cleaning process. Wash Volume 2 (Station 2) — Type the desired wash volume to use during the chip cleaning process. Wash Volume 3 (Station 1) — Type the desired wash volume to use during the chip cleaning process.
Recovery Duration** — Type the recovery duration in milliseconds in the Recovery Duration box. Recovery Mode** — Select the type of recovery that you would like the MANTIS to do after a Continuous Flow dispense. Single — Select this option to enable one reagent recovery cycle. Use this mode for reagents with low to average viscosity. Double — Select this option to enable two reagent recovery cycles. Use this mode for reagents with high viscosity. Passive — Select this option to enable MANTIS to run the reagent recovery cycle based on reagent volume, viscosity, and bottle position. This mode might take longer time than the other modes because it doesn’t use any pressure to recover the reagent to the bottle source.
Tip: If you are using a reagent with low viscosity, low surface tension, and/or a high possibility of creating foaming, such as water combined with detergent, use Passive mode. With Passive mode MANTIS will be able to prevent air bubbles during recovery, allowing more reagent to return to your source container in a single step. To ensure recovery of all of the reagent using Passive mode, it is recommended to set the Recovery Duration to more than 500 ms. Delay Between Recovery** — Type the delay time between two reagent recovery processes in milliseconds in the Delay Between Recovery box. This option is only available when you select the Double recovery mode. Calibration Data** — Displays the calibration data for the current reagent, if the reagent has already been calibrated for CF dispense. To calibrate or recalibrate the reagent, click the Start New Calibration button. For more information, see Calibrating Continuous Flow Chips. Pause for Reagent Refill*** — Enable this option to make the MANTIS pause during the dispense to refill the pipette tip. Reagent Volume*** — Type the reagent volume that will cause MANTIS to pause for reagent refill. This option is available if you enable the Pause for Reagent Refill option. This option allows you to use a pipette tip with reagent volumes exceeding the tip capacity. For example, if you want to deliver 20 μL into every well of a 96 well plate while using 1 ml tip as input source (total 1920 μL) you can set the reagent volume to 950 μL. That will cause the MANTIS to pause for a top-up roughly half-way through the plate. Filling the tip with 10% extra sample is advised to prevent the reagent running out. Note: The reagent tracking works only during a dispense, and not between runs. For example, if you filled the tip with 1000 μL, then executed a dispense delivering 750 μL, after the dispense the reagent volume will remain set to 1000 μL in the software. Restore Default Values — Click the Restore Default Values button to restore the default values for all chip input settings. Date of Manufacture* — Contains the chip’s manufacturing date. Chip Dispense History tab* — Contains information about the chip usage and dispense process.
If you have multiple chips to which you wish to apply the same configuration parameters (like wash volumes or input source type), you do not need to configure each chip position individually. Click the Mass Update Input button  to make changes to multiple chip stations at once. to make changes to multiple chip stations at once.
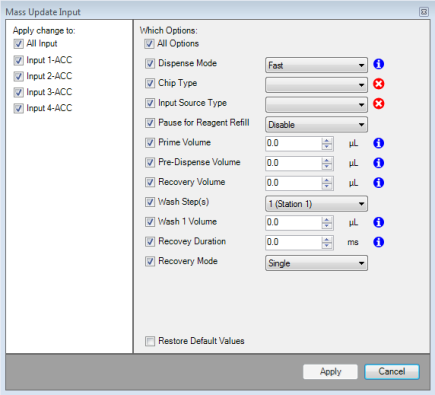
Mass Update Input Options Note: When you use mass update for RFID chips, MANTIS will automatically identify the chip type and the Chip Type option in the Mass Update Input window will be disabled.
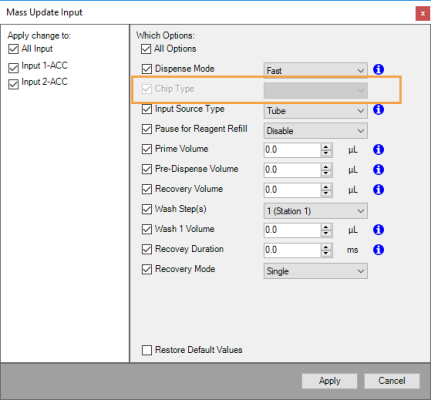
Mass Update Input Window with the Assigned RFID Chips and Disabled Chip Type Option You can also access, modify, and change the Input configuration through the Configuration All Input Settings button  . . If your MANTIS is equipped with RFID, click the Scan All RFID Chips button to scan all RFID chips at once. For more information, See MANTIS Radio-Frequency Identification (RFID). to scan all RFID chips at once. For more information, See MANTIS Radio-Frequency Identification (RFID).
|
 to assign all reagents in the Dispense List at once. You can then click the Mass Update Input button
  or the Input button
  next to every reagent name box to change the input source type (tube or pipette tip), chip type (Low Volume, High Volume, Low Volume PFE, High Volume PFE, Low Volume 3PFE, High Volume 3PFE, or High Volume Continuous flow), and configure the prime volume, wash volume, recovery volume, and pre-dispense volume. To move all of the unassigned inputs to the Dispense List, you can click
  next to the Mass Update Input button.
  .
. 


 means that your input has been properly defined in the dispense list. You should check and define your reagent in the Dispense List if you find this image
 in your Input Status box.
 enables you to change the input source type (tube or pipette tip), chip type (Low Volume, High Volume, Low Volume PFE, High Volume PFE, Low Volume 3PFE, High Volume 3PFE, or High Volume Continuous Flow), and configure the prime volume, wash volume, recovery volume, and pre-dispense volume.


 to make changes to multiple chip stations at once.

 to scan all RFID chips at once. For more information, See