While MANTIS is designed to be a reliable device, as with all instrument, problems may occur with use or over time. If you do not see your problem below, email support@formulatrix.com for assistance. Our technicians monitor this email address 24 hours a day, Monday through Friday.
If you experience inaccurate dispense volumes with MANTIS, there could be a problem with the instrument’s pressure and vacuum regulators or solenoids. To check the regulator and solenoid functionality, you can use the Pneumatic System Check wizard.
Prerequisites:
To check the pneumatic system functionality:
Go to the Tools menu and select Pneumatic System Check.
Important: Make sure that there is no chip attached to the MANTIS before performing the test.
At this point, MANTIS will check the functionality of the pressure and vacuum regulators. The check will involve testing the pressure and vacuum generated by the regulators for dispense with diaphragm chips, and the bottle pressure value used for Continuous Flow dispense in CF enabled MANTIS V3 instruments.
After the check has completed, a table will appear which displays the range of chip, vacuum, and bottle values (if applicable) generated during their test, the average value within that range, and the expected values for optimal MANTIS performance. A green check icon indicates that the generated values are within the expected range, while a red cross icon indicates that the generated values are outside of the expected range.
Choose from the following:
If there are no errors with your regulators, click Solenoid Check to display the Pneumatic System Check wizard and test the solenoid functionality, or click Close to stop the test and close the window. For the solenoid check, please proceed to step 5.
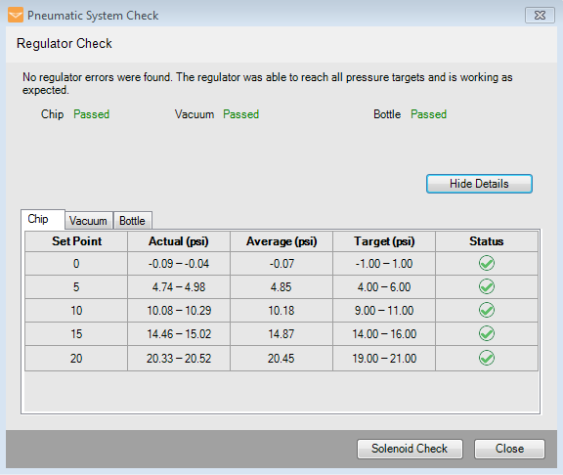
Chip, Vacuum, and Bottle Values are Within the Expected Range
OR
If any of the generated values are outside of the expected range, you can click Retry to try checking the pressure and vacuum regulators again.
Important: If this problem persists, please click the Contact Support and Continue button for technical assistance from FORMULATRIX support. The error description will appear in the Contact Technical Support window. Type your email address on the Reply-to Address field, then click Send to send an email to support@formulatrix.com containing the error information. To close the window without sending an email to FORMULATRIX support, click Cancel.
Tips: To help FORMULATRIX support better assist you, select the Attach log files option to include the log files in the email. You can also include multiple emails for FORMULATRIX support to reply to by separating each email address with a comma.
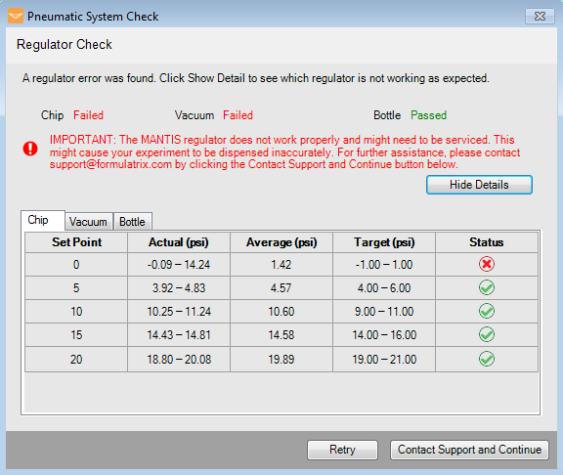
Regulator Check Returns an Error
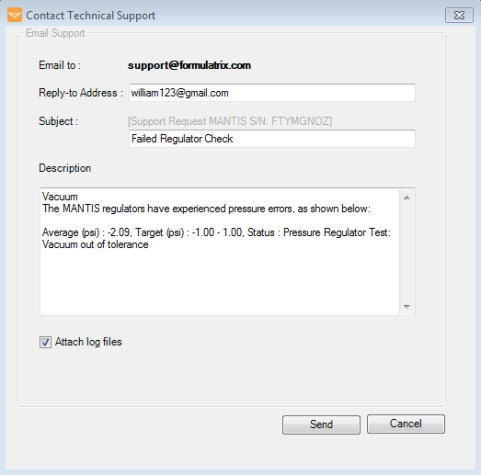
Contact Technical Support Window
Now MANTIS will check for stuck solenoids. After the test is finished, the results will be displayed in the Pneumatic System Check window. A green check icon indicates that a solenoid is not stuck, while a red cross icon indicates that a solenoid may be stuck.
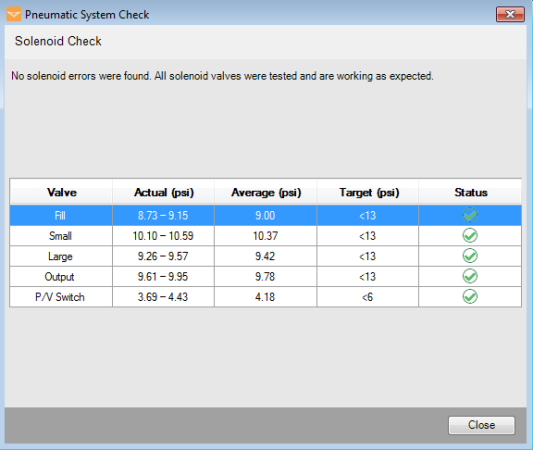
No Solenoids Are Stuck
If MANTIS suspects one or more solenoids of being stuck, you can then confirm whether or not a solenoid is truly stuck using an listening test. Stuck solenoids do not make any sound when actuated, while functional solenoids produce an audible sound. Click Expected Sound to listen to what a solenoid valve should sound like when it opens and closes.
Click Check to actuate the desired solenoid, and listen for the sound.
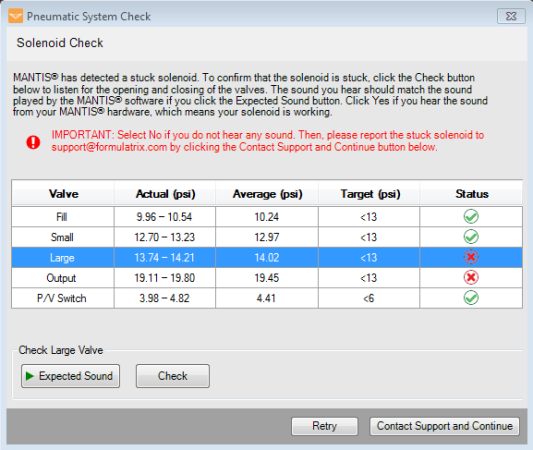
MANTIS has Detected a Stuck Solenoid
Compare the expected sound with the good solenoid sound from your instrument.
Click Yes if the sound from the tested solenoid is similar to the sound you hear when you click Expected Sound. This means that the solenoid works properly.
Click No if you do not hear any sound from the instrument. If you do not hear anything, the solenoid is not working properly. Click Retry to let MANTIS recheck the stuck solenoids or click the Contact Support and Continue button for technical assistance from FORMULATRIX support.
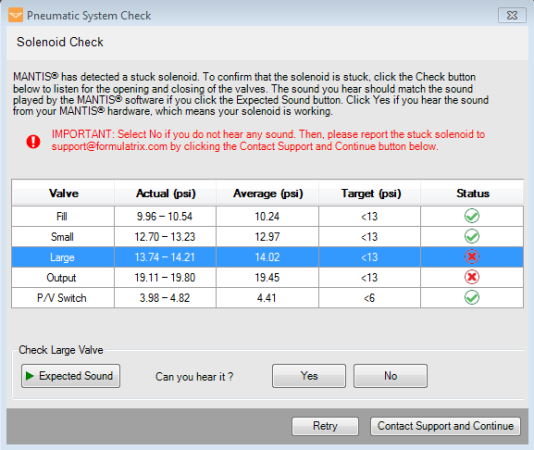
Multiple Solenoids are Stuck
Close the wizard.
Incorrect dispense volumes may occur if the chip type in use is different from the chip type selected in the MANTIS software. Check that the chip type selected in the software is correct; if not, select the correct chip type. See Input Control Panel for modifying and selecting your chip types correctly.
Check the tube connection and make sure it is firmly attached to the chip/tube input. If you see either if these issues after the first dispense or after the chip returns in between reagents, then make sure you are priming the chip before each dispense. Failure to prime a chip will prevent accurate dispenses. Please also note that it takes approximately 150-200 µL to prime the chip for the first dispense.
Sometimes the chips wear out. We recommend that you try dispensing with multiple chips. If the problem persists, contact support by emailing support@formulatrix.com. If you are on maintenance, you will be shipped a loaner MANTIS, instructed to ship yours to support for repairs, and when you receive the repaired device you must ship back the loaner.
Usually this issue is caused by a misalignment of the wash position. To fix this problem, you will need to edit the sequence file. Contact support by emailing support@formulatrix.com and a support representative will walk you through the process.
If your computer is showing that MANTIS USB drive is read-only, you will not be able to use the software because the software frequently writes to the USB drive.
These problems are caused by USB communication issues. Please contact support by emailing support@formulatrix.com. If you are on maintenance, they will issue a loaner device to use while yours is repaired.
This issue can be fixed by calibrating the chip port positions.
Make sure that you have accurately registered your plate definition in the Plate Type Library. For more information, see Adding Plate Types to the Plate Type Library.
If the plate definition has been accurately entered but the problem persists, you can fix the deck geometry settings. Go to the Tools menu and select Deck Geometry Correction, then follow the on-screen instructions. For more information, see Deck Geometry Correction. For assistance using the Deck Geometry Correction Wizard, contact support by emailing support@formulatrix.com.
If you are attempting to open or close the dispense design using a spreadsheet program such as Microsoft Excel, it can take a few moments for the software to translate your actions. Please be patient.
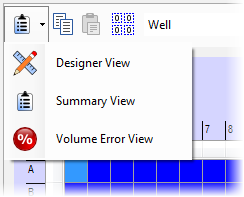
Check that you are not in Summary View or Volume Error View. These two views will "freeze" the rest of the interface. Switch back to Designer View in order to enable the rest of the software's functionality. To change views, click the button at the top of the plate designer to display the alternative views.
The MANTIS Software Seems Frozen
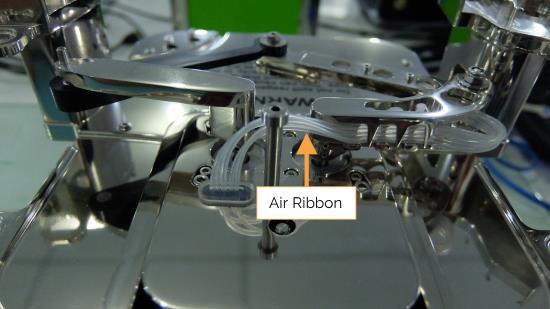
In the case liquid being spilled on top of the chip, the liquid can enter the MANTIS Air Ribbon when the chip is being picked up or dropped off. Liquid can also enter the Air Ribbon if a chip fails catastrophically (diaphragm or valve rupture). If you ever notice liquid droplets in the Air Ribbon, you must purge the liquid to prevent it from entering the solenoid bank and damaging the MANTIS instrument. Follow these instructions to purge liquid from the Air Ribbon.
Air Ribbon at the Back of the MANTIS Arms
To purge liquid from the Air Ribbon:
In the Tools menu, select Purging Tool.
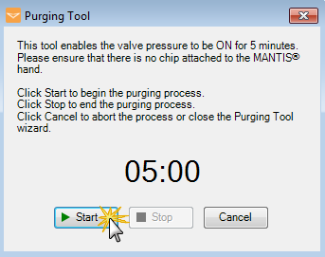
Click Start to begin the purging process.
Starting the Purging Process
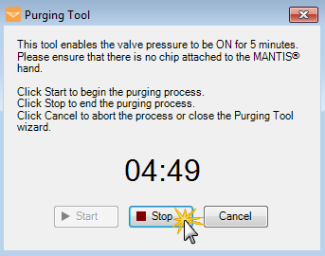
The default time for the purging process is five minutes. If the liquid is completely gone from the Air Ribbon in less than five minutes, click Stop to end the process.
Stopping the Purging Process
Optional: Repeat steps 1 and 2 if there is still liquid in the Air Ribbon, until it has all been purged.
Click the Cancel or Close button when you are finished, or to abort the process and close the Purging Tool wizard.
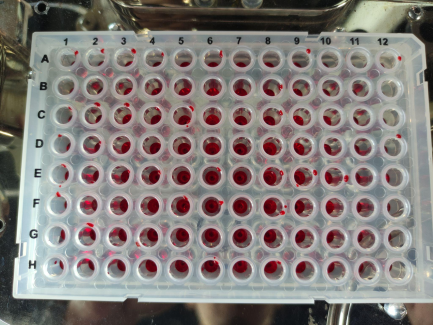
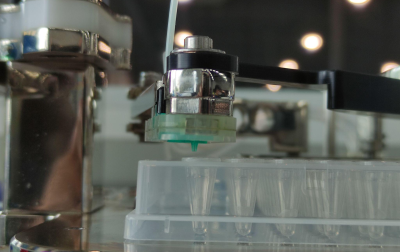
Splashing or rebounding of drops from conical (‘V’ or ‘U’) bottom plates, such as PCR plates, may occur during dispensing with the MANTIS. This issue is most common when large volume drops land near the center of the wells, which causes either splashing onto the top of the plate or the underside of the chips.
Splashing Drops on the 96-well PCR Plate |
Splashing Drops Stuck on the Underside of a MANTIS Chip |
There are two primary adjustments to address this issue:
Prerequisites:
To adjust the A1 well offset:
In the MANTIS software, go to the Tools menu, and select Plate Type Editor.
Open the plate definition of your choice by following the steps below:
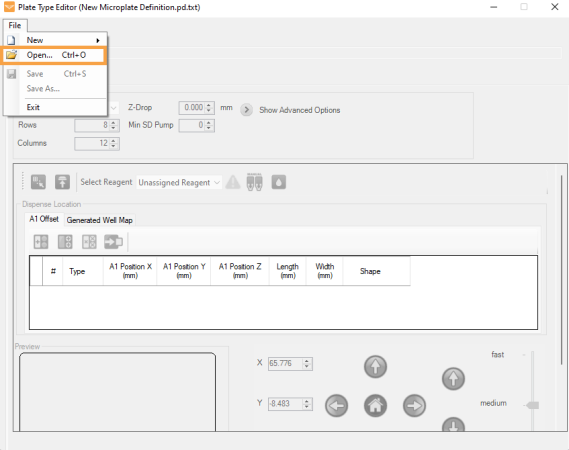
Click File and select Open, or press Ctrl+O on your keyboard.
Select Open
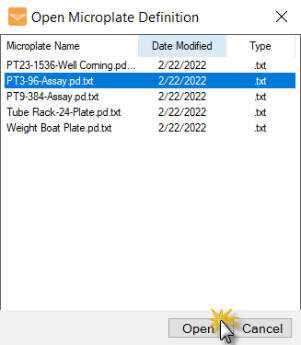
In the Open Microplate Definition window, select the plate that you want to edit.
Click Open.
Open Microplate Definition Window
Select a reagent from the dropdown menu to instruct the MANTIS to pick up your test chip.
Selecting Reagent from the Dropdown Menu
Click the Move To A1 Position location buttonto move the MANTIS hand to the current A1 well location.
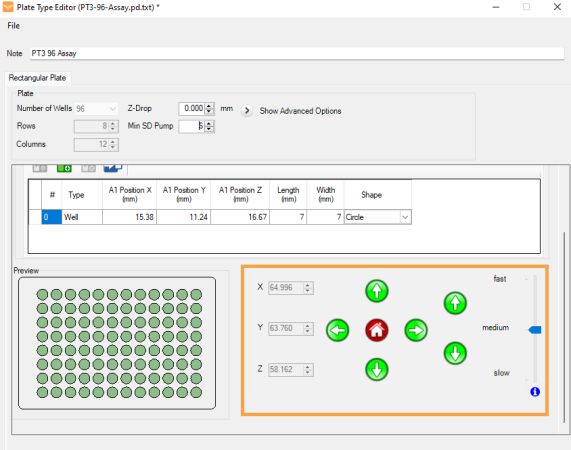
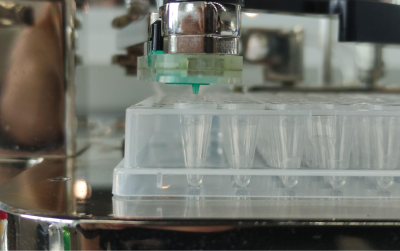
Modify the A1 well position by controlling the MANTIS hand via the Motion Control Pad. Use the arrow keys to maneuver the nozzle so it is not centered above the A1 well.
Motion Control Pad
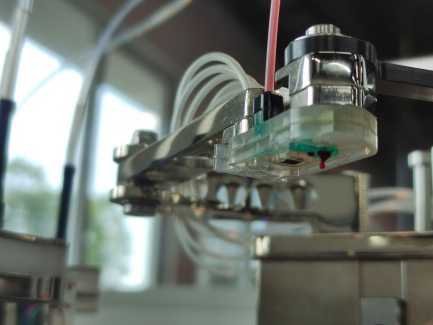
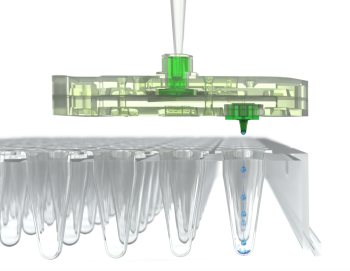
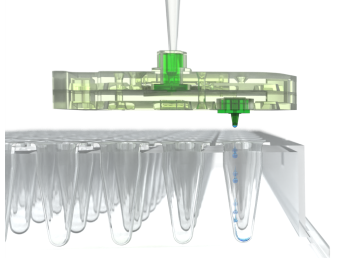
Note: The plate preview in the Plate Type Editor window displays the expected position of the chip nozzle toward the wells. You can get a good view of the nozzle location by looking down the nozzle tip from the front of the MANTIS. For reference see the images below.
Nozzle Centered Over Well |
Nozzle Offset to Edge of Well |
This offset will cause the drops to catch on the walls of the wells and “roll” down to the bottom of the well. This lessens the momentum of the drop and reduces the likelihood of splashing/bouncing.
Nozzle Centered Over Well |
Nozzle Offset to Edge of Well |
Choose from the following options to save the adjustments:
If you are using a custom plate: Go to the File menu and click Save, or press Ctrl+S on your keyboard.
If you are modifying a default plate: Click Save As under the File menu, type a name for your plate in the Microplate Name field of the Save Plate Definition window, and click Save.
Save Plate Definition Window
When you’re done, close the window and run a dispense to test the A1 position configuration.
OPTIONAL: Continue to set the Min SD Pump.
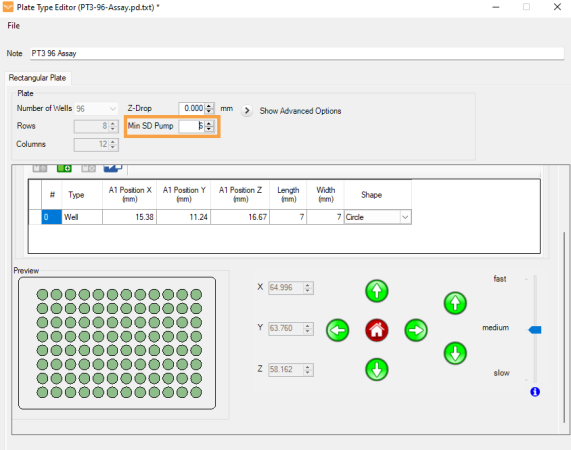
The Min SD Pumps parameter will force the MANTIS chip to use the Small Diaphragm (SD) for a minimum of ‘X’ pulses in each well prior to using the large diaphragm. This pre-fills the well with small drops so larger drops contact the pre-filled liquid, reducing the likelihood of splashing/bouncing.
Prerequisite:
To set the Min SD Pumps:
Set the Min SD Pump Value to 6
Save the changes by selecting the Save option under the File menu, or pressing Ctrl+S on your keyboard.
Close the window, and run a dispense to test if the splashing still occurs. If the problem persists, adjust the A1 Well Offset. Contact FORMULATRIX support at support@formulatrix.com for further assistance.
Note: When dispensing, make sure that the Enable Min SD Pump setting is True.
Enable Min SD Pump Setting
MAOWH-V48R824 |