

The Device Control panel provides access to controls for operating the MANTIS device. You will use it when you have designed a dispense and need to assign reagents to chips, or want to execute or pause a dispense.
The Device Control Panel is divided into four areas:
The buttons at the top of the device control panel execute different actions on the MANTIS.
| Button | Description |
|---|---|
|
|
Clicking the RunDispense button starts the plate dispense. This button changes to a pause button when clicked. |

|
Clicking the Run Dispense with Protocol button starts the plate dispense using the saved protocols available. |
|
|
The Skip Dispense button tells the MANTIS to skip to the next reagent on the dispense list (not visible for ACC MANTIS). |
|
|
The Stop button stops the dispense. |

|
The Pause Dispense button pauses the dispense. This button will appear when you are running a dispense. |
|
|
The Home button homes the MANTIS motors, which can help if the MANTIS is not dispensing as precisely as normal. |

|
The Move to Idle Position button moves the MANTIS arms and hand to the rest position. |

|
The Move to Install Chip Position button extends the MANTIS arms and hand so that you can more easily place the chip into place. |
|
|
The Move to Install Input Position button moves the MANTIS arms and hand to a position that enables you to easily attach the pipette tip or input tube to the chip input. |

|
The Estimate Dispense Time button shows you the estimated dispense time in the Status Bar at the bottom of the window. This button is enabled after you have dragged all reagents into position on the Input Control Panel. |
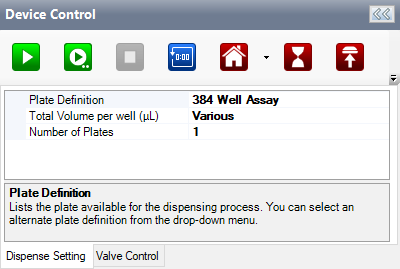
The Dispense Setting tab allows you to see and configure the Plate Definition, the Total Volume per well (µL) of a reagent, and the Number of Plates you want to dispense. You can change the plate by clicking on the name of the plate and selecting a new plate from the list. Note that you can only change between plates with the same number of wells.
The Total Volume per Well field is populated only if every well has the same total volume.
The Number of Plates is where you specify the desired number of plates to be dispensed — it is typically used for running a multi-plate dispense with a single dispense list.

Dispense Setting Tab
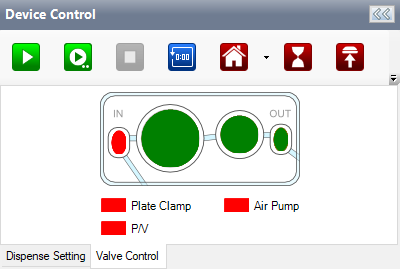
The Valve Control tab provides a visual representation of the microfluidic chip. Inside the microfluidic chip is a valve cluster that controls liquid circulation. This valve cluster has two micro-diaphragms, 0.1 µL (small) and 0.5 µL (large) in a low volume chip and 1 µL (small) and 5 µL (large) in a high volume chip.
Both chips have two valves: fill and output. The graphic display allows you to manually open (green) and shut (red) the valves by clicking on the corresponding area.

Valve Control Tab
The plate clamp toggle is located below the microfluidic display. Its main function is to lock and align your plate when you run the dispensing process so that the plate will not move. The plate clamp is automatically active (green) when you run the dispensing process and is inactive (red) after the dispensing process is completed. The plate clamp is pneumatic. Changing its state will activate the pump for a few seconds in order to actuate it.
The air pump toggle is located next to the plate clamp toggle. Its function is to turn the air pump on and off. The air pump provides adequate pressure and vacuum for MANTIS to run the dispensing, priming, and washing processes. Red indicates that the air pump is inactive, and green indicates that it is active.
When you run the dispensing process, it takes two seconds for the air pump to start. The air pump will need to stabilize the pressure and vacuum before MANTIS runs the dispensing process.
The Pressure and Vacuum toggle turns on and off the pressure in the bottle. A Continuous Flow (CF) chip needs to be on the hand for the bottle to be pressurized. A green toggle indicates that the vacuum is active, and a red toggle indicates that the pressure is active. The Pressure and Vacuum toggle is available only if you are using a CF chip for dispensing.
 | |
| MAOWH-V48R824 |