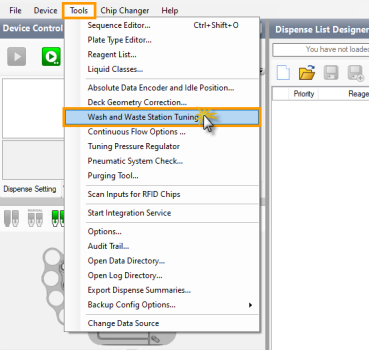
The Wash and Waste Station Tuning feature allows you to adjust and save the MANTIS hand positions for Wash Station 1, Wash Station 2, and the Waste Station. Correct positioning ensures that the chip is properly aligned with the respective station during washing, priming, pre-dispense, and bookend QC.
The Wash/Waste Station may need to be re-tuned if:
The Wash and Waste Station Tuning option is disabled by default. To enable this feature:
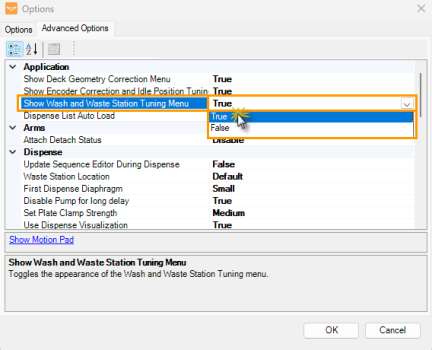
Go to the Tools menu and select Options.
Under the Advanced Options tab, set the Show Wash and Waste Station Tuning Menu setting to True.
Activating the Wash and Waste Station Tuning Feature
Click OK to save the change.
The Wash and Waste Station Tuning option will appear under the Tools menu.
The Wash and Waste Station Tuning Option
You are running Mantis instrument V4 and software version 5.1.
You have at least one available chip in the chip changers.
Tips: Use a Low Volume (LV) chip for the Wash and Waste Station tuning. Do not use Continuous Flow (CF) chips for this tuning procedure
You have contacted FORMULATRIX support and determined a problem is due to wash/waste position alignment/tuning.
OPTIONAL: The Waste Station tuning jig is available if the instrument is equipped with QC Station V2.
Open the Wash and Waste Station Tuning wizard from the Tools menu.
RECOMMENDED: Select the reagent assigned to the chip you will use for this tuning process. The selection is Unassigned Reagent by default.
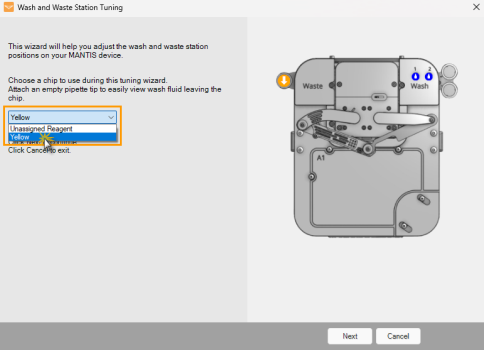
Choose a Reagent for Wash and Waste Station Tuning
Click Next to continue.
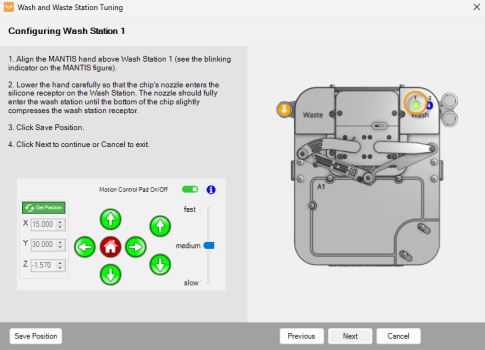
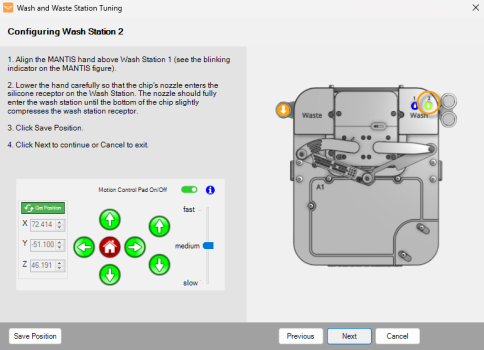
In the Configuring Wash Station 1 and 2 sections, follow the on-screen instructions accordingly. The tuned Wash Station is indicated by the blinking green color on the Mantis figure as seen below. This may take a few minutes, depending on the selected reagent volume.
|
|
| Tune the Wash Station 1 | Tune the Wash Station 2 |
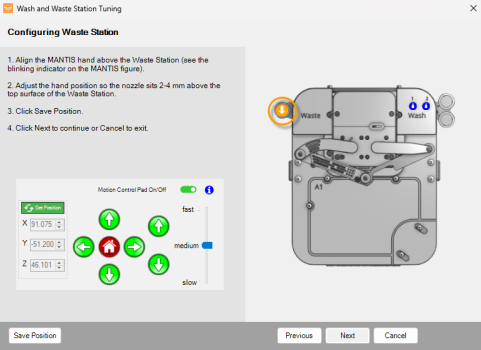
Tips: To align the Mantis hand toward the Wash and Waste Stations, use the Motion Control Pad or adjust manually by hand. If you are not satisfied with the result, click the Get Position button
to revert the X, Y, and Z coordinates generated by Mantis.
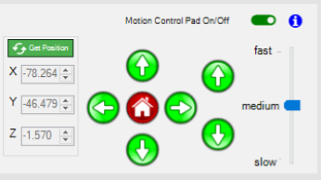
Motion Control Pad
Click Save Position to save the latest Mantis hand coordinates on each Wash Station. Then click Next.
After tuning the Wash Station, proceed with tuning the Waste Station. The tuned Waste Station is indicated by the blinking orange color. Follow the on-screen instructions, and click Save Position. Then, click Next.
Tune the Waste Station
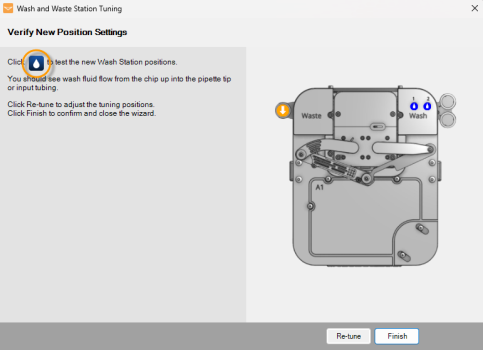
Verify the new Wash Station 1 and 2 positions by clicking the Wash button
.
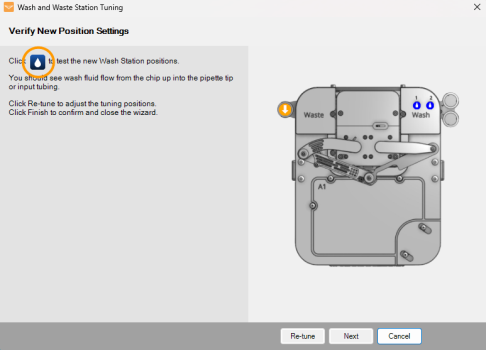
Wash Button
Congratulations, you have successfully tuned the Wash and Waste Station positions. Click Finish when you’re done or Re-tune if you want to readjust the Wash and Waste Station positions.
Open the Wash and Waste Station Tuning wizard from the Tools menu.
RECOMMENDED: Select the reagent assigned to the chip you will use for this tuning process. The selection is Unassigned Reagent by default.
Choose a Reagent for Wash and Waste Station Tuning
Click Next to continue.
In the Configuring Wash Station 1 and 2 sections, follow the on-screen instructions accordingly. The tuned Wash Station is indicated by the blinking green color on the Mantis figure as seen below. This may take a few minutes, depending on the selected reagent volume.
|
|
| Tune the Wash Station 1 | Tune the Wash Station 2 |
Tips: To align the Mantis hand toward the Wash and Waste Stations, use the Motion Control Pad or adjust manually by hand. If you are not satisfied with the result, click the Get Position button
to revert the X, Y, and Z coordinates generated by Mantis.
Motion Control Pad
Click Save Position to save the latest Mantis hand coordinates on each Wash Station. Then click Next.
Verify the new Wash Station 1 and 2 positions by clicking the Wash button
.
Wash Button
After tuning the Wash Station, prepare a jig for the Waste Station tuning. Follow the on-screen instructions accordingly, then click Next.
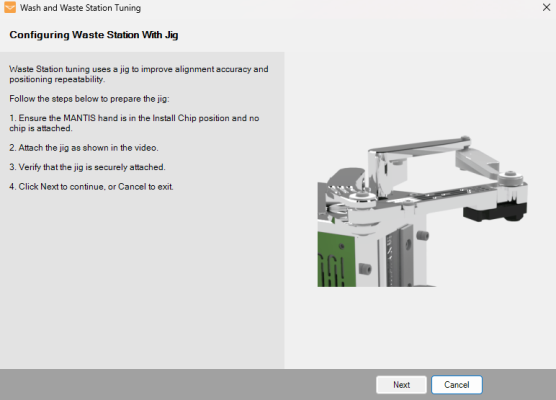
Preparing a Jig for Waste Station Tuning
Proceed with tuning the waste station by following the on-screen instructions. The tuned waste station is indicated by the blinking orange color.
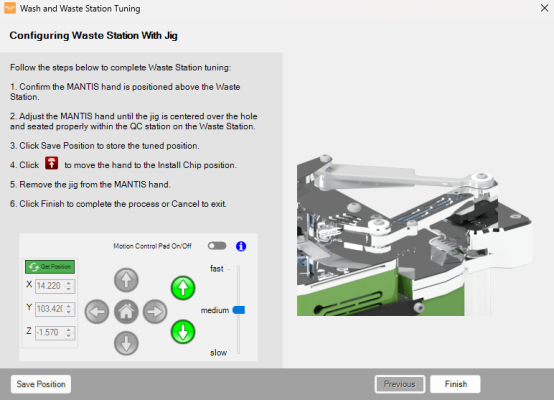
Tuning the Waste Station
Note: Adjust the hand using the Motion Control Pad until the jig is centered over the hole and properly seated in the Waste Station, indicated by the jig's bottom surface locking to the Waste Station.
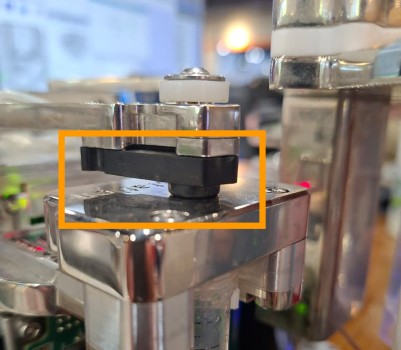
Correct Position of the Jig on the Waste Station
If you’re satisfied with the result, click Save Position. Then, click Next.
Congratulations, you have successfully tuned the Wash and Waste Station positions. Click Finish when you’re done or Re-tune if you want to readjust the Wash and Waste Station positions.
|
|
| MAOWH-V55R126 |