Place the plate in any available slot with the label facing towards you.
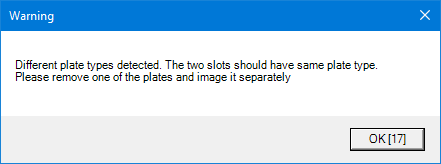
Note: Make sure to only place plates of the same type on the imager hands to avoid collision during imaging. ROCK IMAGER will display the below warning message if the plates on the imager hands are of different types.

Notification Informing Users of Plate Type Mismatch
Tell ROCK IMAGER to scan the barcode.
- Using the ROCK IMAGER software, go to the Imager menu and select Scan Plate(s).
Choose from the following options:
-
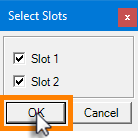
To image an entire plate with the default imaging settings, on the Imager menu, point to Image, and click Plate(s). Then, select Slot 1 and/or Slot 2 in the Select Slots window shown below, and click OK.

Selecting Slots Prior to Imaging Plate(s)
-
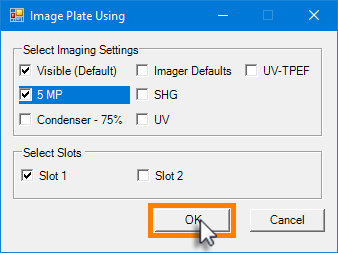
To image an entire plate with the imaging setting(s) of your choice, on the Imager menu, point to Image, and click Plate(s) Using. On the Image Plate Using window, select the desired imaging settings that you want to use and select which slot(s) you want to image. Then, click OK to run the imaging.

Selecting Imaging Settings and Slots in the Image Plate Using Window
Note: The Select Slots feature allows you to image a single plate while having two plates on the imager hand without having to eject the other one. This option is available when using either Image Plate or Image Plate Using in the Image options of the Imager menu.
-
To inspect your plates well-by-well or drop-by-drop without taking images, go to the Live ImageThe Live Image tab is a sub-tab of the Imager tab. It is the tab that displays by default when you open the Imager tab. To find the Live Image tab, go to the Imager tab (top-left of your screen), and look for the tabs at the bottom-left of your screen. tab and use the manual navigation controls.
-
To image a specific drop with the default imaging settings, on the Imager menu, point to Image, and click Drop.
-
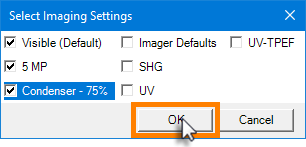
To image a specific drop with your choice of imaging settings, on the Imager menu, point to Image, and click Drop Using. Then, select the applicable imaging settings from the Select Imaging Settings window. Click OK to run the imaging.

Selecting the Imaging Settings
-
If you have tagged certain drops as interesting in ROCK MAKER, you can opt to image only those drops by going to the Imager menu and selecting Interesting Drop(s) in the Image menu to use the default imaging setting.
OR
Point to Image, and click Interesting Drop(s) Using to use a custom imaging setting. Then, select the applicable imaging settings from the Select Imaging Settings window. Click OK to run the imaging.
Selecting the Imaging Settings
When your plates have been imaged at least once, you can view the images in ROCK MAKER.
- As long as ROCK IMAGER Processor is running, you should see thumbnails of your images on the CanvasThe Canvas is the main area in the ROCK MAKER software that lets you design your experiment by adding reagents, protein formulations, stocks, buffers, and so on. You can think of it as your ROCK MAKER workspace..
If your images are not showing up, try pressing F5 on your keyboard while in ROCK MAKER to refresh the image display.
