
A layer defines the contents of an experiment's wells or drops. There are several kinds of layers:
Grid Design layers
Random Design layers
Custom Design layers
Protein layers
Seeding layers, and
Screen layers
When you first create an experiment, you will see an Add Ingredients group in the Design tab of the Experiment tab set.

Experiment Layer Tools
If you are creating a screen, you will not see Protein or Screen in the list.
Then, once you have added ingredients to the layers, you can manage your layers through either the ribbon menu or by right-clicking.

Edit Layer Selection
The layers that you draw can be any size. For example, if you want all of an experiment's wells to contain the same ingredients, you can add a layer that covers all of the plates on the canvas. Or, if you want half of a plate's wells to contain a certain combination of ingredients and the other half a second combination, you could add two layers, each covering only half of the plate.
After you add a layer, you define its ingredients and other information on a side panel that appears automatically. Each layer that you draw will target either drops or wells. Protein layers apply only to drops, and the other layer types can target both wells and drops.
Jump to:
While designing your experiments, you will often need to draw one layer on top of another. For example, after you have added a screen layer to define the contents of a plate's wells, you may want to add a protein layer that defines the plate's drops. When you add the protein layer, the protein layer will become the currently selected layer, and the screen layer will be hidden behind it. These are referred to as overlapping layers.
To select different layers, click the name of the layer in the Edit group on the Design tab of the Experiment contextual tab set.
When overlapping layers target the wells of a plate, each well in the plate will receive ingredients from all of the layers.
When well-targeted layers overlap, the way their ingredients are combined in each well depends on whether the layers are volume-based or concentration-based.
When you click a layer in the Edit group, information about that layer will display on a side panel on the right side of your screen. You can select only one layer at a time.
You can also select a layer by right-clicking and pointing to Select Layer. This displays all layers on that particular well.
Some options and commands on the Plate tab require that you first select wells from the canvas.
When you click once on a well, the well is selected. Clicking again after a short pause selects the corresponding layer on the well. In case of overlapped layers, you can traverse through all layers by clicking repeatedly. Alternatively this can be done by pressing Ctrl+L on your keyboard while having a well selected.
For each well-targeted layer you create, you can specify how you want the layer's ingredients to be combined with the ingredients of any overlapping layers.
This is achieved by:
Clicking a layer in the Edit Layer group on the Design tab.
Click the Advanced tab on the Edit Random Layer side panel.
Selecting Volume Based Addition or Concentration Based Addition.
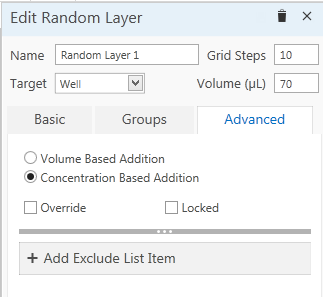
Concentration Based Addition
Note: If you combine a concentration-based layer with a volume-based layer, the addition of their ingredients will be volume-based.
Note: The Volume Based and Concentration Based options are only available for Grid Design, Random Design, and Custom Design layers. Other types of layers are always based on volume.
With Volume Based Addition selected, the well volume of the layer will remain constant when the layer is combined with other layers. This will result in a change in ingredient concentrations.
For example, suppose there are two layers, as shown below.
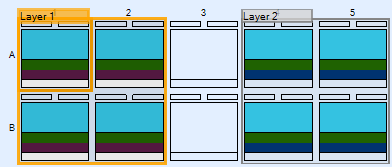
Two Separate Layers
For ease of demonstration, all wells in these two layers contain two ingredients, each at a concentration of 0.2 M. The well volume for both layers is 70 microliters, and the water volume is 42 microliters.
Selecting Volume Based Addition for both layers and then combining them by dragging and dropping one onto the other, the layers will appear as shown below.
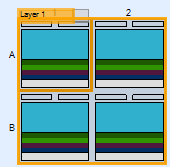
Two Volume-Based Addition Layers Combined
Each well now has the following combination of ingredients. Because the layers are volume-based, each layer's well volume remained unchanged when the wells were combined. Because the well volume of each layer is kept constant at 70 microliters, the resulting well volume is 140 microliters. The water volume also doubled to 84 microliters. The concentration of the ingredients changed to 0.1 M.
With Concentration Based Addition selected, the concentrations of the layer's ingredients will remain constant when you combine the layer with others. This will result in a change in the well's volume. By default, new layers will have Concentration Based Addition selected.
Note: The well volumes for all concentration-based layers on a plate must be equal. If you change the well volume of one concentration-based layer, the well volumes of the others will automatically be changed to the new value as well.
Continuing with the example used for volume-based layers, if the same layers were combined using Concentration Based Addition for both layers, the combined layers would appear as follows:
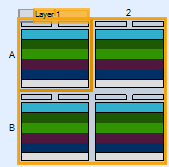
Two Concentration-Based Addition Layers Combined
Because the well volume for each layer was reduced to maintain constant ingredient concentrations, the resulting well volume is 70 microliters, not 140 microliters. The ingredients all have a concentration of 0.2 M, which is the same value they have in their individual layers.
You can drag ingredients from the Ingredients list right to an experiment layer on the Canvas.
If one layer exists in the experiment, ROCK MAKER will add the ingredient to that layer.
If multiple layers exist, you will be asked to select a layer in which to add the ingredient.
If the well has no layers, you will be allowed to create a new layer in which to add the ingredient.
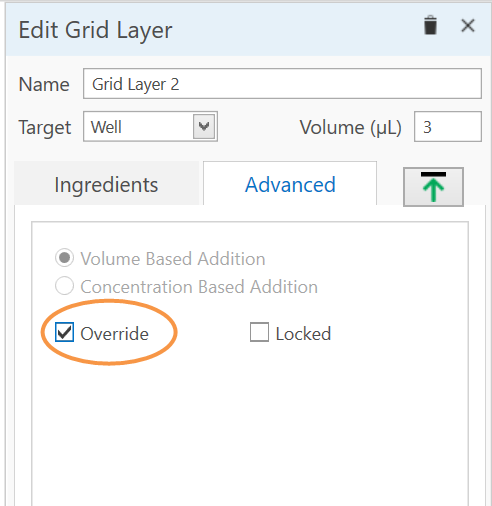
A layer can be marked as an override layer by selecting the Override check box in the Advanced tab. The wells in an override layer override ingredients in a well contributed by concentration-based layer.
In the image below, there are two grid layers. Grid Layer 3 is a concentration-based layer, and Grid Layer 1 is marked as an override layer. Grid Layer 1 overrides ingredients of all overlapping wells contributed by Grid Layer 3.
Grid Layer 1 Overrides Grid Layer 3
Note: The Override option is only available for Grid design, Random design, and Custom design layers.
You can lock any layer by selecting the Lock Layer check box on the Advanced tab. To unlock a layer, clear the Lock Layer check box.
The following statements are true for locked layers:
A locked layer is cut/copied and pasted as it is (no ingredients change even in case of a random layer) when an experiment or screen is cut/copied and pasted.
Note: A random layer will retain its ingredients as they are when the layer is cut/copied and pasted or when converting the experiment to a screen or screen experiment. Overriding is not allowed on a locked random layer. While converting an experiment to a screen or screen experiment, if there is random layer, the new random layer generated in the converted document will contain the original ingredients and their original concentrations, BUT the layer will be locked even if the original random layer in the original document was not locked.
 | |
| RMC-V313R018 |