 , or select one or more chips (use the Ctrl key to select more than one chip) click the Recover Selected button
  .
.If you are using TEMPEST to dispense biological molecules, cells, or cell lysates, the material is likely to build up over time inside the liquid channels of the chips. This tutorial shows you how to clean your TEMPEST chips, removing such material buildup. This procedure can be also used for sterilization of the chips. To sterilize the chips, make sure that you follow aseptic handling procedures, and that all the reagents used are sterile. It is recommended contact time for 0.1 M NaOH (sodium hydroxide) is between 10 and 30 minutes depends on the severity of material buildup inside the chips.
Important: Please ensure that there is no trace of sodium hydroxide left on the chips, nozzles, or wash station. Prolonged exposure to NaOH will damage any silicone parts.
Important: Sodium hydroxide is considered a corrosive and harsh chemical. Please use proper safety equipment at all times when operating the TEMPEST. FORMULATRIX is not responsible for personal injuries incurred due to a lack of or improper use of personal protection equipment. If you would like to modify this procedure to use a different reagent, please consult the chemical compatibility chart and/or contact support@formulatrix.com. Using incompatible reagents can damage the TEMPEST and void the product warranty. FORMULATRIX is not responsible in whole or in part for any damages caused by failure to comply with the procedures outlined in this document.
Fill the both wash reservoirs with water, or put both wash station input tubes in the bottle containing water.
Place the three Falcon tubes containing the cleaning reagent, water, and buffer into the tube holders.
Open the TEMPEST software.
Go to the Tools menu and select Reagent List.
Input the cleaning reagent and buffer name in the Reagent Name, and specify the liquid class in the Liquid Class list. Then, click OK.
Note: All reagents used in this procedure belong to the Normal liquid class, unless your buffer of choice contains glycerol or a similarly viscous chemical.
Next, go to the Tools menu and select Options.
Go to the Recovery and Wash tab and select Water for Wash Station 1 and Wash Station 2.
Click Save to save the settings.
Important: If there are traces of reagent in the chips, you must recover the reagent and wash the chips first, before proceeding with the cleaning procedure. Even if there are no visible reagent traces in the chips, you must wash the chips with water before following the procedure below.
 , or select one or more chips (use the Ctrl key to select more than one chip) click the Recover Selected button
  .
.
In this section, you will use sodium hydroxide to wash the chips.
Put the input tubes in the waste bottle.
In the TEMPEST software, create a new dispense list containing sodium hydroxide, with the volume per well set to 100 µL.
Assign the sodium hydroxide in the input control panel. You can assign it to one or more inputs according to the number of chips that you want to clean.
Put the input tubes in the reagent tube that contains the cleaning reagent.
Place the 96-well plate on the TEMPEST stage.
Click Prime All to prime the chips.
Click Run Dispense![]() to dispense the cleaning reagent into the plate.
to dispense the cleaning reagent into the plate.
Let the chips sit for 10 to 30 minutes.
In this section, you will remove the sodium hydroxide from the chips.
After 10 to 30 minutes, click Prime All to prime the chips.
Click Run Dispense ![]() to dispense the sodium hydroxide into the plate.
to dispense the sodium hydroxide into the plate.
If you have finished, click Recover All to recover the sodium hydroxide.
Then, move the input tubes to the waste bottle.
Carefully remove the plate from the TEMPEST stage.
Important: Sodium hydroxide is strongly irritating and corrosive. Please wear appropriate safety equipment and take care to not spill the reagent when removing the plate from the TEMPEST stage. Exposure to sodium hydroxide can cause severe burns and permanent damage to any tissues that it comes in contact with.
To wash all inputs at once, click the Wash All button![]() , or select one or more chips and click the Wash Selected button
, or select one or more chips and click the Wash Selected button![]() to wash the selected chips.
to wash the selected chips.
Click Save ![]() to save the dispense list to a desired folder.
to save the dispense list to a desired folder.
Click Clear the Dispense List![]() on the Dispense List menu and remove all reagents from the input control panel.
on the Dispense List menu and remove all reagents from the input control panel.
In this section, you will use water to remove any traces of sodium hydroxide from the chips.
Create a new dispense list containing water, with the volume per well set to 100 µL.
Assign the water in the input control panel. You can assign it to one or more inputs according to the number of chips that you want to clean.
Place the new 96-well plate on the TEMPEST stage.
Move the clear input tube for each chip you want to clean into the reagent tube that contains water, and put the green waste tube for each chip in the waste bottle.
Click Prime All to prime the chips.
Click Run Dispense![]() to dispense the water into the plate.
to dispense the water into the plate.
Click Recover All to recover the water.
Click Save![]() to save the dispense list to a desired folder.
to save the dispense list to a desired folder.
Click Clear the Dispense List![]() on the Dispense List menu and remove all reagents from the input control panel.
on the Dispense List menu and remove all reagents from the input control panel.
After cleaning the chips with water, you will need to neutralize using a buffer reagent.
Create a new dispense list containing buffer, with the volume per well set to 100 µL.
Assign the buffer in the input control panel. You can assign it to one or more inputs according to the number of chips that you want to neutralize.
Move the clear input tube for each chip you want to neutralize into the reagent tube that contains buffer, and put the green waste tube for each chip in the waste bottle.
Click Prime All to prime the chips.
Click Run Dispense![]() to dispense the buffer into the plate.
to dispense the buffer into the plate.
Click Recover All to recover the buffer.
Then, move the input tubes to the waste bottle.
Carefully remove the plate from the TEMPEST stage.
To wash all inputs at once, click the Wash All button![]() , or select one or more chips and click the Wash Selected button
, or select one or more chips and click the Wash Selected button![]() to wash the selected chips.
to wash the selected chips.
Click Save![]() to save the dispense list to a desired folder.
to save the dispense list to a desired folder.
Click Clear the Dispense List![]() on the Dispense List menu and remove all reagents from the input control.
on the Dispense List menu and remove all reagents from the input control.
In this section, you will clean the chips again with water to remove the any traces of the buffer.
Open the previously saved (section 2) dispense list that contains water.
Assign the water in the input control panel. You can assign it to one or more inputs according to the number of chips that you want to clean.
Move the clear input tube for each chip you want to clean into the reagent tube that contains water, and put the green waste tube for each chip in the waste bottle.
Click Prime All to prime the chips.
Click Run Dispense![]() to dispense the water into the plate.
to dispense the water into the plate.
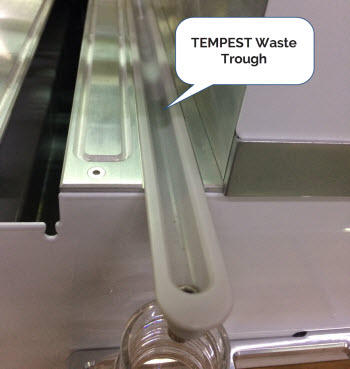
After the sterilizing process has finished, you have to wash the TEMPEST waste trough manually.

TEMPEST Waste Through
It is recommended to clean the chips’ nozzle strips to remove any dried up material.
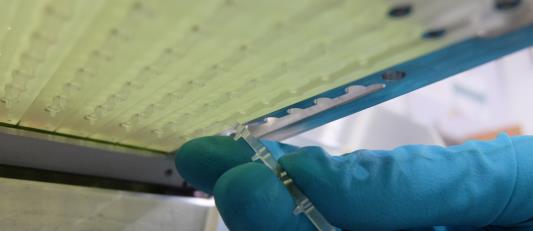
Remove the dirty nozzle strip by gently pulling it off of the chip by the tab in the front. You can use a small pair of forceps to grasp the tab if it is too difficult to do so with your fingers. See the picture below for reference:

Removing the Nozzle Strip
Repeat step 1 to remove other dirty nozzle strips from the TEMPEST chips.
Note: If you are replacing the nozzle strips with the clean ones, you can directly proceed to section C and do section B at a later time. Otherwise, you please proceed to section B
Soak the nozzle strips in deionized or Nuclease/DNA Free Water for 30 minutes to remove any dried up material from the outside of the nozzles. You can also gently rub the nozzle strips between your fingers to help dislodge any material.
After 30 minutes, take the nozzle strips out of the water and rinse them with fresh deionized or Nuclease/DNA Free Water. Put the nozzles in a clean container.
Let the nozzles dry before use, or blot them dry using lint-free wipes (Kimwipes).
Put the nozzle strips in a clean container for future use. It is recommended to have an extra set of nozzle strips and rotate the set in use to minimise the downtime while ensuring that the TEMPEST always dispenses from clean nozzles.
If the nozzle strips have already been cleaned and dried, you can reinstall the nozzle strips onto the TEMPEST chips.
Starting from the rear of the chip, attach a clean nozzle strip onto the TEMPEST chip and make sure that the nozzle strip is in alignment, so that the height of each nozzle is the same.

Attaching the Nozzle Strip
Repeat step 1 to install the other nozzle strips.

|
|
| TEC-V34R020
|