You can add new labware to the database through the Labware Manager menu. Nearly all Society for Biomolecular Screening (SBS) standardized labware types are compatible with FLO i8. You can simply input the labware specifications, details, and parameters that you can find in your labware datasheet.
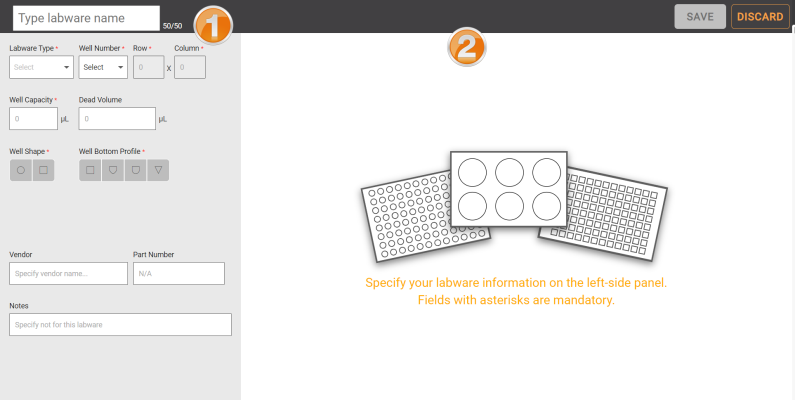
To create a new labware, input all required information on the new labware setup page. The page is divided into two sections, left-side panel (1) and right-side panel (2).
New Labware Set Up Page
Left-side panel consists of the labware specification fields which must be filled in first. You can input the general information of your labware, including Labware Name, Labware Type, Row & Column, Well Capacity, Dead Volume, Well Shape, Well Bottom Profile, Vendor, Part Number, and Notes.
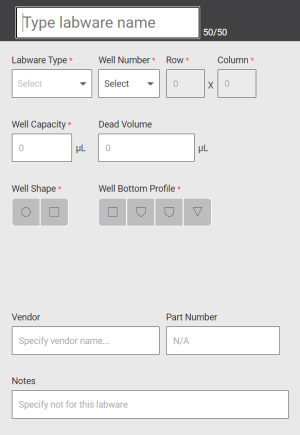
Left-Side Panel: Labware Specification Fields
The right-side panel—containing labware parameter fields—will appear after you define all of the required specifications. You have to input your labware’s parameter values on each field. The required parameters are Column Origin (CO), Column Pitch (CP), Row Origin (RO), Row Pitch (RP), Well Diameter (D), Well Depth (WD), and Well Height (H).

Right-Side Panel: Labware Parameter Fields
To create a new labware, you can follow the tutorial below.
 icon on the Labware Manager menu bar.
You can find the descriptions of each specification field in the following table.
| Specification | Description |
| Labware Name | Type the labware name here. Tip: Add labware’s well number and well capacity in the labware name to help you easily choose labware types during protocol design. |
| Labware Type | Click the Expand button and select the labware type from the Labware Type list. The supported types are:
|
| Well Number | Click the Expand button and select the labware number from the Well Number list. The number choices will adjust according to the Labware Type you select. You can also customize the Well Number. If you select Custom, you have to manually input the Row and Column numbers. |
| Row and Column | The system will auto-fill the Row and Column field according to the Labware Type and Well Number you choose. If you choose Custom for the Well Number, you have to manually input the Row and Column numbers. |
| Well Capacity | Type the well’s volume capacity here. Make sure the volume is in microlitre (μL). |
| Dead Volume | Fill the well’s residual volume in microlitre (μL). Note: Dead Volume refers to liquid volume that remains in the source labware or tip after dispense. The dead volume is used to avoid air aspiration. |
| Well Shape | Select the shape of the well’s mouth. The system-supported shapes are circle and rectangle. |
| Well Bottom Profile | Select the shape of the well’s lower part. The system-supported shapes are:
After selecting the Well Bottom Profile, the labware parameter set up will appear on the right-side panel. |
| Vendor | Fill the labware’s vendor name here. |
| Part Number | Type the labware’s part number here. |
| Notes | Add any important notes or specifications related to the labware, such as incompatibility or incomplete data. |
 inside the parameter box.
Seeing the Labware Parameter Description
Learn about the labware parameter descriptions in the table below.
| Parameter | Description |
| Column Origin (CO) | Distance (mm) from the center of A1 well to the left edge of the plate. |
| Column Pitch (CP) | Distance (mm) of A1 well (center) to A2 well (center). |
| Row Origin (RO) | Distance (mm) from the center of A1 well to the top of the plate. |
| Row Pitch (RP) | Distance (mm) from the center of A1 well to the center of B1 well. |
| Well Diameter (D) | Diameter (mm) of the well. Note: This option is only available if you select a Circular Well Shape. |
| Well Depth (WD) | Depth (mm) of the well section. Note: This option is available when you select Flat and V-shaped Well Bottom Profile. |
| Well Depth 1 (WD1) | Depth (mm) of the WD1 well section. Note: This option is available when you choose Cone and U-shaped Well Bottom Profile. |
| Well Depth 2 (WD2) | Depth (mm) of the WD2 well section. Note: This option is available when you choose Cone and U-shaped Well Bottom Profile. |
| Well Width (W) | Vertical distance across the well. Note: W is mandatory if you choose Rectangle Well Shape. |
| Well Length (L) | Horizontal distance across the well. Note: L parameter is mandatory if you choose Rectangle Well Shape. |
| Labware Height (H) | Labware height (mm) from top to bottom. |
If you wish to cancel the action, click the DISCARD button on the menu bar. A dialog box will appear to confirm your action.

Discarding Labware Set Up Dialog Box
After saving the set up, your new labware automatically appears on the list of the Labware Manager page. Find more about managing the labware in the Managing Existing Labware topic.
| FLOi8Q-V20R021
|
 Flat
Flat Cone
Cone U
U V
V