 when facing and recovering errors, except for fatal errors
 .
.When you encounter an error during a protocol execution, FLO i8 provides options for recovery. You can find the detailed information about each error and the recovery procedure in the following sections.
Note: The status bar will show the paused icon when facing and recovering errors, except for fatal errors
 .
.
Pipetting errors relate to any issues occurring on pipetting channels and tips during protocol executions. Possible pipetting errors are Clog Detection, Air Aspiration, and Pipetting Time Out. Whenever the FLO i8 system detects any of these errors, the running protocol will automatically pause. Subsequently, a recovery window named Pipetting Error Detection pops up on your screen, containing error details and recovery options for you to choose from.
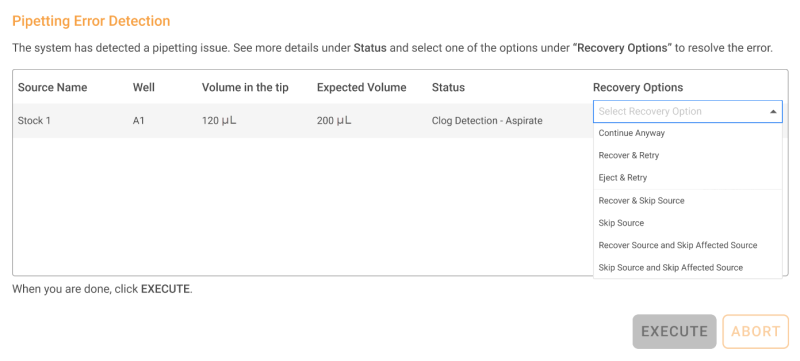
Pipetting Error Detection Window
The window provides information related to the occurring error, such as source name, well, volume in the tip, expected volume, status, and recovery options. EXECUTE and ABORT action buttons are also available for you to choose after selecting the recovery option for the pipetting errors.
The descriptions of the Pipetting Error Detection window are available in the table below.
| Item | Description |
| Source Name | The source labware that encountered an error during protocol execution. |
| Well | The well index where the pipetting error occurred. |
| Volume in the tip | The actual liquid volume inside the tips that encountered the error. |
| Expected Volume | The liquid volume that is expected to be aspirated or dispensed by the tips. |
| Status |
The error type followed by the execution status when the error occurred (e.g. Pipetting Time Out - Dispense). Note: Error type and execution status determine the list of recovery options available on the window. |
| Recovery Options |
The list of recovery options you can choose to handle the pipetting errors. The list differs according to the error status. Tip: If you want to see the description of the recovery options, drag and hover your cursor to each option. A screen tip containing the recovery description will appear.
Hover Your Cursor to the Recovery Option Note: Resulting source refers to a source created by the combination of two or more sources in a single well. |
| EXECUTE | The system runs the recovery option you select. |
| ABORT |
The system ejects the tips and stops the running protocol without doing any error recovery procedure. When you click the ABORT button, a message will pop up to ensure your decision in aborting the protocol.
Abort Message |
Please check the following sections to find out more about each pipetting error type.
The system senses clog in tips (e.g. clumps, or other solid substances) while aspirating, dispensing, or mixing liquid. Clogs block the liquid flow, resulting in failure to aspirate or dispense the full commanded volume.
When the system detects clogging, the Pipetting Error Detection window pops up to provide detailed information about the error. Select an option from the Recovery Options list to handle the issue. You can choose different options in the event that multiple clogs are detected.
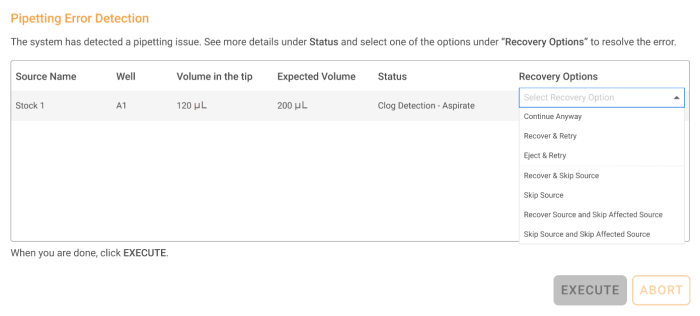
Clog Detection Recovery Window
The recovery options are provided differently according to the Status (e.g. Clog Detection - Aspirate) in which the error occurs . The statuses are aspirate, dispense, mixing before aspirate, mixing after dispense, and dispense (multi dispense). You can find the error recovery options for each status below.
Clog can occur when the tips aspirate liquid from the source well. When the error occurs, there are seven recovery options available for you to choose from, including Continue Anyway, Recover & Retry, Eject & Retry, Recover & Skip Source, Skip Source, Recover Source and Skip Affected Source, and Skip Source and Skip Affected Source.
The flow of liquid during dispense to the destination well can be disrupted by clogs. To solve the issue, you can choose four recovery options, including Continue Anyway, Retry, Skip Source, and Skip Source and Skip Affected Source.
After selecting the recovery option(s) according to the clogging status, you can proceed to select EXECUTE. Or you can forgo recovery and end the protocol by selecting ABORT.
The system senses unexpected aspiration of air. This can occur if there are bubbles in the source, or if the end of the tip is not submerged in the liquid.
The FLO i8 system automatically pauses any task whenever it detects air entering the tips. You can see the details of the occurring Air Aspiration in the recovery window that pops up after the protocol is paused.
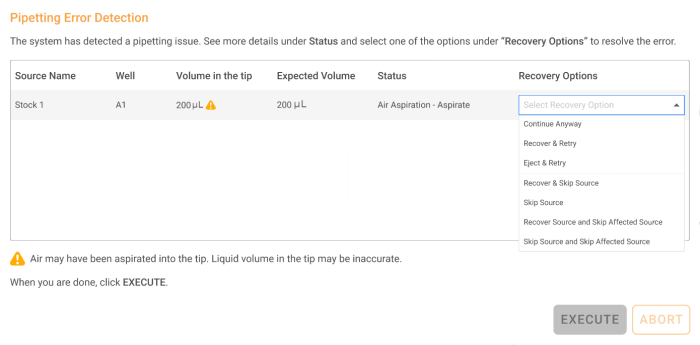
Air Aspiration Recovery Window
The Pipetting Error Detection window provides the details of the Air Aspiration error. The  icon in the Volume in the tip indicates that the stated volume may not be accurate due to the presence of air.
Subsequently, the provided recovery options for this error depends on the execution status in which the error happens, as seen in the Status column (e.g. Air Aspiration - Aspirate). The statuses are aspirate, mixing before aspirate, and mixing after dispense. The following sections provide the lists of Air Aspiration recovery options according to the error status.
There are seven recovery options available for this error status, including Continue Anyway, Recover & Retry, Eject & Retry, Recover & Skip Source, Skip Source, Recover Source and Skip Affected Source, and Skip Source and Skip Affected Source.
Similar to mixing before aspirate, air aspiration can occur when the pipettes mix sample liquid. See the Using the Pipetting Parameters topic to find out more about Mixing.
There are four recovery options available for this particular status, including Continue Anyway, Retry, Skip Source, and Skip Source and Skip Affected Source.
After selecting the recovery option according to the status in which Air Aspiration occurs, you can proceed to select EXECUTE or ABORT.
Pipetting Time Out occurs when it takes longer than the estimated time to execute a pipetting task. When Pipetting Time Out occurs, the Pipetting Error Detection window appears with recovery options to fix it.
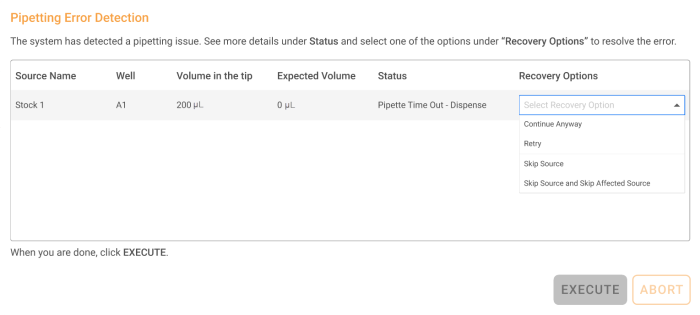
Pipetting Time Out Recovery Window
The recovery options are provided according to the system status when an error occurs. Pipetting Time Out usually occurs during aspirate, dispense, mixing before aspirate, and mixing after dispense. To find the error status, you can take a look at the Status column in the Pipetting Error Detection window.
The lists of recovery options for each status are available in the following sections.
The pipetting channels can aspirate liquid from the source well longer than the expected time, resulting in Pipetting Time Out. There are seven recovery options you can choose, including Continue Anyway, Recover & Retry, Eject & Retry, Recover & Skip Source, Skip Source, Recover Source and Skip Affected Source, and Skip Source and Skip Affected Source.
The pipetting channels can take longer in dispensing liquid to the destination well, triggering Pipetting Time Out. The available recovery options for this particular status are Continue Anyway, Retry, Skip Source, and Skip Source and Skip Affected Source.
After selecting the recovery option according to the error status, you can choose EXECUTE or ABORT.
The FLO i8 can detect when there is not enough volume in the source well to complete the aspiration. All tasks will automatically pause as Insufficient Source Volume Recovery window appears. You can compare the Aspirated Volume with the Volume Needed, as well as selecting the recovery option for the issue.
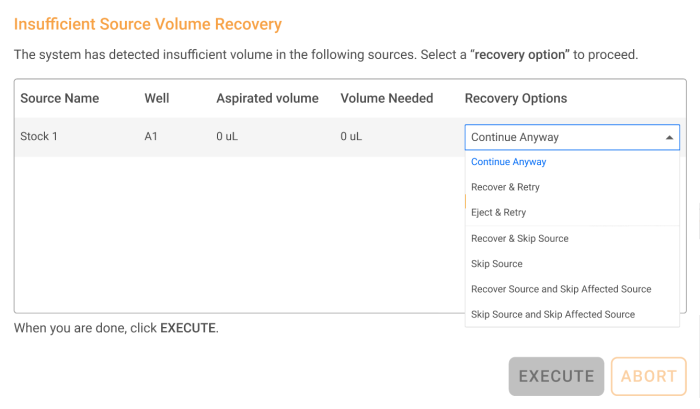
Insufficient Source Volume Recovery Window
The recovery options available are Continue Anyway, Recover & Retry, Eject & Retry, Recover & Skip Source, Skip Source, Recover Source and Skip Affected Source, and Skip Source and Skip Affected Source.
After selecting the recovery option for the Insufficient Volume issue, you can choose EXECUTE or ABORT.
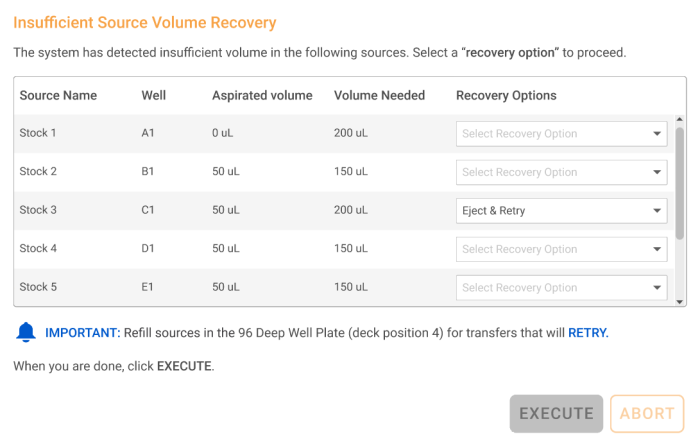
Eject & Retry Recovery Option That Requires Source Refill
When you select Recover & Retry or Eject & Retry, you are required to refill or replace the insufficient source labware. You can complete the recovery procedure through the following steps.
Collision refers to unexpected impact to one or more pipetting channels. This is most commonly caused by contact between channels, unexpected contact with labware, and contact by the user.
When the height of the labware placed on the deck is higher than the labware type selected in the Protocol Editor, channels may travel at a height that allows them to collide with the labware. The system will automatically pause and require you to conduct recovery procedures.
Collisions can also be caused by the user's touch. If you open the instrument door and accidentally touch the pipetting channels, you can trigger collisions in that particular pipetting channel. In this case, the protocol will automatically pause.
To handle collision issues, you can choose to RECOVER CHANNEL, SKIP, RETRY, RECOVER, and ABORT. Find the detailed description of each action in the following table.
| Action | Description |
| RECOVER CHANNEL | Continue the execution without recovering the occurring error. |
| RETRY | Eject the tip with errors to the waste bin, pick up a new tip, and retry the current step of the protocol execution. |
| SKIP | Eject the tip with errors to the waste bin, pick up a new tip, and continue the next step of the protocol execution. |
| RECOVER | Retry the step with error using the same tips. |
| ABORT |
Stop and end all protocol execution without doing any recovery procedure. |

Actuator Error Message Due to Collision
Collisions may occur during or after aspiration while the tips are still connected to the pipetting channels. If the system detects any collisions, choose from the following actuator error messages for troubleshooting.

Actuator Error Message Due to Collision During Aspiration

Actuator Error Message Due to Collision After Aspiration
Selecting RETRY leads you to the Collision Clean-up Option window. Click RECOVER to dispense any excess liquid in the tips back to the source location. Select EJECT TIP to dispose the used tips along with the remaining liquid to the waste bin.
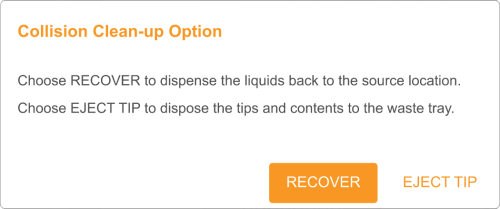
The Collision Clean-up Option Window
Collisions may also occur while the tips are still connected to the pipetting channel during dispense. If this issue occurs, you can only select SKIP to eject tips to the waste bin. At this stage the affected channel will stop operating, while the rest of the channels continue the protocol execution.

Actuator Error Message Due to Collision During Dispense
Actuator error occurs due to multiple factors, such as:
When there is an error in the instrument actuator, the protocol is automatically paused. A banner message appears at the top of the virtual deck with recovery options you can choose according to the severity of the error.
There are three types of error messages for three different error severity, namely recoverable motor error, collision, and actuator fatal error. Each is elaborated in the following sections.
Recoverable motor error covers errors that do not disable the system from operating, so the issue can be immediately handled. An error message, as well as the RETRY and ABORT buttons, are available for you to handle the issue. The description of each option is available in the following table.

Retry Button in a Motor Error Message
| Action | Description |
| RETRY | Clicking the RETRY button instructs the system to conduct homing and clean up procedures. After the recovery process, the system continues the protocol execution. |
| ABORT | ABORT button is available in any actuator error. It instructs the system to stop all protocol execution without doing any recovery procedure. |
In some cases, collision can cause actuator error, specifically when the contacts are too harsh or the collisions occur in multiple pipetting channels. Due to the collision, the actuator encounters emergency stops that result in a motor error. If you still see the RETRY button, the actuator might be able to be recovered.
However, the recovery tends to fail if the collision causes a fatal error. Alternatively, you can create a log package and report the issue to support at support@formualtrix.com.
Fatal error covers unrecoverable actuator errors that disable the instrument from operating. We suggest creating log packages and contacting the support team at support@formulatrix.com. The error codes for fatal actuator errors are usually ActuatorEncoderError, ActuatorMecNoMove, ActuatorEnableFailed, ActuatorUnknownError, ActuatorIllegalPos, ActuatorNotReady.

Actuator Fatal Error Message
In the error message, you can find the REPORT and CLOSE buttons that direct the system to take action regarding the issues. The instrument's overall status on the status bar is also red . The details are listed below.
| Action | Description |
| REPORT |
Clicking the REPORT button directs you to the report of protocol execution history, pipetting profile details, and execution time. Accessing Protocol Report Error Form |
| CLOSE |
Clicking the CLOSE button will close the runtime without any recovery procedure. Hover your cursor to the status bar to see the error details.
Fatal Error Message in Protocol Editor |
As an early measure to handle the issue, you are suggested to restart the FLO i8 instrument manually by switching the instrument’s power button off, then switching back to on.

Restart Suggestion in the Actuator Fatal Error Message
Tips error occurs when the system runs out of tips during protocol execution or when an incorrect tip type is on the deck. The explanation of each error case and the recovery procedure is covered in the two following sections.
An error message appears when the system detects there are not enough tips on the deck to continue the protocol execution.
The error message will appear whenever the tips run out, consisting of the deck position number, the type of the tip, and the remaining amount of tips needed.

Insufficient Tips Error Message
The empty tip boxes have to be replaced with the full ones. You can follow the listed steps in changing the tip box.

Tip Box Position Error on the Preparing Required Labware Page
The FLO i8 system can detect when a tip box on the deck does not match the expected type. In designing a protocol, the FLO i8 system calculates the liquid volume with the number of tips needed according to the tip type. You can see the tip types recommendation on the Preparing Required Labware page.
When you place the incorrect tip type, the system cannot proceed to execute the protocol after you click the RUN button. The Incorrect Tip Type window will appear on the screen to provide information about expected tip types and the ones detected by the system.
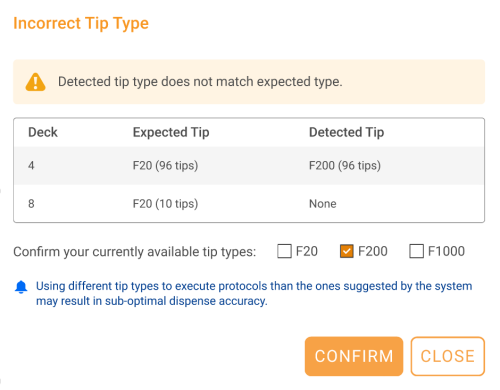
Incorrect Tip Type Window
Simultaneously, placing incorrect tip types can also happen when replacing empty tip boxes in the middle of protocol execution. The Incorrect Tip Type window will pop up when the system attempts to validate the replaced tip boxes and finds the unmatched tip types.
To handle the issue, follow the tutorial of changing incorrect tips on the deck below.
Note: The system can recalculate the expected tip numbers according to the tip type you have.
Tip touch-off failure may occur due to inaccurate labware definition. Differences in height of the actual labware versus that in the labware definition can cause the system to fail in detecting the side of the well (read more on Using the Pipetting Parameters). To handle this issue, you can disable the Tip Touch-Off by clicking the DISABLE TOUCH OFF button to continue execution.

Disabling the Tip Touch-Off Setting

|
|
| FLOWH-V27R124
|
Unit 6, Level 13, Gate District, Gate Building Dubai International Financial Centre |