If the bottle input is dirty, you must clean it. The bottle input is a polypropylene triangular piece that contains two fluid lines, one for reagent to move into the FORMULATOR's dispensing system and also for the wash fluid to clean the bottle input, and another to act as a drain for the water that comes into the area during an input wash.
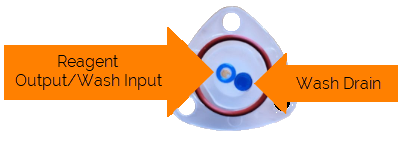
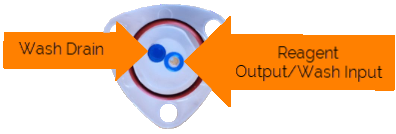
Before you begin, it's important that you identify and differentiate the two inputs. Use the picture below as a guide. Note that the two holes align with the bottom-right screw in a diagonal line (exception: the FORMULATOR 34 Falcon tube inputs are reversed, see below). The port with the blue ring is the Wash Input/Reagent Output and the solid blue port is the Wash Drain.
Reagent Output/Wash Input and Wash Drain for Each FORMULATOR Model Falcon Tube Inputs.

The Reagent Output/Wash Input (left) and Wash Drain (right) for FORMULATOR 10 and 16

The Reagent Output/Wash Input (left) and Wash Drain (right) for FORMULATOR 34
Note: The valves and O-Ring have been made more visible for clarity. The configuration shown above is a top-down view of the Bottle Interface Module (BIM) as installed on the FORMULATOR.
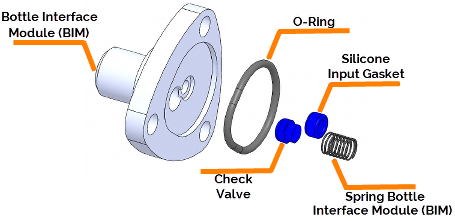
O-Ring, Check Valve, Silicone Input Gasket, and Spring of the Bottle Interface Module (BIM).

O-Ring, Check Valve, Silicone Input Gasket, and Spring of the Bottle Interface Module (BIM)
A 2 mm hexagonal screw driver or a 2 mm Allen wrench (hexagonal wrench).
The bottle input's pin alignment tool (included with the accessory kit).
Water or 70% Isopropanol to use as the cleaning solution.
Make sure the FORMULATOR is powered OFF.
Remove the three screws that hold the bottle input in place using a screw driver or Allen wrench.
Remove the bottle input from the FORMULATOR. If the O-Ring stays behind, lift it out so you can clean it.
Insert the Pin Alignment Tool into the Reagent Output/Wash Input. This action will push the silicone input gasket on the reagent output/wash input out through the back of the bottle input.
Remove the silicone check valve and spring from the wash drain. You can remove the silicone check valve and spring by hand, or you can insert a 1.5 mm Allen wrench into the wash drain to remove them.
Clean the various parts of the bottle input assembly:
Clean the silicone check valve and the silicone input gasket.
Remove the O-Ring if it is still attached to the bottle input.
Clean the O-Ring.
Remove the pin alignment tool from the bottle input.
Clean all surfaces of the bottle input (triangular polypropylene piece).
Clean the exposed part of the FORMULATOR: this is where the bottle input attaches to the rest of the FORMULATOR instrument.
Put the pin alignment tool back in the Reagent Output/Wash Input.
Reattached the cleaned O-ring to the bottle input.
Reattach the silicone check valve and the silicone input gasket to the bottle input.
Guide the bottle input back into place by putting the tip of the pin alignment tool into the Reagent Output/Wash Input hole on the FORMULATOR.
Screw the screws back in to secure the bottle input. Tighten the screws a half-turn at a time, moving from one screw to another, so that the bottle input assembly remains flat against the FORMULATOR's bottle input surface. Tightening one screw at a time may result in an uneven bottle input surface, which could result in decreased system performance or leaks.
Remove the pin alignment tool.
Turn the FORMULATOR back ON.
The FORMULATOR is now ready for dispensing.

|
|
| FOOWH-V115R623 |