Open topic with navigation
You are here: Maintenance : Testing MANTIS Chip Dispense Accuracy
Testing MANTIS Chip Dispense Accuracy
These tests should be performed to verify dispense volume accuracy and chip performance on the MANTIS automated liquid handler. These tests will identify dispense problems to assist in troubleshooting.
If you would like a full Operational Qualification (OQ) performed on your device, please contact the FORMULATRIX support team.
Dispense Volume Accuracy Test
There are two dispense volume accuracy tests:
- Dispense Volume Accuracy Test for HV Chip.
- Dispense Volume Accuracy Test for LV Chip.
Use the table below as a reference for the MANTIS chip specifications.
| Low Volume (LV) Silicone Chip
|
10% |
10%
|
<3%
|
1,000,000 |
| High Volume (HV) Silicone Chip
|
10% |
10% |
<3% |
1,000,000 |
| Low Volume PFE (LVP) Chip |
5% |
10%
|
<5%
|
750,000 |
| High Volume PFE (HVP) Chip |
3% |
8% |
<3% |
750,000 |
| Low Volume PFE (LVP) Chip |
5% |
10%
|
<5%
|
750,000 |
| Continuous Flow (CF) Silicone Chip |
3% |
N/A |
<3% |
1,000,000 |
| Continuous Flow (CF) PFE Chip |
3% |
N/A
|
<3%
|
1,000,000 |
Note: If your chip dispenses outside of the above specifications, repeat the tests using a new chip. Chips that are no longer dispensing accurately should be replaced. If multiple chips fail these tests, contact support@formulatrix.com for further assistance.
Required tools
- 1 pc of 96-well (recommended)
- MANTIS High/Low/PFE chips
- A weigh balance
Dispense Volume Accuracy Test for HV Chip
 Large Diaphragm
-
Weigh the 96-well and record the weight, or tare the plate on your balance.
-
Open the MANTIS software on your computer, and create a new dispense list using the appropriate plate type.
-
Add the 100% Water in the dispense list, and assign it to the chip you wish to test in the Input Control Panel.
-
In the Dispense List Designer, input 100 μL volume to the first and last columns of the 96-well plate, as shown in Figure 1 below.
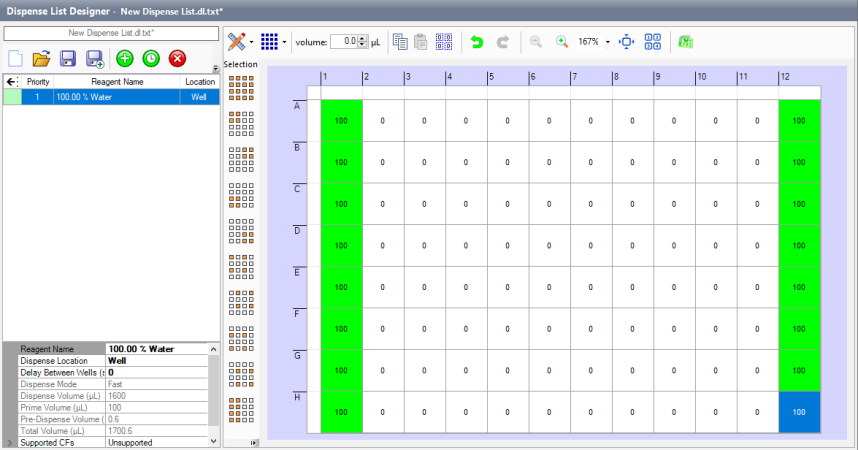
Figure 1: Input 100 μL volume to the 96-well plate in the Dispense List Designer
-
In the MANTIS software, go to the Plate Type Editor window under the Tools menu and change/verify the Min SD pumps parameter is set to 0, as shown in Figure 2 below.
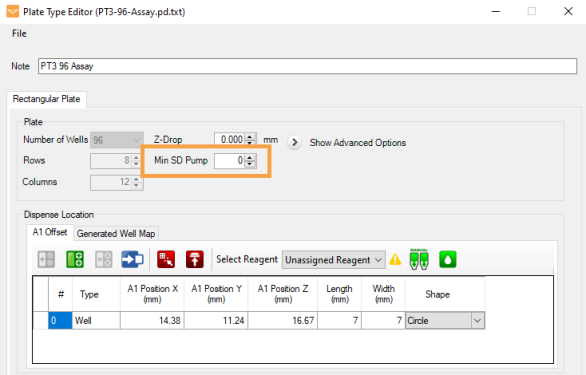
Figure 2: Set the Min SD Pumps Parameter to 0
-
Run the dispense list by clicking the Run Dispense button  .
.
Important: Ensure adequate prime and pre-dispense volumes for your input tubing and chip type. An inadequately primed chip will under-dispense.
-
After the dispense has completed, weigh the plate on the balance.
-
Calculate the dispense volume error as follows, and refer to the table for the chip accuracy error spec.

 Small Diaphragm
-
Weigh the 96-well and record the weight, or tare the plate on your balance.
-
Open the MANTIS software on your computer, and create a new dispense list using the appropriate plate type.
-
Add the 100% Water in the dispense list, and assign it to the chip you wish to test in the Input Control Panel.
-
In the Dispense List Designer, input 20 μL volume to the first and last columns of the 96-well plate, as shown in Figure 3 below.
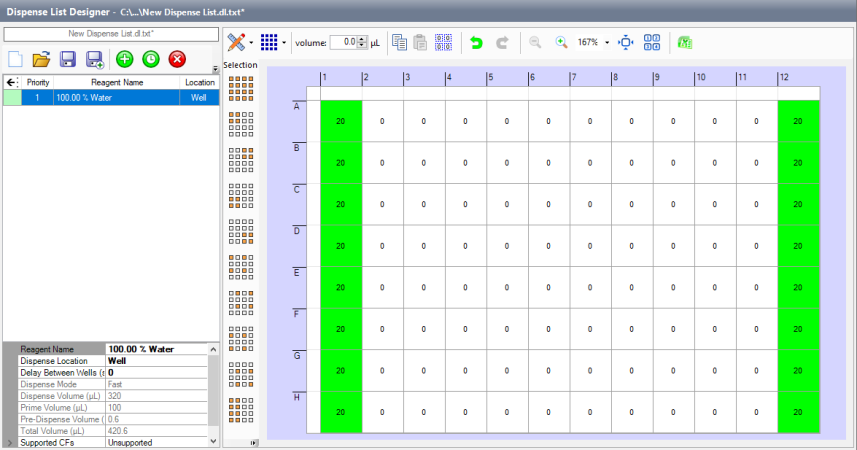
Figure 3: Input 20 μL volume to the 96-well plate in the Dispense List Designer
-
In the MANTIS software, go to the Plate Type Editor window under the Tools menu and change the Min SD pumps parameter to 100, as shown in Figure 4 below. This forces the chip to use the small diaphragm 100x per well prior to using the large diaphragm. For this test, 100 will be sufficient to ensure only the small diaphragm is used.
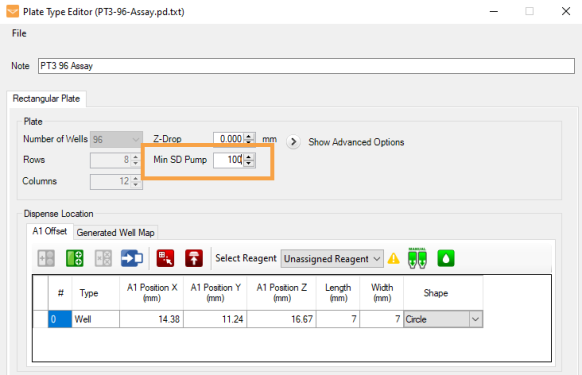
Figure 4: Set the Min SD Pumps Parameter to 100
-
Run the dispense list by clicking the Run Dispense button  .
.
Important: Ensure adequate prime and pre-dispense volumes for your input tubing and chip type. An inadequately primed chip will under-dispense.
-
After the dispense has completed, weigh the plate on the balance.
-
Calculate the dispense volume error as follows, and refer to the table for the chip accuracy error spec.

Dispense Volume Accuracy Test for LV Chip
 Large Diaphragm
-
Weigh the 96-well and record the weight, or tare the plate on your balance.
-
Open the MANTIS software on your computer, and create a new dispense list using the appropriate plate type.
-
Add the 100% Water in the dispense list, and assign it to the chip you wish to test in the Input Control Panel.
-
In the Dispense List Designer, input 20 μL volume to the first and last columns of the 96-well plate, as shown in Figure 5 below.

Figure 5: Input 20 μL volume to the 96-well plate in the Dispense List Designer
-
In the MANTIS software, go to the Plate Type Editor window under the Tools menu and change/verify the Min SD pumps parameter is set to 0, as shown in Figure 6 below.

Figure 6: Set the Min SD Pumps Parameter to 0
-
Run the dispense list by clicking the Run Dispense button  .
.
Important: Ensure adequate prime and pre-dispense volumes for your input tubing and chip type. An inadequately primed chip will under-dispense.
-
After the dispense has completed, weigh the plate on the balance.
-
Calculate the dispense volume error as follows, and refer to the table for the chip accuracy error spec.

 Small Diaphragm
-
Weigh the 96-well and record the weight, or tare the plate on your balance.
-
Open the MANTIS software on your computer, and create a new dispense list using the appropriate plate type.
-
Add the 100% Water in the dispense list, and assign it to the chip you wish to test in the Input Control Panel.
-
In the Dispense List Designer, input 10 μL volume to the first and last columns of the 96-well plate, as shown in Figure 7 below.
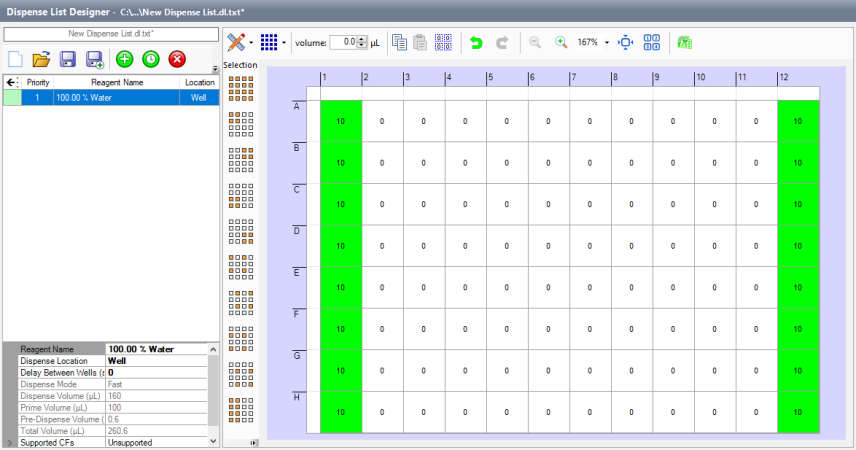
Figure 7: Input 10 μL volume to the 96-well plate in the Dispense List Designer
-
In the MANTIS software, go to the Plate Type Editor window under the Tools menu and change the Min SD pumps parameter to 100, as shown in Figure 8 below. This forces the chip to use the small diaphragm 100x per well prior to using the large diaphragm. For this test, 100 will be sufficient to ensure only the small diaphragm is used.

Figure 8: Set the Min SD Pumps Parameter to 100
-
Run the dispense list by clicking the Run Dispense button  .
.
-
After the dispense has completed, weigh the plate on the balance.
-
Calculate the dispense volume error as follows, and refer to the table for the chip accuracy error spec.
Important: Ensure adequate prime and pre-dispense volumes for your input tubing and chip type. An inadequately primed chip will under-dispense.

Drop Location Accuracy and Chip Diaphragm Test
Required tools
- A clear reference plate
- Food coloring
Note: This test can be performed with a normal 96-well or 384-well plate, but it is recommended to use the clear reference plate, which is included in your MANTIS accessories kit. You can flip the reference plate upside-down to provide a flat, clear surface on which to dispense.
To test the drop location accuracy and chip diaphragm:
-
In the MANTIS software, create a new dispense list and load the plate definition for the default 96-well or 384-well plate.
-
Add your water reagent in the dispense list and assign it to the chip to be tested.
Tip: Use water with food coloring to make drops easier to see.
-
Set up your plate to dispense a single large diaphragm drop on one half of the plate, and a single small diaphragm drop on the other half. See Figure 9 below for an example of an HV chip (5 μL and 1 μL diaphragms) in a 96-well plate layout.
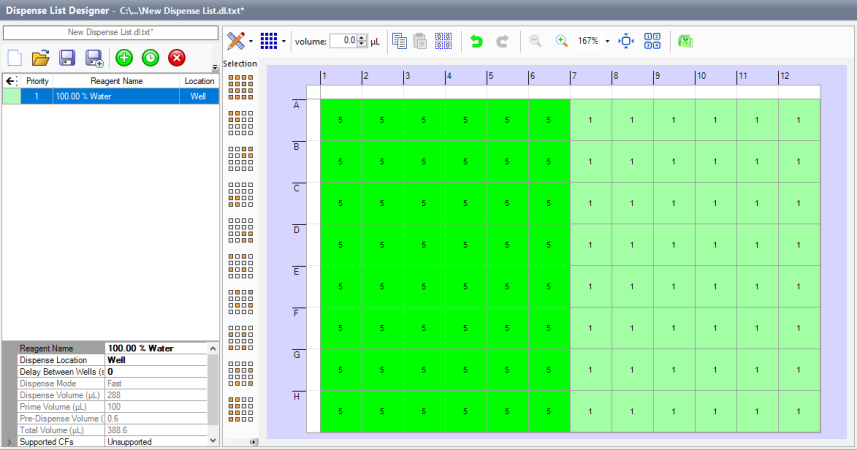
Figure 9: Assign the 5 μL and 1 μL reagent volume in the Dispense List Designer in the 96-well plate
-
Run the dispense onto the clear reference plate.
-
Visually inspect the plate to check the following:
-
The grid pattern should match the plate definition.
Note: Drops may not be perfectly aligned due to static effects causing drops to shift on flat surfaces, but the grid should be mostly accurate. Major problems with drop placement may require service from the FORMULATRIX support team.
-
The drops of each diaphragm should be consistent in size.
-
There should be little or no satellite drops or splashing surrounding the drops.
Note: If you see lots of small satellite drops, try replacing the nozzle on your chip.
-
If your chip fails the above criteria, repeat this test using a new chip. If multiple chips fail this test, contact support@formulatrix.com for further assistance.
Related Topics
|
|

|
| MAOWH-V47R722
|
|


 .
.


