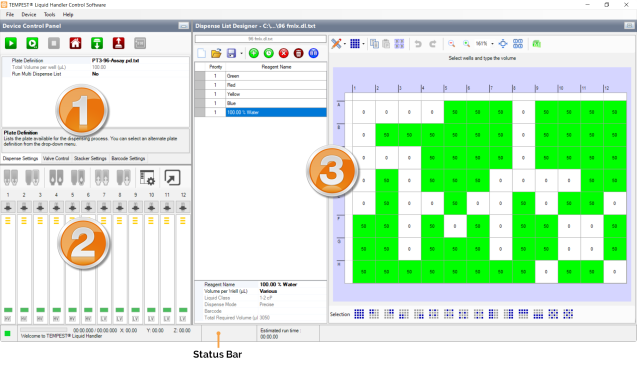
The TEMPEST control software is made up of three main panels and a status bar.

TEMPEST Interface
Section 1 is the Device Control panel. This is where you execute commands on the TEMPEST hardware using the buttons at the top of the panel.
You can also access and set up your current dispense and TEMPEST hardware functionality from the Dispense Settings, Valve Control, Stacker Settings, and Barcode Settings tab. For more information, see Device Control Panel.

Device Control Panel
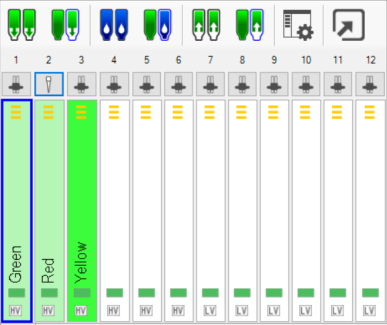
Section 2 is the Input Control Panel. You can use this panel to assign reagents to chip stations, run the wash, prime, and reagent recovery processes, monitor chip lifetime, and tell the TEMPEST whether you are dispensing via pipette tip or input tubing.
In the Input Control Panel, you also have quick-access to edit a protocol by clicking the Edit Protocol button. For a wider display of the Input Control Panel, click the Expand Input Control Panel Window button. For more information, see Input Control Panel.

Input Control Panel
Note: Some buttons in the Input Toolbar might be hidden due to the monitor resolution differences. To display all of the Input Toolbar buttons, simply click the Toolstrip Drop Down Arrow button in the Input Control Panel, or maximize your TEMPEST software window.

The Toolstrip Drop Down Arrow Button in the Input Control Panel
Section 3 is the Dispense List Designer. A dispense list is a list of reagents, volumes, and well locations where those reagents will be dispensed to a plate. On the left is where a list of your reagents appear, and on the right is a visual representation of your plate layout. For more information, see Dispense List Designer.

Dispense List Designer
The Status Bar shows you what's going on with your TEMPEST at a glance. For more information, see The Status Bar.
 | |
| TEC-V35R621
|