Open topic with navigation
Normalizing Concentration
F.A.S.T. enables concentration normalization by importing a .CSV file of sample concentration data and then calculating and dispensing the required diluent volume for each well.
In order to execute the Normalization feature, please follow the instructions below.
Prerequisites:
-
You have a .CSV file of the concentration data.
-
Prefill the trough, 96-, or 384- well plate with diluent as the diluent source plate.
-
Put the required labware on the tray.
To normalize your concentration data:
-
Click and drag the relevant labware for diluent and sample to the Virtual Tray.
Normalization Option
-
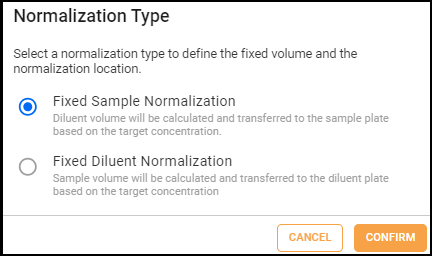
Click the Normalization button  . A pop up message will appear to give you two options of Normalization. Please select one Normalization type by clicking on the option.
-
Fixed Sample Normalization: Diluent volume will be calculated and transferred to the Sample Plate based on the target concentration.
-
Fixed Diluent Normalization: Sample volume will be calculated and transferred to the Diluent Plate based on the target concentration.
-
Click CONFIRM and select your Sample Plate, then click NEXT.
-
Select your Diluent Plate, then click the NEXT.
Note: Trough plates cannot be used in the Fixed Diluent Normalization.
-
Click the button to locate and upload the .CSV file.
-
When the file is successfully uploaded, select the reagent data column.
Note: Make sure the Column Delimiter matches the separator between values in the .CSV file.
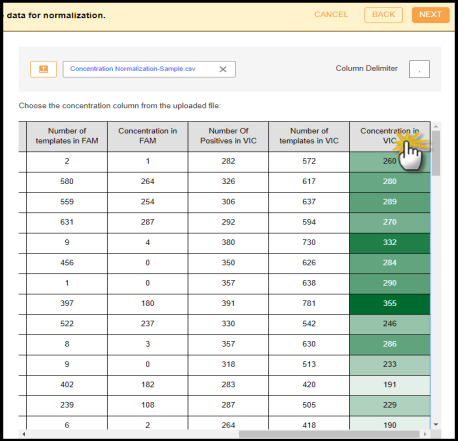
Selecting Reagent Data
- Define the well numbering convention used in your file by selecting either Row: A1, A2, A3 or Column: A1, B1, C1.
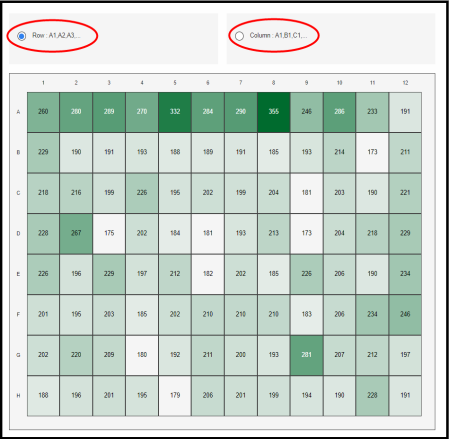
Note: Take a look at the examples below.
- Well increments by Row: A1, A2, A3 means that the wells in your plate design are numbered left-to-right in rows. For example, wells A1 through A12 are numbered 1 to 12 and are represented by the first 12 data rows of your .CSV file. Wells B1 through B12 are numbered 13 to 24 and so on.
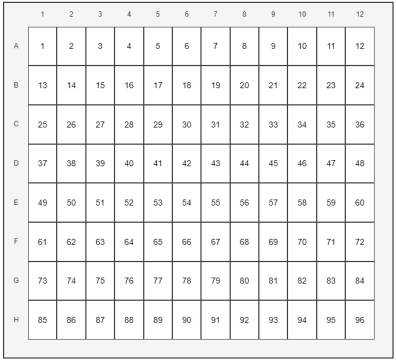
Well Number Increments by Row
- Well increments by Column: A1, B1, C1 means the wells in your plate design are numbered top-to-bottom in columns. For example, wells A1 through H1 are numbered 1 to 8 and are represented by the first 8 data rows of your .CSV file. Wells the next column A2 through H2 are numbered 9 to 16 well, and so on.
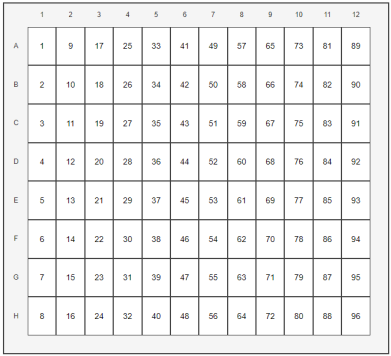
Well Number Increments by Column
-
Click NEXT to go to the Normalization Settings page.
-
Determine the Fixed Sample/Diluent Volume per well (µL) and Target Concentration in the text field.

Target Settings
Note: You cannot continue to the next step if your current settings cause diluent volume overflow (red mark), which is shown in the plate preview. To fix this, you can adjust either the Target Concentration value or the Fixed Sample/Diluent Volume per well (µL) value until no overflow wells are detected. Well capacity should not exceed the actual maximum well volume for your plate.
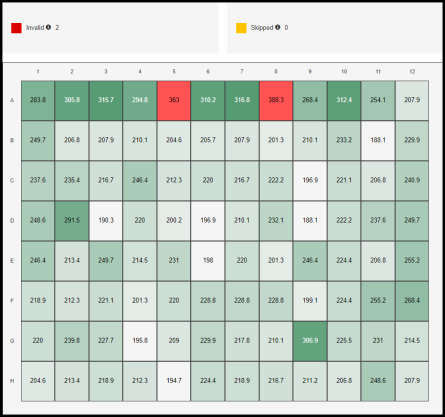
Invalid Preview
-
Click FINISH to go to the Virtual Tray.
Note: You can easily return to the previous action or reverse the last Undo that you performed by clicking the Undo or Redo
 button located on the top right section of the page.
-
Click START to execute the Normalization task. For more information, see Running a Protocol.
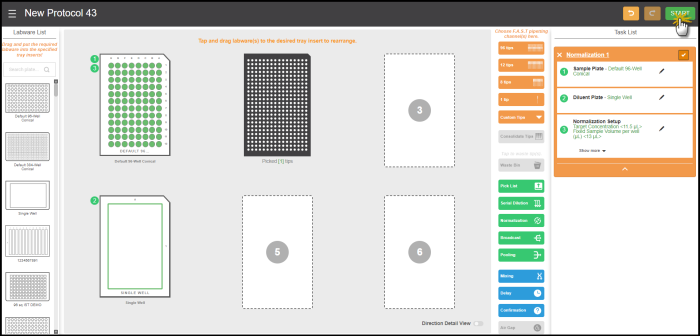
Normalization Task Execution
Related Topics:
|
|

|
| FAOWH-V130R024
|
|
 . A pop up message will appear to give you two options of Normalization. Please select one Normalization type by clicking on the option.

 button to locate and upload the .CSV file.


 or Redo
 button located on the top right section of the page.
