If you have externally generated experiment designs saved as .CSV files, (either volume or concentration data) you can easily load them into the MANTIS software using the Import Dispense Data feature. There are three support layouts: Well Name Based, Reagent Name Based, and Well Name Based With Delay and Priority. MANTIS will convert your .CSV file into a dispense list and allow you to edit each of the experiment parameters, if necessary. When you have finished editing the parameters, you can save your work as a protocol to be used for future dispenses. Protocols generated from .CSV files even allow reloading of updated data after saving. To access the Import Dispense Data wizard, go to the File menu and select the Import Dispense Data option.
Note: MANTIS also provides a .CSV sample file for each dispense data option. To show or download the file, click the link under the option name. Then, select the available application to open it, and click OK. If needed, you can modify the data in the .CSV sample file and save the modified file with a different name to keep the original version. To continue, minimize or close the window, then click Next.
Import Dispense Data Option
Select from the following options to learn how to import your .CSV file for dispense using the MANTIS.
Well Name Based format organizes the dispense information with data arranged in rows, with one row per well/reagent combination. This allows you to omit well/reagent combinations with 0 for target volume.
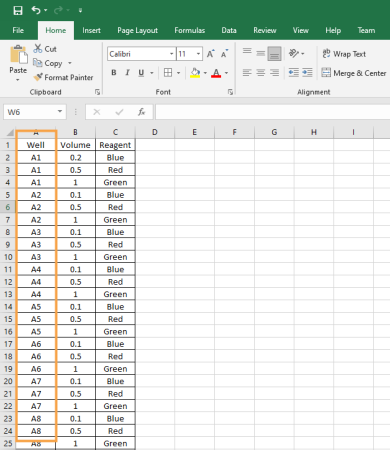
Well Name Based Example Shown in Microsoft Excel
Go to the File menu, and select Import Dispense Data on the Import Dispense Data menu.
Select Well Name Based and click Next.
Note: If you want to see or use the .CSV sample file, click Click here to show the Well Name Based .CSV sample file. Then, select an application to open the file, and click OK. If needed, you can modify the Well, Volume, and Reagent values in the .CSV sample file. To keep the original version, save the modified file with a different name. To continue, you can either minimize or close the window, then click Next.
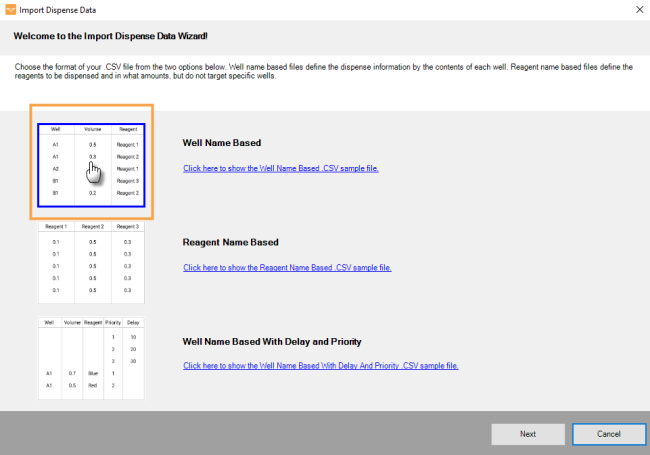
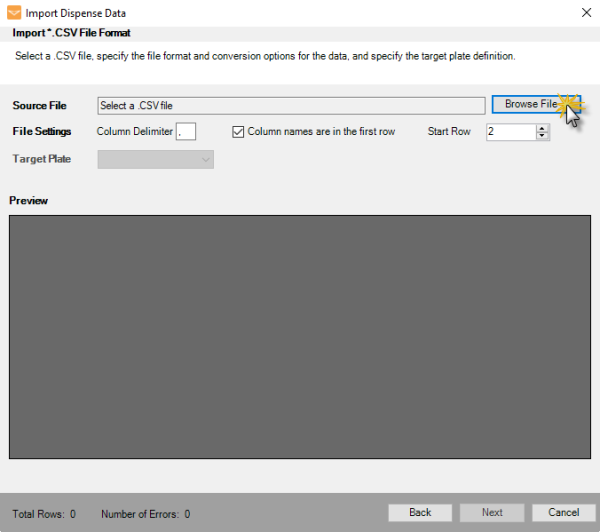
Selecting the Well Name Based File Format
Click the Browse File... button next to the Source File box and locate the file you want to import.
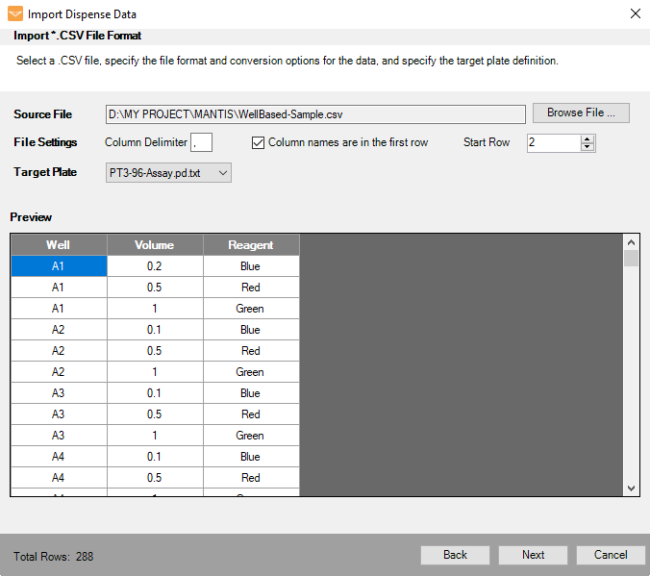
Modifying the File Settings
In the File Settings option:
The Column Delimiter determines the separator between values in the .CSV file. Type the separator used in your file.
If your .CSV file has a header and the column names are in the first row, select the Column names are in the first row box. If not, deselect the option.
Select or type the row number you want to start importing data from in the Start Row box (typically the first data row).
In the Target Plate option, select the plate type you want to use for dispense from the plate list and then click Next.
Select from one of the options below:
Concentration Data: If your current data is a list of concentration values, select this option to convert it to volume, and then proceed to step 7.
Volume (μL) Data: If your current data is a list of volumes in μL, select this option and proceed to step 8.
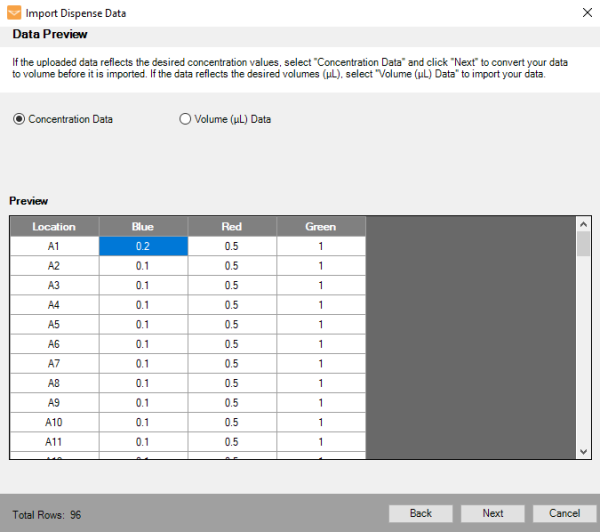
Data Preview Options
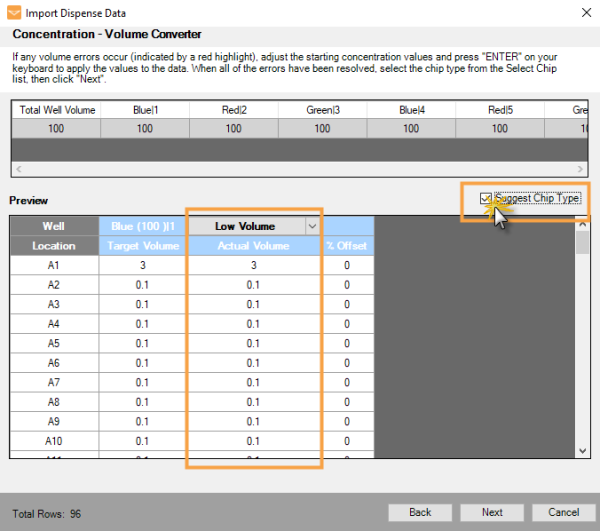
Input the Total Well Volume (μL) and the stock concentration values of each reagent, then hit the Enter key on your keyboard to apply the values. The Converted Data table will display the updated volumes in microliters (μL). Click Next to select the chip type for your reagents.
Note: If one or more items in the converted data are highlighted in red, the stock concentration is not suitable for delivering one or more of the well volumes without overfilling the well(s). Adjust the stock concentration value and try again.
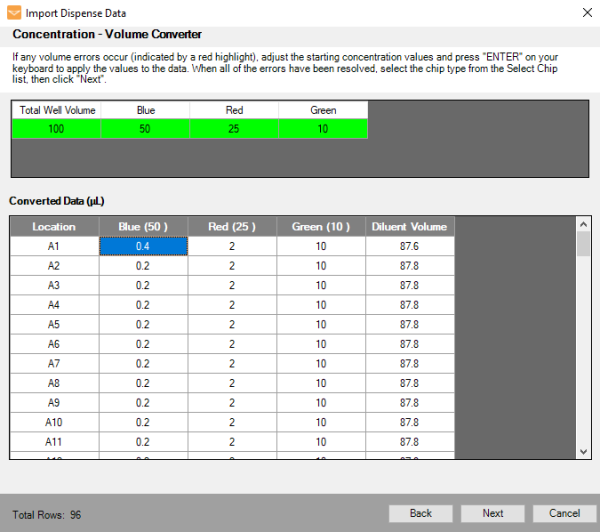
Concentration - Volume Converter
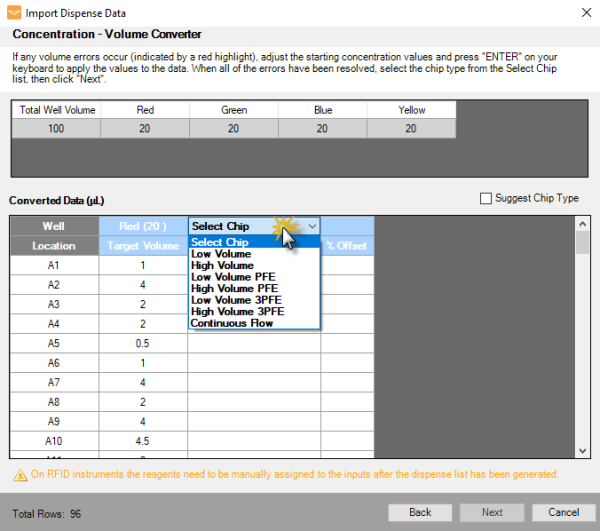
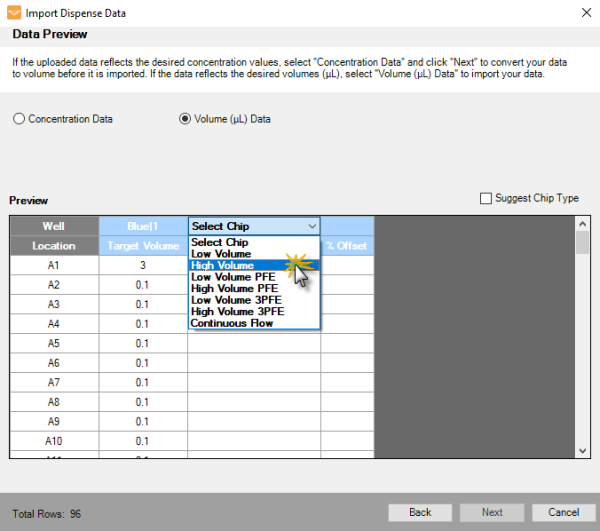
Click the Chip Type drop-down list and select the desired chip type (Low Volume, High Volume, or Continuous Flow) that you want to use. The table columns to help you make an informed choice:
Target Volume: The result calculated by the concentration to volume converter.
Actual Volume: The actual volume that can be achieved with the selected chip.
% offset: The difference between the Target Volume and the Actual Volume, expressed as a percentage.
Note: For Continuous Flow chip, when the target volume is lower than 5 μL, the actual volume will display the error volume in red. For more information, see the FORMULATRIX Chip Specification.
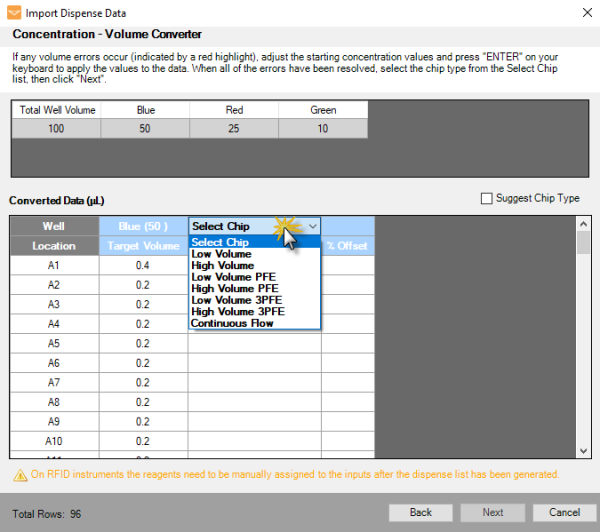
Select Chip Type Options
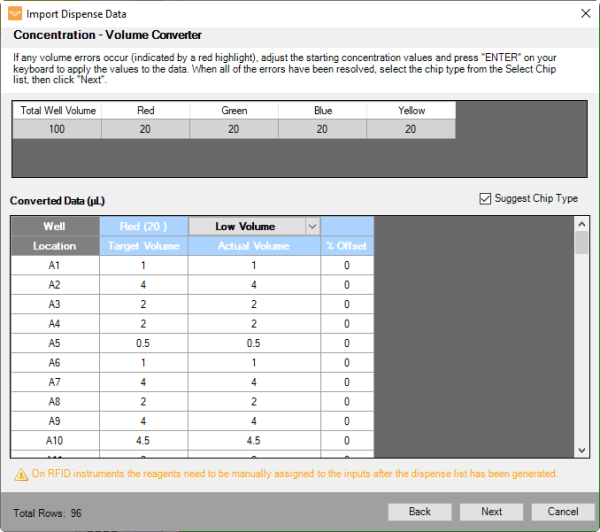
Note: You can also select the Suggest Chip Type option on the right corner of the Converted Data (μL) panel, which enables MANTIS to suggest a chip type for each reagent, based on the volume data, while maximizing speed and minimizing error.
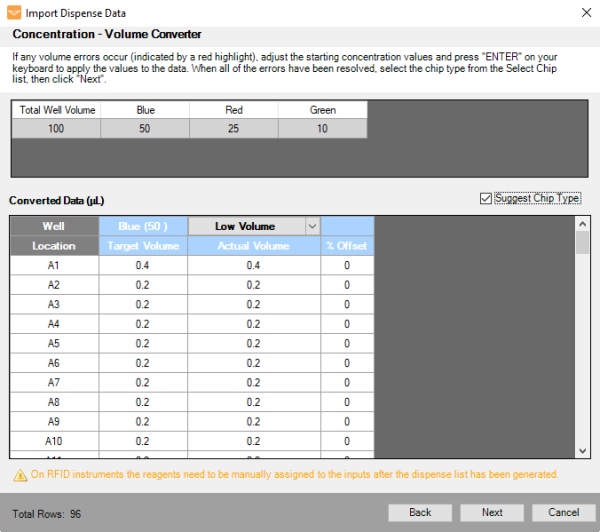
Suggest Chip Type Option
Click Next to select chip types for the other reagents and the diluent. When you are done selecting the chip types for all reagents, click Next.
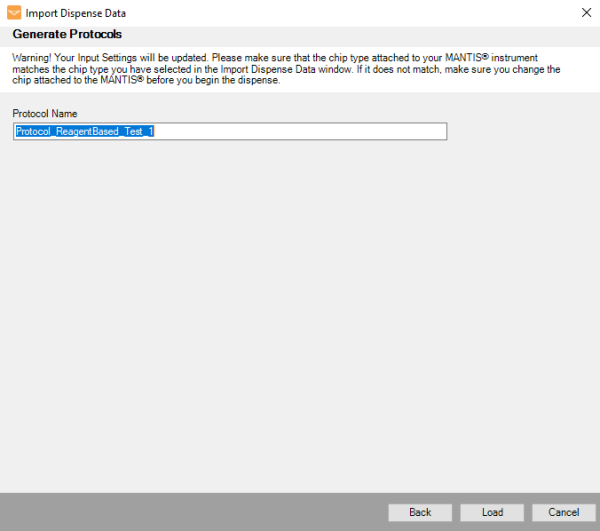
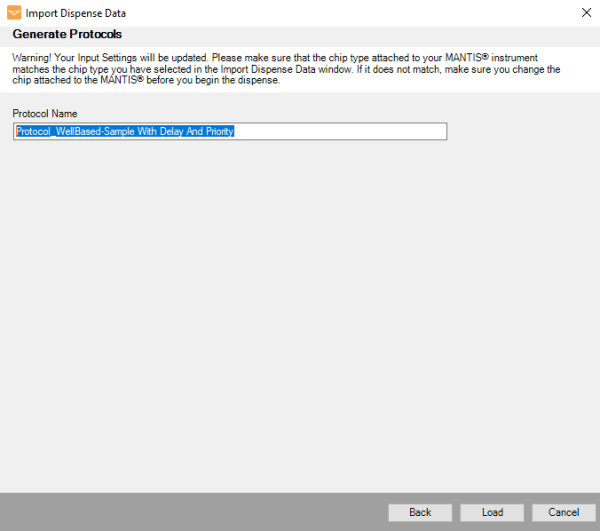
To save your settings as a protocol, type a descriptive name in the Protocol Name box. Your new protocol will be added to the MANTIS Protocol List database, which you can access from the Load option under the File and Protocols menus. To learn more about protocols, see Creating and Using Protocols.
Note: You will not be able to modify a saved protocol via the Import Dispense Data wizard if you re-open it after you close the MANTIS software. All the choices you made during the import process will be lost, and you will have to start over again.
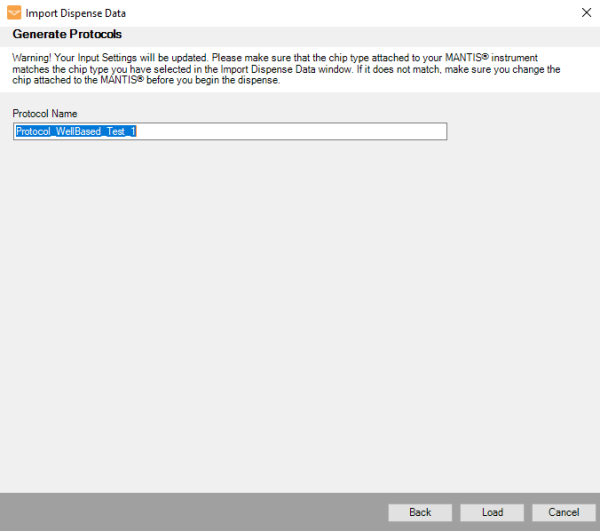
The Protocol Name
Then, click the Load button to load the data into a Dispense List.
Note: If you choose a Continuous Flow chip and you have not calibrated your reagents, the MANTIS Continuous Flow calibration window will appear after you click the Load button. Follow the on-screen instructions to calibrate your chips. For more information, see Calibrating Continuous Flow Chips.
OPTIONAL: Go to the File menu, and select Import Dispense Data if you are not satisfied with the way your current your experiment was imported. The software will remember the choices you have made during the import process and allow you to modify them as necessary. This option is applicable only if you have not restarted the MANTIS software.
Click the Run Dispense button .
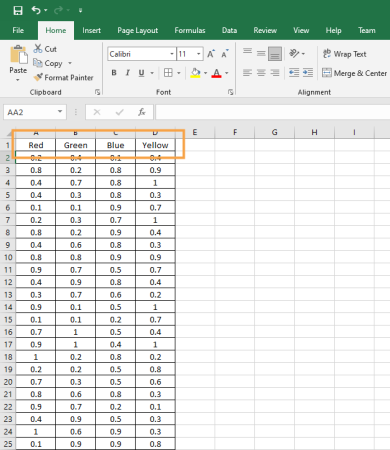
Reagent Name Based format defines what reagents are to be dispensed and in what amounts without referencing specific well names. A Reagent Name Based file arranges its data in columns, with one reagent per column and one row per well.
Reagent Name Based Example Shown in Microsoft Excel
Go to the File menu, and select Import Dispense Data on the Import Dispense Data menu.
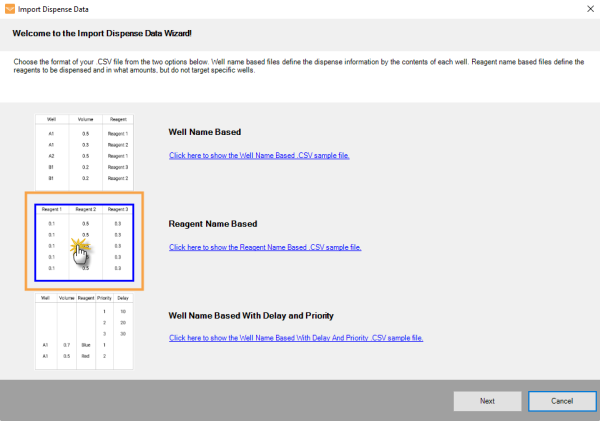
Select Reagent Name Based and click Next.
Note: If you want to see or use the .CSV sample file, click Click here to show the Reagent Name Based .CSV sample file. Then, select the available application to open the file, and click OK. If needed, you can modify the reagent data values in the .CSV sample file. To keep the original version, save the modified file with a different name. To continue, you can either minimize or close the window, and click Next.
Selecting the Reagent Name Based File Format
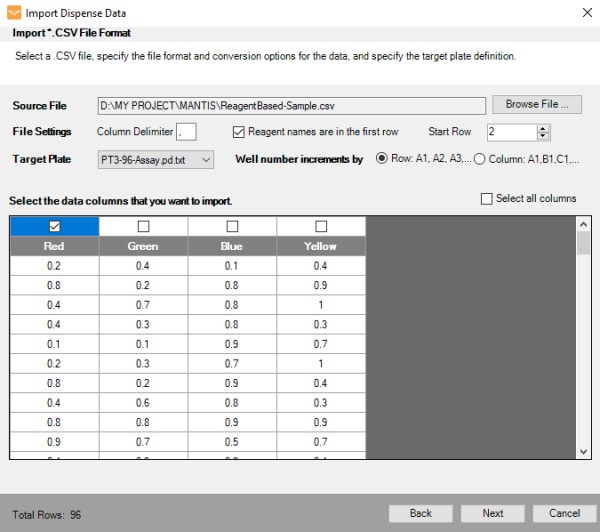
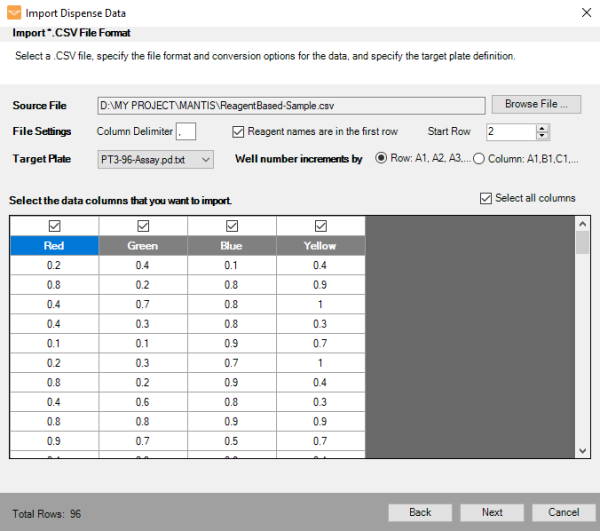
Click the Browse File... button next to the Source File box and locate the file you want to import.
Modifying the File Settings
In the File Settings option:
The Column Delimiter determines the separator between values in the .CSV file. Type the separator used in your file.
If your reagent names are in the first row, select the Reagent names are in the first row box. If not, deselect the option.
Select or type the row number you want to start with in the Start Row box.
In the Target Plate option:
Select the plate type you want to use for dispense from the plate list.
Determine the well numbering convention by selecting either the Well number increments by Row: A1, A2, A3 or by Column A1, B1, C1 option.
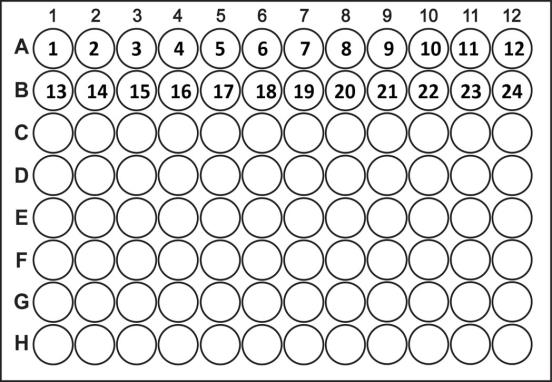
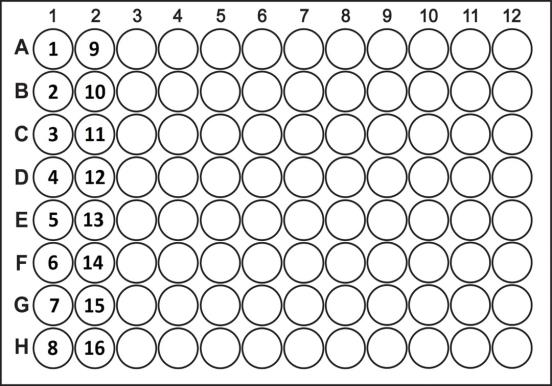
Well increments by Row: A1, A2, A3 means that the wells in your plate design are numbered left-to-right in rows. For example, wells A1 through A12 are numbered 1 to 12 and are represented by the first 12 data rows of your .CSV file. Wells B1 through B12 are numbered 13 to 24 and so on.
Well Number Incrementing by Row
Well increments by Column: A1, B1, C1 means the wells in your plate design are numbered top-to-bottom in columns. For example, wells A1 through H1 are numbered 1 to 8 and are represented by the first 8 data rows of your .CSV file. Wells the next column A2 through H2 are numbered 9 to 16 well, and so on.
Well Number Incrementing by Column
You can select one or several reagent data columns to be imported from the .CSV by checking the boxes above the columns in the table. To select all reagents at once, check the Select all columns box at the upper-right corner of the table. Click Next to proceed.
Note: You cannot proceed to the next step until you have selected one or several reagents in the Select data columns to be imported table. You can always go back to this table to modify your reagent selection if you haven’t closed the Import Dispense Data wizard.
Selecting All Reagents at Once
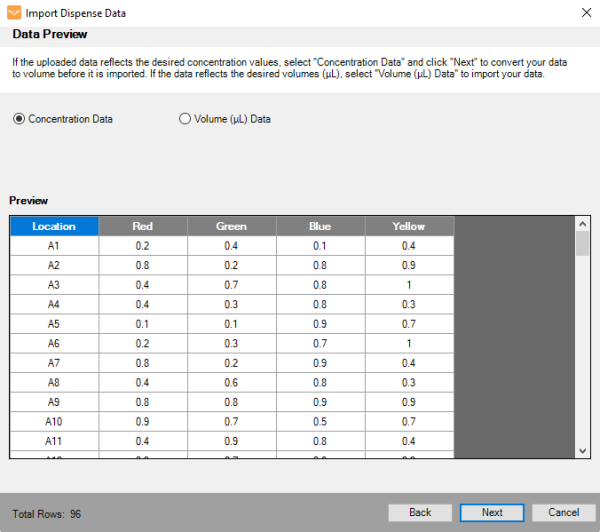
Select from one of the options below:
Concentration Data: If your current data is a list of concentration values, select this option to convert it to volume, and then proceed to step 9.
Volume (μL) Data: If your current data is a list of volumes in μL, select this option and proceed to step 10.
Data Preview Options
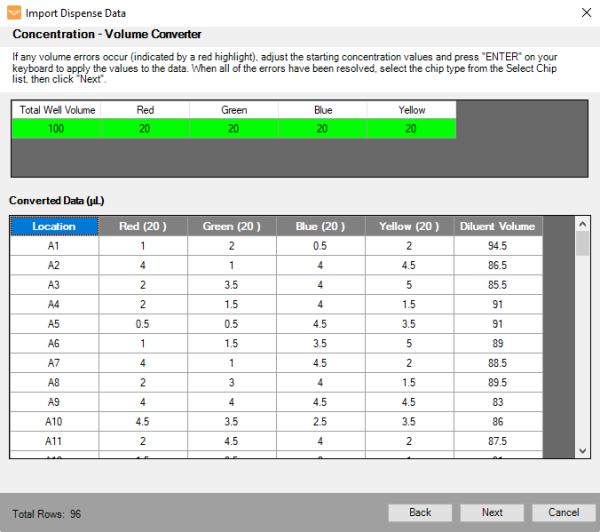
Input the Total Well Volume (μL) and the stock concentration values of each reagent, then hit the Enter key on your keyboard to apply the values. The Converted Data table will display the updated volumes in microliters (μL). Click Next to select the chip type for your reagents.
Note: If one or more items in the converted data are highlighted in red, the stock concentration is not suitable for delivering one or more of the well volumes without overfilling the well(s). Adjust the stock concentration value and try again.
Concentration - Volume Converter
Click the Chip Type drop-down list and select the desired chip type (Low Volume, High Volume, or Continuous Flow) that you want to use. The table columns to help you make an informed choice:
Target Volume: The result calculated by the concentration to volume converter.
Actual Volume: The actual volume that can be achieved with the selected chip.
% offset: The difference between the Target Volume and the Actual Volume, as a percentage.
Note: For Continuous Flow chip, when the target volume is lower than 5 μL, the actual volume will display the error volume in red. For more information, see the FORMULATRIX Chip Specifications.
Select Chip Type Options
Note: You can also select the Suggest Chip Type option on the right corner of the Converted Data (μL) panel, which enables MANTIS to suggest a chip type for each reagent, based on the volume data, while maximizing speed and minimizing error.
Suggest Chip Type Option
Click Next to select chip types for the other reagents and the diluent. When you are done selecting the chip types for all reagents, click Next.
To save your settings as a protocol, type a descriptive name in the Protocol Name box. Your new protocol will be added to the MANTIS Protocol List database, which you can access from the Load option under the File and Protocols menus.
Note: You will not be able to modify a saved protocol from the Import Dispense Data wizard if you re-open it after you close the MANTIS software.
Type the Protocol Name
Then, click the Load button to load the data into a Dispense List.
Note: If you choose a Continuous Flow chip and you have not calibrated your reagents, the MANTIS Continuous Flow calibration window will appear after you click the Load button. Follow the on-screen instructions to calibrate your chips. For more information, see Calibrating Continuous Flow Chips.
OPTIONAL: Go to the File menu, and select Import Dispense Data if you are not satisfied with the way your current experiment was imported. The software will remember the choices you have made during the import process and allow you to modify them as necessary. This option is applicable only if you have not restarted the MANTIS software.
Click the Run Dispense button .
Well Name Based With Delay and Priority format organizes the dispense information with data arranged in rows, with one row per well/reagent and dispense priority combination. Using this data format, you can also set up dispense priority and delay. The dispense delay column specifies delay duration (in seconds) during dispense for each predefined priority. While the dispense priority column specifies the reagent priority during dispense, especially if one well requires multiple reagents and/or the same reagent to be dispensed at different priorities. Like the Well Name Based format, this also allows you to omit well/reagent combinations with 0 for target volume.
Well Name Based With Delay and Priority Example Shown in Microsoft Excel
Go to the File menu, and select Import Dispense Data on the Import Dispense Data menu.
Select Well Name Based With Delay and Priority and click Next.
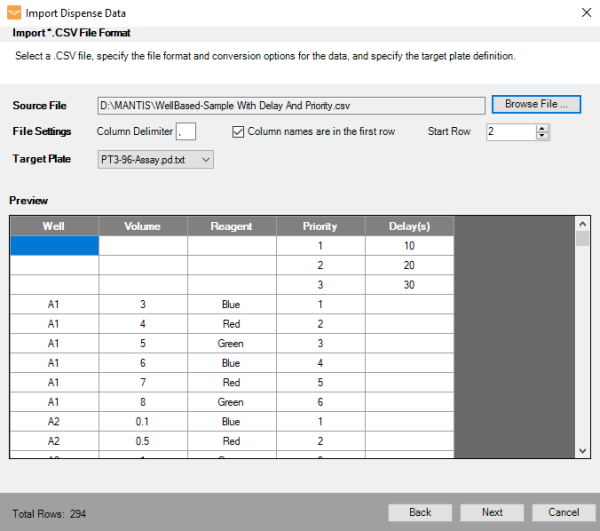
Click the Browse File button next to the Source File box and locate the file you want to import.
Click the Browse File Button
In the File Settings option:
The Column Delimiter determines the separator between values in the .CSV file. Select this box and type the separator used in your file.
If your .CSV file has a header and the column names are in the first row, select the Column names are in the first row box. If not, deselect the option.
Select or type the row number you want to start importing data from in the Start Row box (typically the first data row).
.CSV File Has Been Loaded
In the Target Plate option, select the plate type you want to use for dispense from the plate list and then click Next.
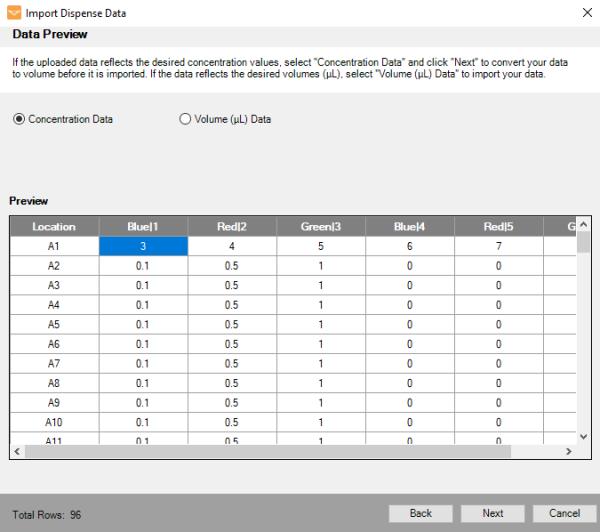
Select from one of the options below:
Concentration Data: If your current data is a list of concentration values, select this option to convert it to volume, and then proceed to step 7.
Concentration Data Preview
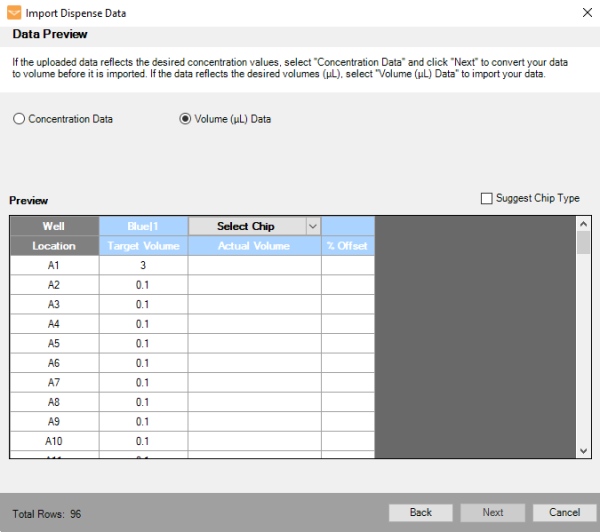
Volume (μL) Data: If your current data is a list of volumes in μL, select this option and proceed to step 8.
Volume (μL) Data Preview
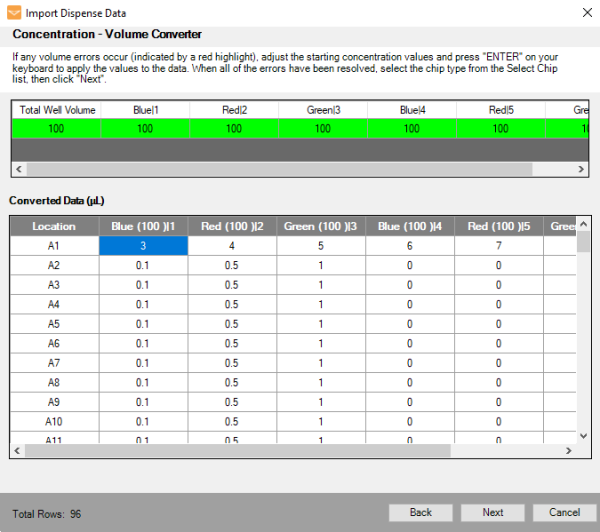
Input the Total Well Volume (μL) and the stock concentration values of each reagent, then hit the Enter key to apply the values. The Converted Data table will display the updated volumes in microliters (μL). Click Next to select the chip type for your reagents.
Note: If one or more items in the converted data are highlighted in red, the stock concentration is not suitable for delivering one or more of the well volumes without overfilling the well(s). Adjust the stock concentration value and try again.
Concentration - Volume Converter
Click the Chip Type drop-down list and select the desired chip type (Low Volume, High Volume, or Continuous Flow) that you want to use. The table columns to help you make an informed choice:
Note: For Continuous Flow chip, when the target volume is lower than 5 μL, the actual volume will display the error volume in red. For more information, see the FORMULATRIX Chip Specification.
Select Chip Type Options
Note: You can also select the Suggest Chip Type option on the right corner of the Converted Data (μL) panel, which enables MANTIS to suggest a chip type for each reagent, based on the volume data, while maximizing speed and minimizing error.
Suggested Chip Type Options
Click Next to select chip types for the other reagents and the diluent. When you are done selecting the chip types for all reagents, click Next.
To save your settings as a protocol, type a descriptive name in the Protocol Name box. Your new protocol will be added to the MANTIS Protocol List database, which you can access from the Load option under the File and Protocols menus. To learn more about protocols, see Creating and Using Protocols.
Note: You will not be able to modify a saved protocol via the Import Dispense Data wizard if you re-open it after you close the MANTIS software. All the choices you made during the import process will be lost, and you will have to start over again.
The Protocol Name
Then, click the Load button to load the data into a Dispense List.
Note: If you choose a Continuous Flow chip and you have not calibrated your reagents, the MANTIS Continuous Flow calibration window will appear after you click the Load button. Follow the on-screen instructions to calibrate your chips. For more information, see Calibrating Continuous Flow Chips.
OPTIONAL: If you are not satisfied with the way your current experiment was imported, go to the File menu, and select Import Dispense Data. The software will remember the choices you have made during the import process and allow you to modify them as necessary. This option is applicable only if you have not restarted the MANTIS software.
Click the Run Dispense button .
MAOWH-V47R722 |