Seeding Experiments
A seeding experiment is where you utilize crystal fragments from previous experiments to help with the crystallization process. You can dispense your seeding experiments with NT8 by mixing the ingredients during the aspirate process to suspend the seeds in the source liquid, and then proceed to dispense as normal. There are two ways to work with seeding experiments in NT8: either by designing your experiment first in ROCK MAKER, or working directly with the NT8 Control Software. In this section, you will learn about:
Seeding Experiment with ROCK MAKER Integration
You can create a seeding experiment in ROCK MAKER and dispense it with the NT8.
Prerequisites
You are running ROCK MAKER version 3.10 or newer.
You have created a seeding experiment in ROCK MAKER. Please refer to the “Creating a Seed and Adding a Seeding Layer” section of the ROCK MAKER help file.
Dispensing ROCK MAKER Seeding Experiments with the NT8
Go tothe ROCK MAKER Integration view.
Type your experiment barcode number under any of the available Plate Stations or scan the barcode with a barcode scanner (if it is available). After the barcode is validated, the ROCK MAKER Experiment Properties Panel populates.
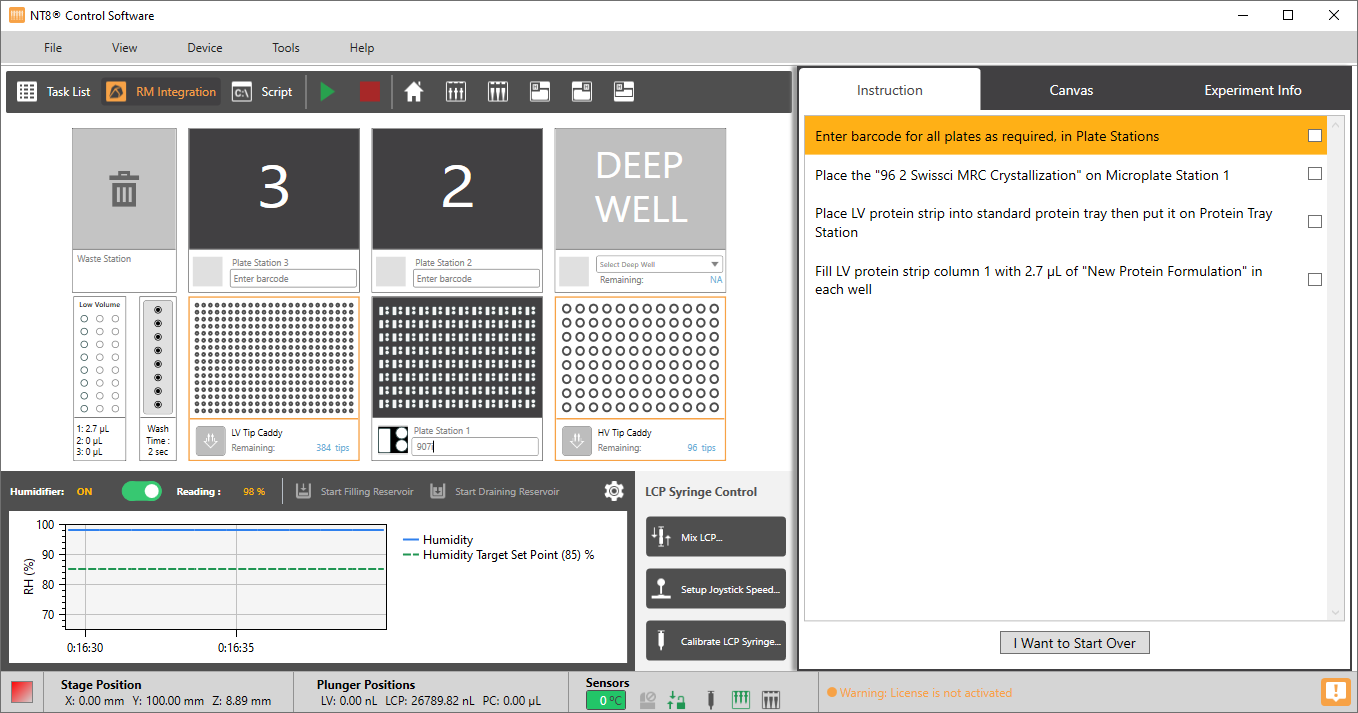
ROCK MAKER Experiment Properties Panel Populates
Warning
The ROCK MAKER Experiment Properties Panel displayed in NT8 is based on the preferences that you have defined in ROCK MAKER. You can still modify and edit dispense-related settings on the Experiment Info tab if necessary. However, if you modify these settings in NT8, ROCK MAKER will not be able to mark your experiment as “dispensed”. You will have to manually update your experiment in ROCK MAKER after it has been dispensed.
Next, follow the on-screen instructions presented on the Instructions tab. The instructions tell you to do some hardware preparations. For example, you may be told to place the 96 2 ArtRobbins IntelliPlate on Plate Station 1, place the protein tray on the protein tray station, install microplates on the microplate stations, etc. For more information, please read ROCK MAKER Integration view.
Select all of the check boxes to confirm that you have completed all of the required instructions, as shown in the picture below.
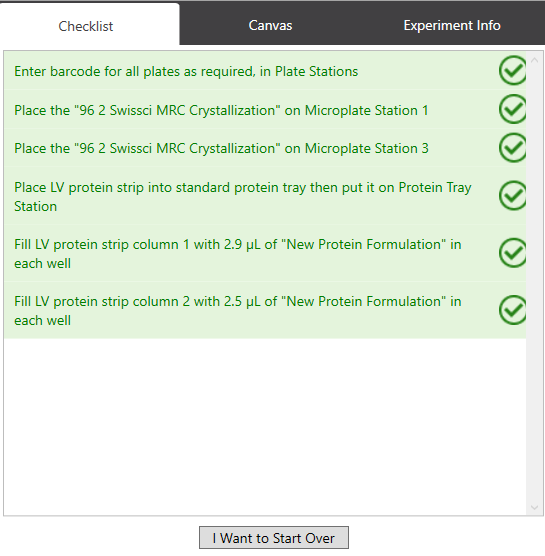
List of Instructions On the Instructions Tab
When the notification message appears, click Yes to continue. Then follow the on-screen instructions.
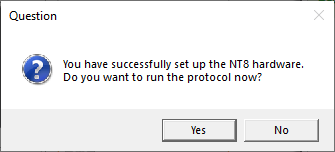
Click Yes To Run the Protocol
Seeding Experiment without ROCK MAKER Integration
You can also create a seeding experiment directly from the NT8 Control Software.
Prerequisites
You are running NT8 Control Software version 2.8 or newer.
You have placed your plate(s) on the same Plate station(s) similar to the physical setup.
Dispensing ROCK MAKER Seeding Experiments with the NT8
Mimic the NT8’s physical setup with the software, For example if you placed your experiment plate on the Plate Station 1, then click the downward arrow under Plate Station 1 on the software.
Select the associated plate type from the Plate Selection window.
Right-click on the LV Tip Caddy and select Pick Tip.
Click the Add Repeat Task button
 in the Task List
panel to mark the beginning of tasks you will repeat on each column
of your plate.
in the Task List
panel to mark the beginning of tasks you will repeat on each column
of your plate.Then, wash the LV Tip. For seeding experiments it is important to keep the tip clean.
Right-click on the Protein Source Station and select Aspirate/Dispense.
OR
Double-click the Protein Source Station to open the Task Details window.
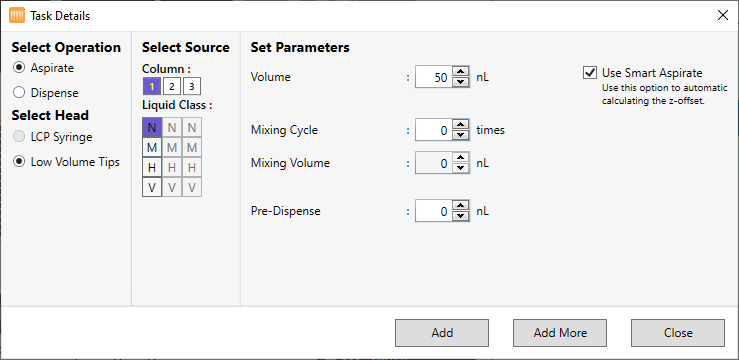
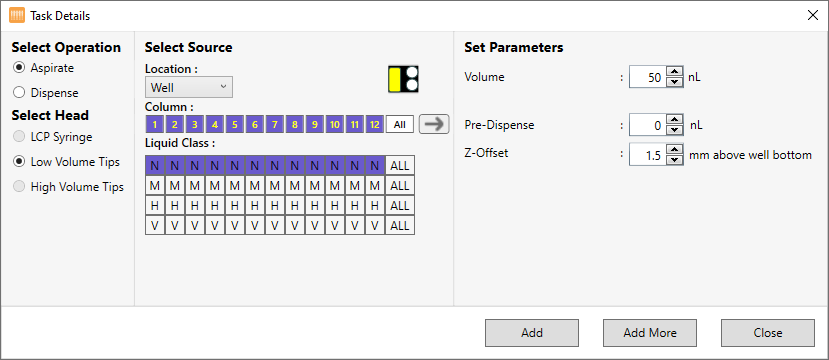
Task Details Window
Under Select Operation, select Aspirate. The Low Volume Tips under Select Head is automatically selected.
Under Column, select the column of the protein tray you want to aspirate the seed from. In this example Column 1 is used.
Select a Liquid Class from the Liquid Class list.
Type the volume to be aspirated in the Volume box.
Note
The minimum required volume is 50 nL. Contact support@formulatrix.com to enable dispense for volumes lower than 50 nL. Setting the volume lower than 50 nL will affect the dispense volume accuracy.
Type how many times you want the aspirated liquid to be mixed in the Mixing Cycle box.
Important
You are required to mix the seeds during aspiration for at least one mixing cycle to ensure that the seeds do not settle at the bottom of the tray.
Type the desired mixing volume in the Mixing Volume box.
OPTIONAL: Set the additional volume to be aspirated after aspirating the targeted volume in the Pre-Dispense box.
OPTIONAL: You may opt for Custom Aspirate to determine the tip height during an aspiration task. However, we recommend that you use Smart Aspirate so the tip height will automatically adjust to the remaining volume in the protein tray. Smart Aspirate is enabled by default.
Click Add to proceed. The task you have just created will appear in the Task List panel.
Right-click on your plate and select Aspirate/Dispense to dispense the seed to the drops.

Task Details Window
Under Select Operation, select Dispense. The Low Volume Tips under Select Head is automatically selected.
Under Location drop-down list, select a drop location you want to dispense the seed into. In this example, Drop 1 is selected. The selected location is highlighted in yellow.

Selecting Target Area
Under Column, select the columns you want to dispense to.
Select a liquid Ccass from the list.
Next to Volume, enter the volume to be dispensed.
If you want the NT8 to mix your solution, enter the desired number of mixing cycles next to Mixing. Mixing is not required for dispense.
Next to Z-Offset, you may choose to let the NT8’s Flexible Fingers determine the dispense height (recommended), or manually specify the distance you want the fingers to stop at before dispensing.
Click Add to continue.
Then, double-click the Wash Station to add the wash tip command. For seeding experiments it is important to keep the tips clean.
After you wash the tip, aspirate the protein sample by double-clicking the Protein Tray Station.

Task Details Window
Under Select Operation, select Aspirate. The Low Volume Tips under Select Head is automatically selected.
Under Column, select the column you want to aspirate the protein from. In this example column 2 is selected.
Select a liquid class from the list.
Type the volume to be aspirated in the Volume box.
Note
The minimum required volume is 50 nL. Contact support@formulatrix.com to enable dispense for volumes lower than 50 nL. Setting the volume lower than 50 nL will affect the dispense volume accuracy.
If desired, type the mixing volume into the Mixing Volume box and the number of mixing cycles into the Mixing Cycle box.
Important: It is not recommended to mix proteins, because it can increase the dead volume.
Set the additional volume to be aspirated after aspirating the targeted volume in the Pre-Dispense box.
OPTIONAL: You may opt for Custom Aspirate to determine the tip height during an aspiration task. However, we recommend that you use Smart Aspirate so the tip height will automatically adjust to the remaining volume in the protein tray. Smart Aspirate is enabled by default.
Click Add to proceed. The task you have just created will appear in the Task List panel.
After that, right-click on your plate and select Aspirate/Dispense to aspirate your well solution.
Task Details Window
Under Select Operation, select Aspirate. The Low Volume Tips under Select Head is automatically selected.
Under Location drop-down list, select Well. The selected location is highlighted in yellow.

Selecting Target Area
Under Column, select the columns you want to aspirate from.
Select a liquid class from the list.
Next to Volume, enter the volume to be aspirated.
Note
The minimum required volume is 50 nL. Contact support@formulatrix.com to enable dispense for volumes lower than 50 nL. Setting the volume lower than 50 nL will affect the dispense volume accuracy.
Set the extra volume to be aspirated after aspirating the targeted volume in the Pre-Dispense box.
Next to Z-Offset, you can specify the distance you want the fingers to stop at before dispensing, or use the default recommended height, which automatically appears in the box.
Click Add.
Right-click on your plate and select Aspirate/Dispense to dispense the protein and well solution into the drop location on the microplate.

Task Details Window
Under Select Operation, select Aspirate. The Low Volume Tips under Select Head is automatically selected.
Under Location drop-down list, select Drop 1. The selected location is highlighted in yellow.
Selecting Target Area
Under Column, select the columns you want to dispense to.
Select a liquid class from the list.
Next to Volume, enter the volume to be dispensed.
If you want the NT8 to mix your solution, enter the desired number of mixing cycles next to Mixing. Mixing is not required for dispense.
Next to Z-Offset, you may choose to let the NT8’s Flexible Fingers determine the dispense height (recommended), or manually specify the distance you want the fingers to stop at before dispensing.
Click End Repeat in the Task List to stop the repetition of the above tasks.
Add the Dispose Tip command to the Task List by clicking the Waste Station image. Your Task list will look like this:
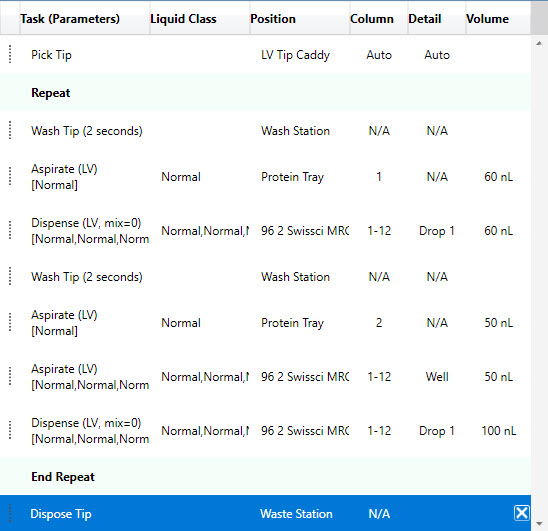
Seeding Experiment Task List
OPTIONAL: Save your Task List by clicking the Save Task List button
 .
.
OR
Click the File menu and select Save Task List.
Add well solution to the plate wells using a hand pipette.
Add the seed solution to column 1 of the protein tray using a hand pipette.
Add the protein to column 2 of the Protein Block using a hand pipette.
Click the Run Task List button
 to execute the Task List.
Related Topics