Sitting Drop Experiments
Follow the steps below to set up and run a Sitting Drop experiment. There are four overall steps:
Power On the NT8 and Start the Software
Connect the NT8 to your computer using the USB cable.
Find the power switch located on the back-right of the NT8 and turn it on.
Double-click the NT8 icon on your computer’s desktop. It will take a few moments for the NT8 Control Software to load while the NT8 initializes. The instrument indicator on the bottom-left corner of the software will turn green when the NT8 is connected and ready to use.
After that, proceed to Set Up the NT8 Hardware.
Set Up the NT8 Hardware
Place the tip caddy and the microplate on the NT8.
Place the protein tray on the protein block, and put the protein tray clamp on top of the protein tray to hold it in place. You will add the protein sample to the protein block after you set up the software.
Option 1: Set up the Software with the Sitting Drop Template
A Sitting Drop experiment setup template is pre-installed with your software. You may use it if you plan to combine 100 nL well solution with 100 nL protein for a total dispense volume of 200 nL. You can also modify these volumes by double-clicking the item on the task list. However, you must use the MRC 2 Well Crystallization plate.
To use this template:
Click the Open Task List button
 in the Task List panel.
OR
Click the File menu and select Load Task List.
Open the Sample folder and select the Sitting Drop MRC2 100 nL Protein and 100 nL Well Solution task list.
Click Open.
OPTIONAL: If you need to change the aspirate or dispense volumes, double-click the task in the Task List panel and edit the volume.
Once you make sure everything is all set, click the Run Task List button
 to execute the Task List.
Option 2: Manually Set Up the NT8 Software
To manually set up the NT8 software:
Mimic the NT8’s physical setup with the software. For example, if you put the microplate on plate station 1 in the hardware, then click the downward arrow under the same plate station on the software.
Select the appropriate plate from the Plate Selection window.
Add the Pick Tip command to the Task List by double-clicking the LV Tip Caddy image.
Click the Add Repeat Task button
 in the Task List
panel t to mark the beginning of tasks you will repeat on each column
of your plate.
in the Task List
panel t to mark the beginning of tasks you will repeat on each column
of your plate.Add the Wash Tip command to the Task List by double-clicking the Wash Station image.
Now you’ll begin adding aspirate and dispense commands. First, tell the NT8 to aspirate from your protein source by adding an aspirate command.
Double-click the Protein Source image to display the Task Details window, as shown below.
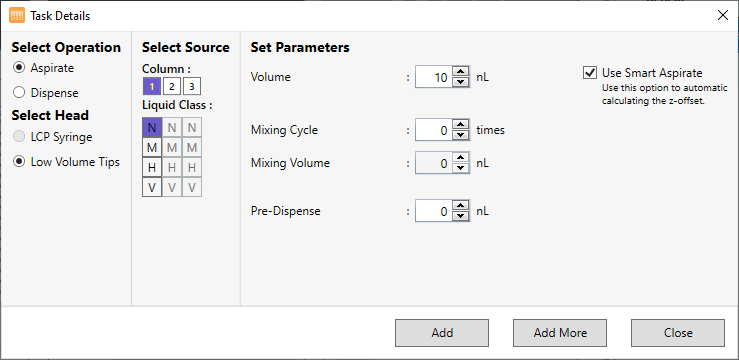
Task Details Window
Under Select Operation, select Aspirate. The Low Volume Tips in the Select Head option is automatically selected.
Next to Column, select the column you want to aspirate the protein from.
Select a liquid class from the Liquid Class list.
Next to Volume, type in the volume you want to aspirate.
OPTIONAL: Type the number of times you want the protein to be mixed in the Mixing Cycle box.
OPTIONAL: Set the volume in nL you want to be mixed in the Mixing Volume box.
OPTIONAL: Set the additional volume in nL to be aspirated after aspirating the targeted volume in the Pre-Dispense box.
If you are finished adding commands for that plate, click Add. If you want to create another aspirate task, click Add More.
Now you’ll tell the NT8 to aspirate your well solution.
Double-click the microplate image to open the Task Details window.
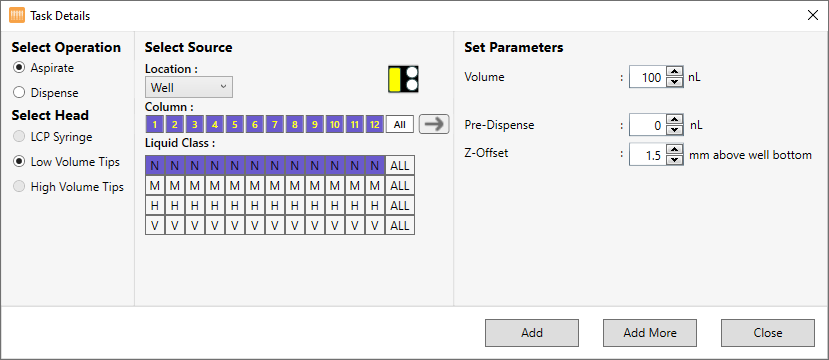
Task Details Window
Under Select Operation click Aspirate. The Low Volume Tips in the Select Head option is automatically selected.
Under Location drop-down list, select Well. The selected location is highlighted in yellow.

Selecting Target Area
To select multiple columns, click the first desired column, then hold the Shift key and click the last desired column.
Select a Liquid Class from the liquid class list.
Set the volume to be aspirated in the Volume box.
OPTIONAL: Set the additional volume to be aspirated after aspirating the targeted volume in the Pre-Dispense box.
Next to Z-Offset, determine the height in mm at which the tip stops before aspirating.
If you are finished adding commands for that plate, click Add. If you want to dispense to drop locations on this plate, click Add More.
Instruct the NT8 to dispense the protein and well solution mixture to the drop location on the microplate.
If you clicked Add More in the last step, the Task Details window remains open. If not, double-click the microplate image again to open it.
Under Select Operation, click Dispense.
Under Location drop-down list, select Drop 1. The selected location is highlighted in yellow.

Selecting Target Area
Next to Column, select the columns you want to dispense to.
Select a Liquid Class from the liquid class list.
Next to Volume, enter the volume to be dispensed. If you want the NT8 to mix your solution, type the number of mixing cycles next to Mixing (optional).
Next to Z-Offset, you may choose to let the NT8’s Flexible Fingers determine the dispense height (recommended), or manually specify the distance you want the fingers to stop at before dispensing.
If you are finished adding commands for that plate, click Add. If you want to create more dispense tasks to this plate, click Add More.
Click End Repeat in the Task List to select it.
Add the Dispose Tip command to the Task List by clicking the Waste Station image.
OPTIONAL: Save your Task List by clicking the Save Task List button
 .
.OR
Click the File menu and select Save Task List. Your task list will look like this.
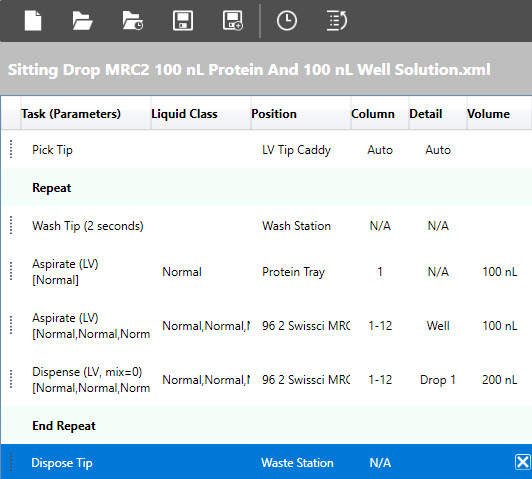
Sitting Drop Task List
Add Protein to the Protein Block
There are two ways you can add the protein sample to the protein block. Follow step 1 to pipette the sample manually and follow step 2 to tell the NT8 to dispense the protein sample using an LCP syringe.
Using a hand pipette, pipette the protein to be used in the sitting drop experiment into the protein block.
Run the Sitting Drop Dispense
Click the Run Task List button to execute the Task List.
The NT8 picks up the LV tips, washes them, aspirates from the protein
block, aspirates from the wells in the microplate, and then dispenses to
the drop location. This process repeats for each column you specified
earlier. After the NT8 has completed the tasks for each column, it
disposes the tips in the waste station.
Related Topics