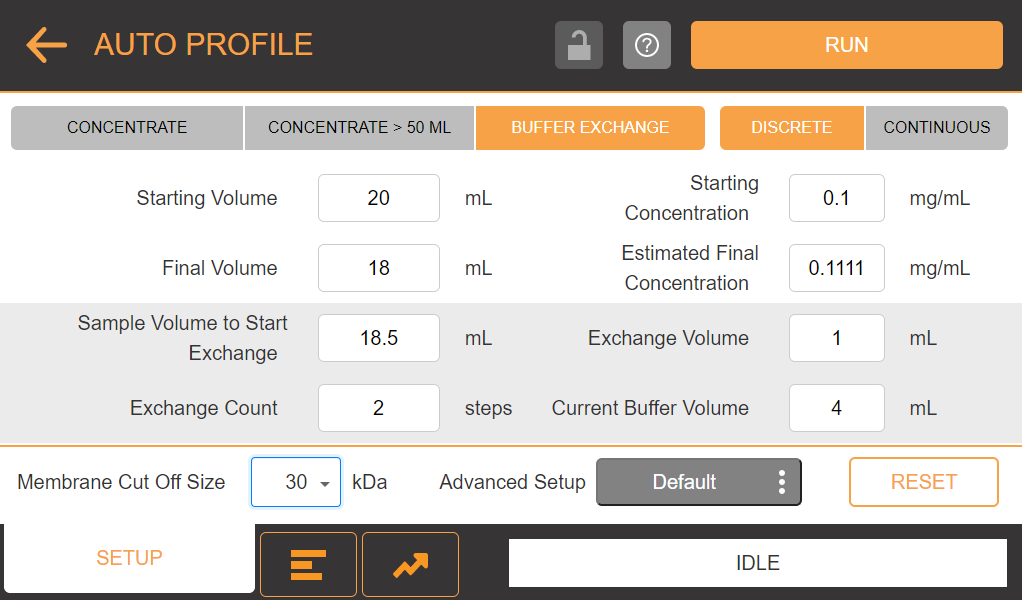
µPULSE allows you to create a profile consisting of desired experiment settings for concentrating sample or performing buffer exchange. The system tracks volume as it runs sequences based on the values you have entered when designing a profile.
To set up a new profile, tap AUTO PROFILE on the Home Screen. Then choose between these 3 options:
Tap the CONCENTRATE tab if you want to concentrate a sample 50 mL or less.
Tap the CONCENTRATE > 50 ML tab if you want to concentrate more than 50 mL of sample.
Tap the BUFFER EXCHANGE tab if you want to exchange buffer solution for another from the buffer (right) tube. The reagent type can be the same or different as the carrier reagent.

AUTO PROFILE Menu
Tip: Tap the Help button  to get acquainted with the software and learn about what you can do in the AUTO PROFILE menu.
On the Home Screen, open the AUTO PROFILE menu. The CONCENTRATE tab is selected by default.
Type the Starting Volume in mL and Starting Concentration in mg/mL based on the sample you’re using, and then type the desired Final Volume. The Estimated Final Concentration will be automatically generated after you have set the other values.
OPTIONAL: If you tapped the CONCENTRATE > 50 ML tab, type the volume in the Starting Volume of Tube 02 field. The default value in the 1st tube is 50 mL, but you can adjust it to your desired volume.
Select the membrane cutoff size that matches the chip you’re using from the Membrane Cutoff Size drop-down list.
OPTIONAL: Tap the Advanced Setup tab to configure advanced settings, such as pressure levels and pump timings, for each cycle. You can save the settings and load them for future use.
Once you make sure everything is all set, tap RUN. See Running a Profile for more details.
On the Home Screen, open the AUTO PROFILE menu and tap the BUFFER EXCHANGE tab.
Type the Starting Volume in mL and Starting Concentration in mg/mL based on the sample you’re using, and then type the desired Final Volume. The Estimated Final Concentration will be automatically generated after you have set the other values.
Note: When performing buffer exchange you cannot concentrate more than 50 mL.
Then select between these two options:
Select DISCRETE to diafiltrate in a certain number of steps determined by Exchange Count. For example, if you exchange 30 mL of buffer in 3 exchanges and start the buffer exchange at 20 mL, μPULSE will concentrate to 20 mL and then add 10 mL of buffer and concentrate back to 20 mL in 3 x 10 mL steps.
Select CONTINUOUS to diafiltrate continuously using a step size of 2 mL. For example, if you use 30 mL of buffer and start the buffer exchange at 25 mL, µPULSE will concentrate to 25 mL and then add 2 mL of buffer, then concentrate back to 25 mL 15 times.
Type the desired value in the Sample Volume to Start Exchange field. This is the sample volume at which buffer exchange will begin.
Then, type the exchange volume to use in the Exchange Volume field and input the total amount of buffer in the tube in the Total Buffer Volume field.
Select the membrane cutoff size that matches the chip you’re using from the Membrane Cutoff Size drop-down list.
OPTIONAL: Tap the Advanced Setup tab to configure advanced settings, such as pressure levels and pump timings, for each cycle. You can save the settings and load them for future use.
Once you make sure everything is all set, tap RUN. See Running a Profile for more details.
You can configure more profile settings to meet your preferences by tapping the Advanced Setup tab. There you can find a list of advanced settings, such as pressure levels and pumping timings, for each cycle— i.e., prime, concentrate and buffer exchange, and recovery cycle.
µPULSE also allows you to save these settings for future use by tapping the SAVE SETUP AS button and type a specific name for it. The saved advanced setup that you are currently using for a profile is what will appear on the Advanced Setup Explorer tab on AUTO PROFILE menu. For example, if you use the system for the first time, DEFAULT SETUP appears as the name because the software uses the default advanced settings.
Important: Make sure that you understand these options before making any changes.
Refer to the table below to better understand advance settings.
Note: Tap the RESET button to reset the values and switch back to the default values.
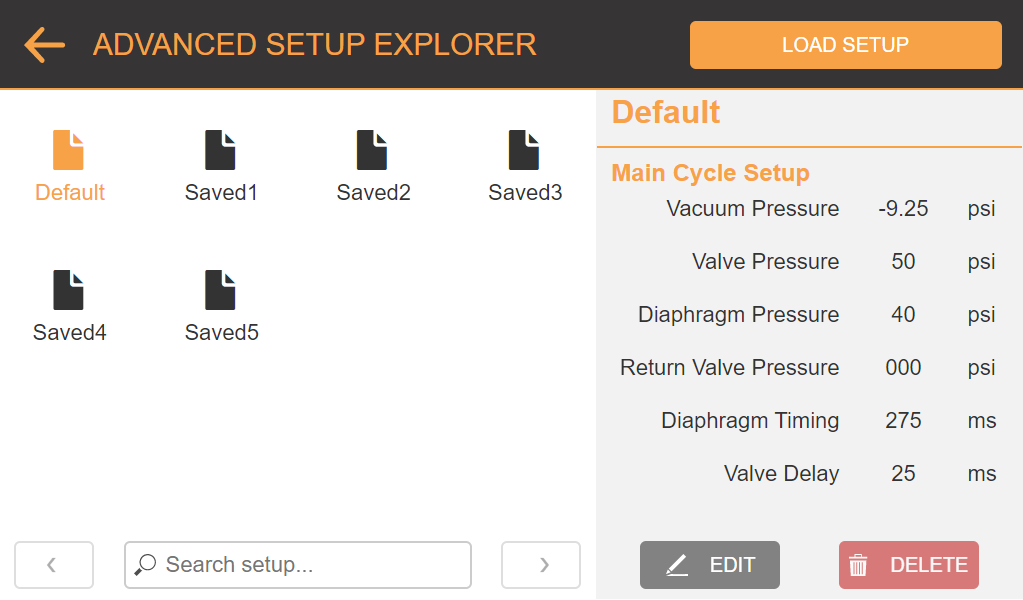
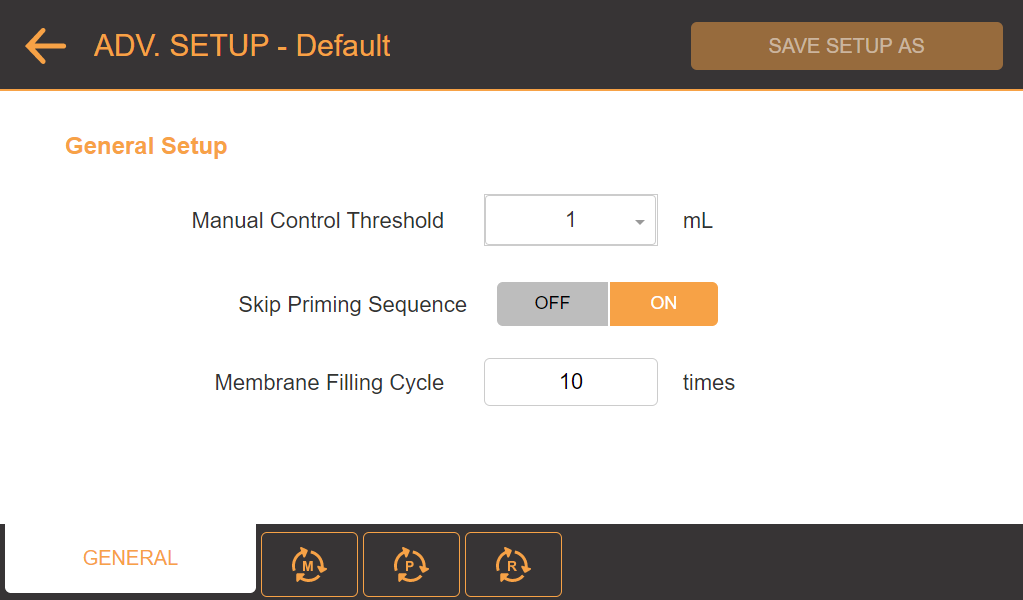
|
| The Advanced Setup Explorer Tab and the General Sub-tab of Advanced Setup Tab |
| Items | Description |
|---|---|
|
This threshold sets the extra volume above the defined final volume. Once the threshold has been reached, the system pauses the concentration to avoid over-concentrating the sample. |
|
|
Skip Priming Sequence |
Set this option to skip priming when µPULSE runs a profile. |
|
Membrane Filling Cycle |
If you turn ON the Skip Priming Sequence option, define how many times you want µPULSE to perform a membrane filling cycle. This option is necessary if you skip the priming sequence to ensure the membrane is wetted slowlyprior to running a profile. Note: This option is hidden when the Skip Priming Sequence option is off. |
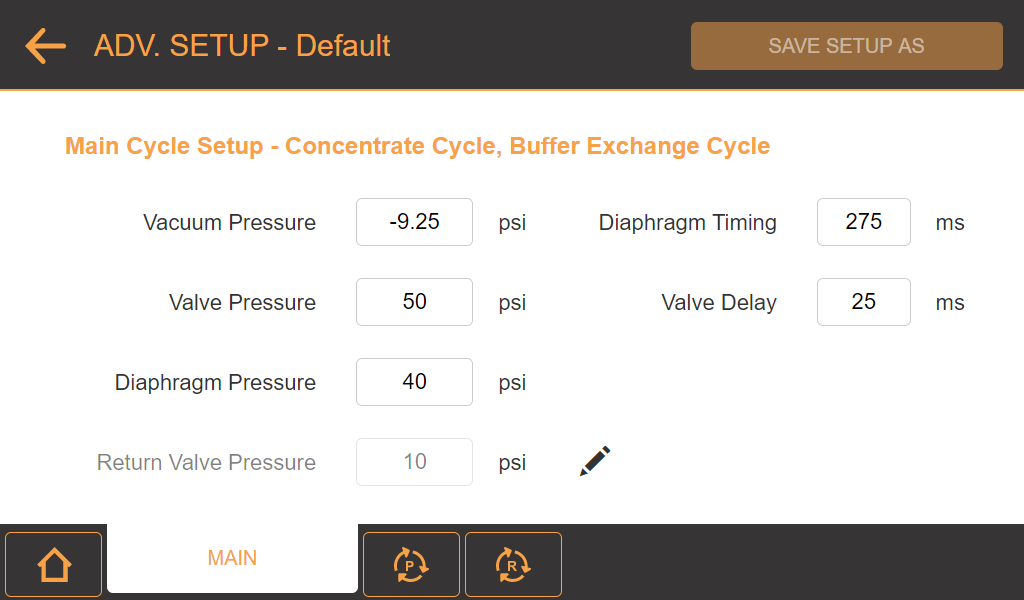
Main Sub-tab of Advanced Setup
| Items | Description | Default Value |
|---|---|---|
| Vacuum Pressure |
Determines the vacuum pressure applied to the diaphragm. |
-9.25 psi |
| Valve Pressure |
Determines the pressure applied to the valves. |
50 psi |
| Diaphragm Pressure |
Determines the pressure applied to the diaphragm to make one pulse. |
40 psi |
| Return Valve Pressure |
Determines the resistance to flow that generates a trans-membrane pressure to drive concentration of the sample. Note: Higher pressure results in faster concentration, but can damage the membrane if set too high. Click the pencil icon
Edit Return Valve Pressure Dialog Box |
10 psi |
| Diaphragm Timing |
Determines the timing for the diaphragm to make one full pulse. |
275 ms |
| Valve Delay |
Determines the operational timing of the valves. |
25 ms |
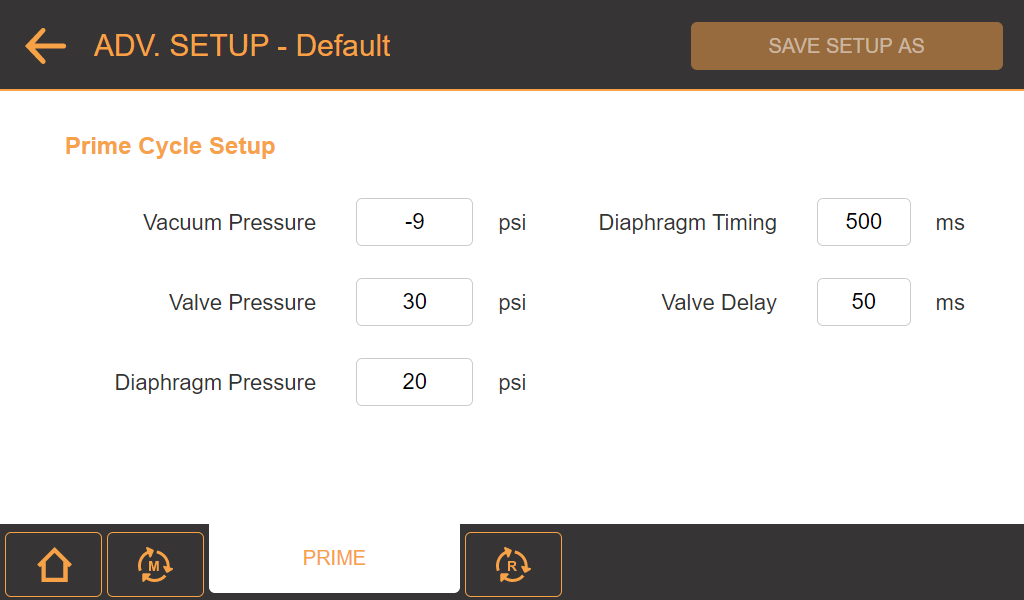
Prime Sub-tab of Advanced Setup
| Items | Description | Default Value |
|---|---|---|
| Vacuum Pressure |
Determines the vacuum pressure applied to the diaphragm. |
-9 psi |
| Valve Pressure |
Determines the pressure applied to the valves. |
30 psi |
| Diaphragm Pressure |
Determines the pressure applied to the diaphragm to make one pulse. |
20 psi |
| Diaphragm Timing |
Determines the timing for the diaphragm to make one full pulse. |
500 ms |
| Valve Delay |
Determines the operational timing of the valves. |
50 ms |
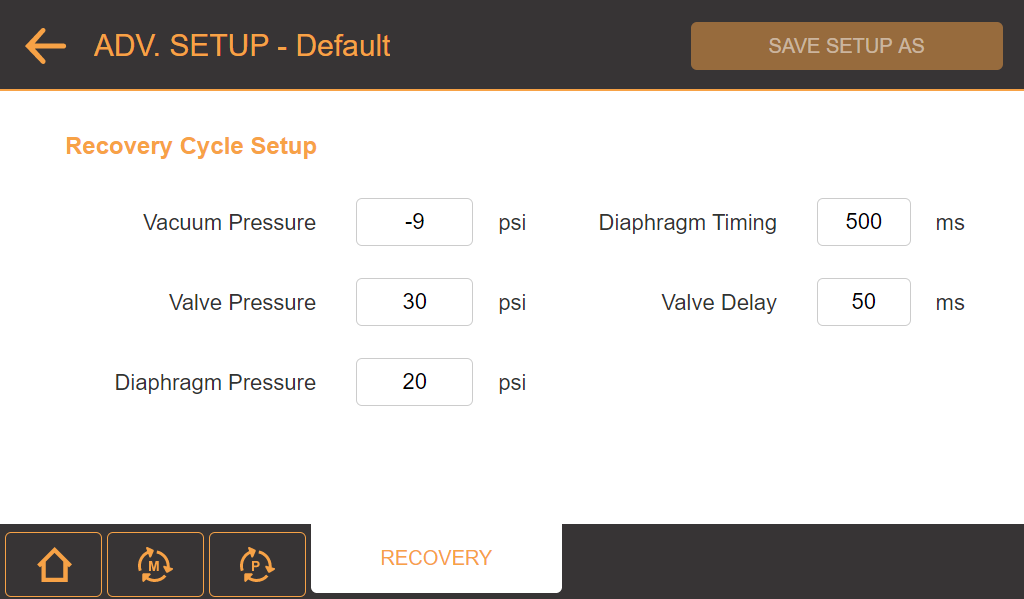
Recovery Sub-tab of Advanced Setup
| Items | Description | Default Value |
|---|---|---|
| Vacuum Pressure |
Determines the vacuum pressure applied to the diaphragm. |
-9 psi |
| Valve Pressure |
Determines the pressure value applied to the valves. |
30 psi |
| Diaphragm Pressure |
Determines the pressure applied to the diaphragm to make one pulse. |
20 psi |
| Diaphragm Timing |
Determines the timing for the diaphragm to make one full pulse. |
500 ms |
| Valve Delay |
Determines the operational timing of the valves. |
50 ms |

|
|
| PTFF-V20R221 |