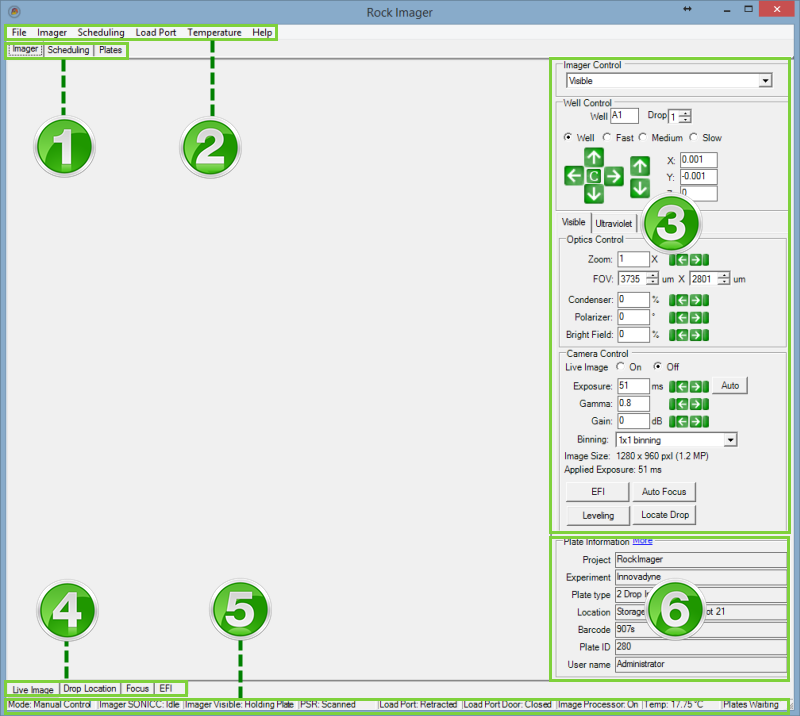
The Rock Imager software enables you to use your imager as a high-powered microscope, load and unload plates from Rock Imager, and get information about the plates currently inside your imager.
The software consists of menus and tabs and various other components that change based on which tab you are viewing.
The screenshot shown below is the default view when you first start Rock Imager. What you are viewing is the contents of the Imager Tab — components 3 and 6 would not be present if you clicked to a different tab.
Note: The screenshot shown below is from Rock Imager 1000. The options on your screen may vary slightly.

The User Interface of Rock Imager

|
Imager, Scheduling, and Plates TabsThese three tabs are the main navigational components of Rock Imager. You can:
|

|
Menu BarAll commands are available through various lists on the menu bar. |

|
Manual Imaging ControlsManual Imaging Controls are found on the Live Image sub-tab of the Plates tab, which is the default view when you start Rock Imager. For more information about what you can do with these controls, see Using Well Controls, Using Camera Controls, and Using Optics Controls. |

|
Sub-TabsThe sub-tabs change based on whether you are working on the Imager tab or the Plates tab (Rock Imagers 1000, 182, and 54 only). The Scheduling tab does not have any sub-tabs.
|

|
Status BarThe Status Bar provides at-a-glance information about all of Rock Imager's important components. For more information, see Status Bar. |

|
Plate InformationThe Plate Information panel is part of the Live Image sub-tab. It provides you with the current plate's Project, Experiment, Plate type, Location, and Barcode. |

|
|
| RIC-V33R116 |