 , and select the folder you desire or click the Make New Folder button to create a new storage. The current protocol name will then be displayed in Protocol name.
To access the TEMPEST Options menu, go to the Tools menu and select Options.
You will notice that there are three tabs: Dispense Options Tab, Chip Configuration Tab, and Advanced Options Tab. Advanced Options should be used by support technicians only. Please do not alter the options under the Advanced tab unless you are under guidance of a FORMULATRIX support person.
The tutorial covers the following sections:
To access Dispense Options settings, go to the Tools menu, select Options and click on the Dispense Options tab.
You can browse and locate the data configuration files by changing the root path location in the User Data Location box of the Dispense Options tab. Click the browse button  , and select the folder you desire or click the Make New Folder button to create a new storage. The current protocol name will then be displayed in Protocol name.
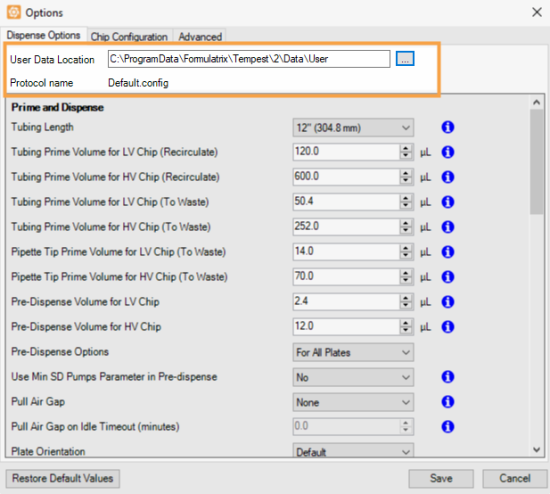
User Data Location and Protocol Name
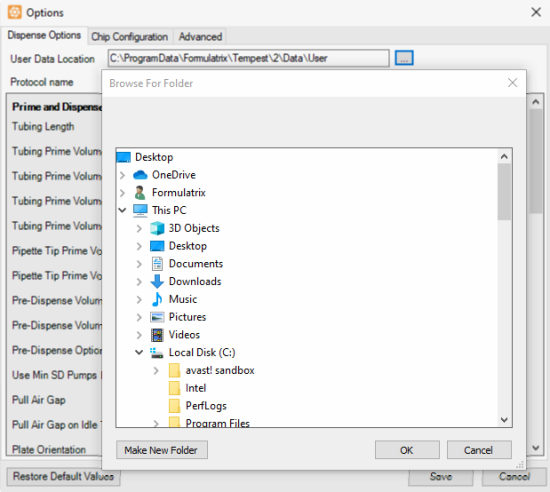
Browse For Folder Window
The Dispense Options tab consists of four group of settings which contain various options: Prime and Dispense, Recovery and Wash, Recirculate, Stacker, Scan Barcode and Dispense, and Multi Dispense Run.
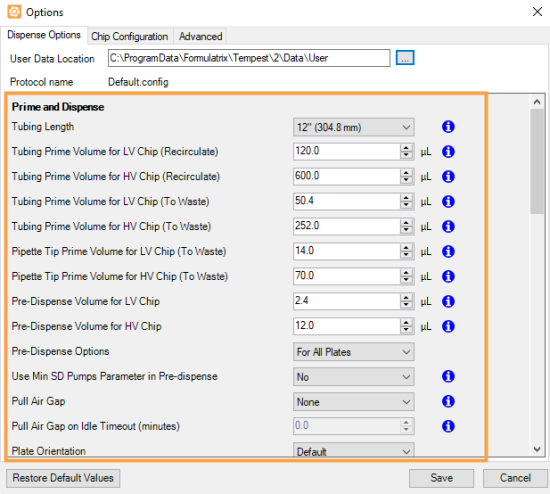
Prime and Dispense Settings
Note: The Prime and Dispense settings will only display the prime volume options based on the input selection (tube or pipette) in the Input Control Panel.
*This option is available only when a Low Volume chip is assigned to the input source.
**This option is available only when a High Volume chip is assigned to the input source.
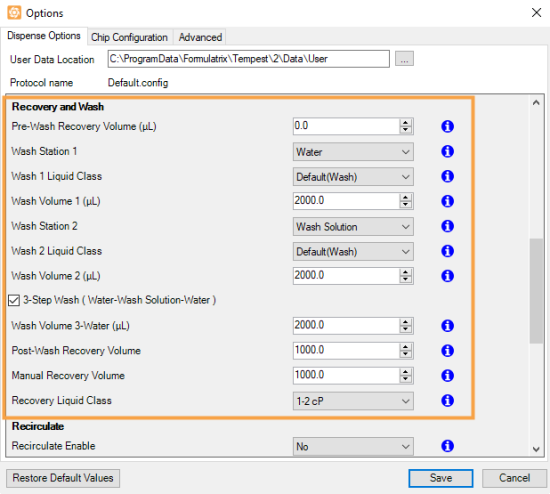
Recovery and Wash Settings
*Select 3-Step Wash (Water-Wash Solution-Water) option to enable the feature.
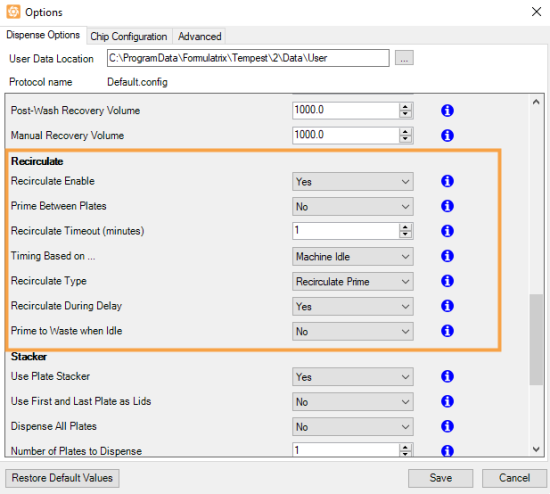
Recirculate Settings
*Hidden unless Recirculate Enable is set to Yes.
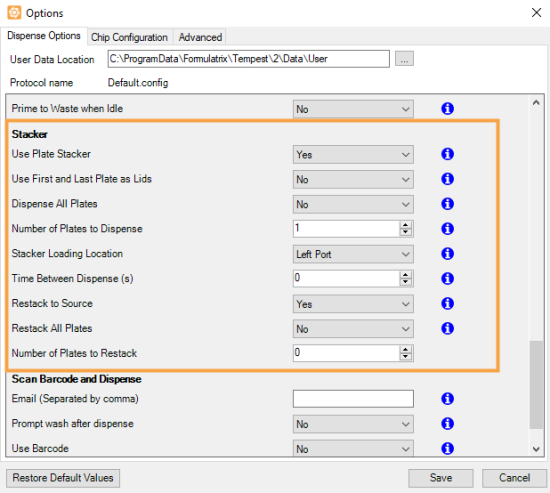
Stacker Settings
* Available only for TEMPEST with plate stackers.
| Option | Default Setting | Description |
|---|---|---|
| Use Plate Stacker | No | Enables the use of the TEMPEST plate stackers. |
| Use First and Last Plate as Lids* | No | Enables you to use the first and last plate in the loading stacker as lids during dispense. If you select Yes, TEMPEST will skip the first and the last plate. Note: You must specify the number of plates to dispense, excluding the two plates as lids. If you are using the Smart Batch Delay mode, you can use the Dispense All Plates option. |
| Dispense All Plates* | No | Dispense all plates automatically until the stacker is empty. Note: Hidden unless Use First and Last Plate as Lids is set to No. |
| Number of Plates to Dispense* | 1 | Determines the number of plates to be dispensed by TEMPEST after you click the Run Dispense button  . . Note: Hidden unless Dispense All Plates is set to No. |
| Stacker Loading Location* | Left Port | Determines which stacker plates have been loaded into for dispense. |
| Time Between Plate (s)* | 0 | Determines the length of time in seconds that a dispense will start after the previous dispense has finished. |
| Restack To Source* | No | Determines whether or not any of your plates are restacked to the load stacker after dispense. |
| Restack All Plates* | No | Restack all plates automatically to the load stacker after dispense. Note: Hidden unless Restack To Source is set to Yes. |
| Number of Plates to Restack* | 1 |
Determines the number of plates to be restacked to the load stacker after dispense.
Note: Hidden unless Restack To All Plates is set to No. |
* Hidden unless Use Plate Stacker is set to Yes.
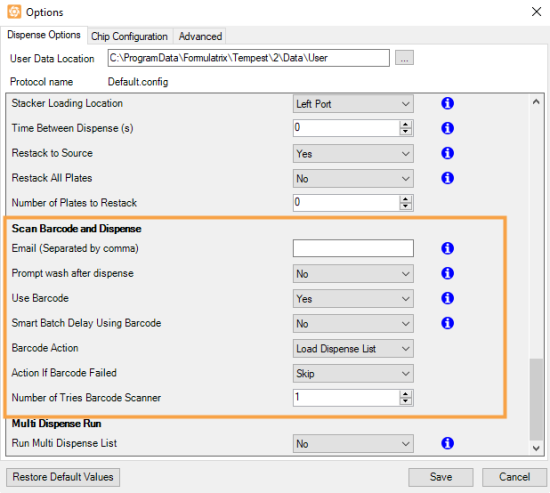
Scan Barcode and Dispense Settings
*Hidden unless Use Barcode is set to Yes.
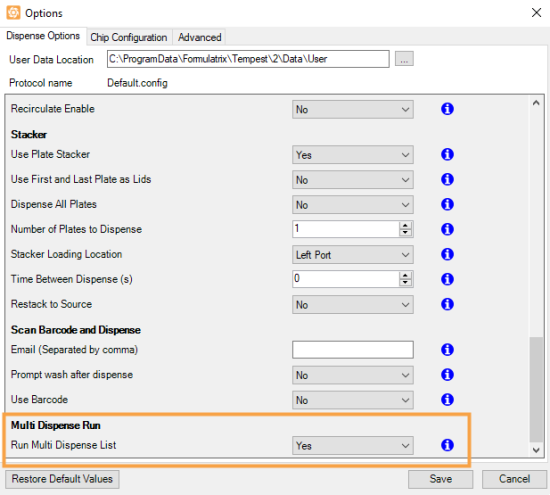
Multi Dispense Run Settings
| Option | Default Setting | Description |
|---|---|---|
| Run Multi Dispense List | No | Determines whether or not TEMPEST runs multi dispense lists. When enabled, TEMPEST will run multiple dispense lists for pre-defined batches of plates. For more information, see Executing Multi-Plate, Multi Dispense List.
Note: This option is hidden when the Use Plate Stacker option is set to No. |
To access Chip Configuration settings, go to the Tools menu, select Options and click on the Chip Configuration tab.
You must input the chips’ information, such as serial number, installation date, and chip type in the Chip Configuration tab. You can view the Small Diaphragm, Large Diaphragm, Output Cycles, Prime Cycles, and Dispense Cycles information that are automatically updated after dispense.
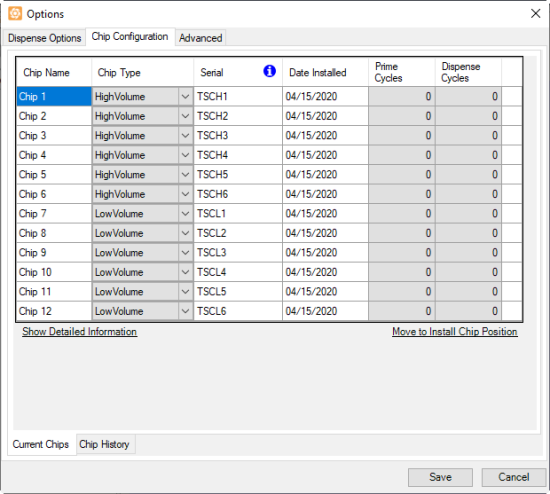
Chip Configuration Tab
In this tab, you can also view the chip(s) usage information in the Chip History tab. The history information include the chip(s)’ Purge Cycles, Fill Cycles, Small Diaphragm Cycles, Large Diaphragm Cycles, and Output Cycles.
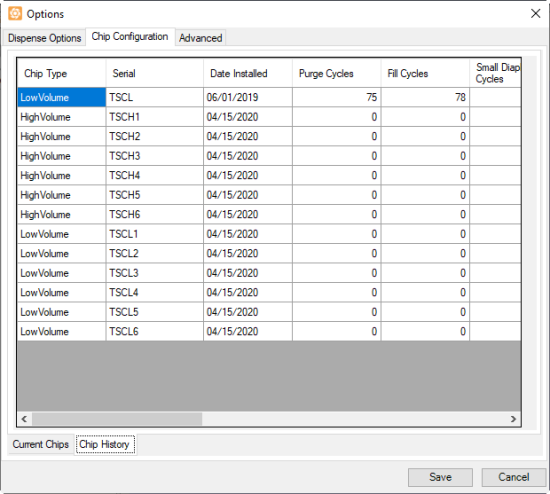
Chip History Window
Important: Advanced options should be used by support engineers and advanced users only. Please do not alter the options under the Advanced tab unless you are operating under the guidance of a FORMULATRIX support person.
To access advanced settings, go to the Tools menu, select Options and click on the Advanced tab.
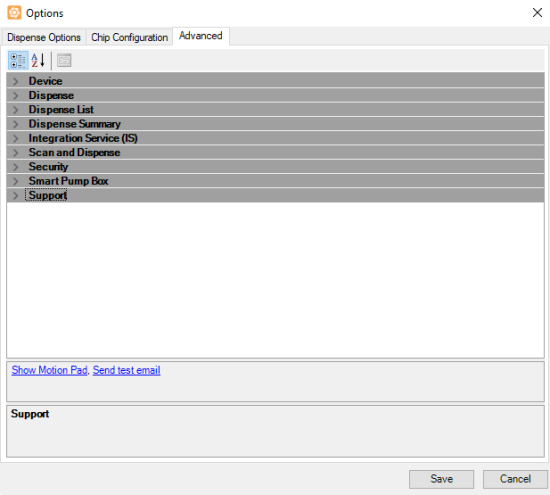
Advanced Tab
Click the topics below to see more detailed explanations.
| Option | Description |
|---|---|
| Pressure Alarm | Determines the pressure limit value. If the current pressure value is less than the default limit value, the TEMPEST will sound an alarm and abort the dispensing process. |
| Vacuum Alarm | Determines the vacuum limit value. If the current vacuum value is less than the default limit value, the TEMPEST will sound an alarm and abort the dispensing process. |
| Is Pressure Vacuum Alarm Enable | Determines whether the pressure and vacuum alarms are enabled or disabled. Set into True to enable the alarms. |
| Min Travel in X Axis | Determines the minimum travel value of the X axis. |
| Max Travel in X Axis | Determines the maximum travel value of the X axis. |
| Min Travel in Y Axis | Determines the minimum travel value of the Y axis. |
| Max Travel in Y Axis | Determines the maximum travel value of the Y axis. |
| Min Travel in Z Axis | Determines the minimum travel value of the Z axis. |
| Max Travel in Z Axis | Determines the maximum travel value along the Z axis. |
| Wash Station Position | Determines the wash station position in the first column. This position is configurable depending on the wash station type (single or double column) and can be set by entering necessary numbers into each axis field. The list provides Get the current position and Move to position options. |
| Waste Station Position | Determines the waste position in the first input column. The waste station is used to hold the pre-dispense, nozzle prime, and prime to nozzle (if a pipette tip is used) waste volume. |
| Wash Station Z Drop | Determines the height clearance necessary for the wash inputs to safely move to the next input column. This will ensure that the TEMPEST will properly wash the chips. |
| Left Port Position | Determines the X, Y, and Z coordinates of the plate holder position when it is at the left port. |
| Right Port Position | Determines the X, Y, and Z coordinates of the plate holder position when it is at the right port. |
| Plate Stacker Left Position* | Determines the X, Y, and Z coordinates of the plate stacker position on the left. Note: Available only for TEMPEST with plate stackers. |
| Plate Stacker Left Position* | Determines the X, Y, and Z coordinates of the plate stacker position on the right. Note: Available only for TEMPEST with plate stackers. |
| Option | Description |
|---|---|
| Update Sequence Editor During Dispense | Controls the software user interface when running sequences. Select “True” if you want to view each sequence process. Select “False” if you want to hide the process. |
| Option | Default Setting | Description |
|---|---|---|
| Dispense List Auto Load | False | Set this option to True to automatically load a dispense list of your choice every time you launch the TEMPEST software. |
| Auto Load Dispense List File Name | Empty | Select a dispense list to be automatically loaded every time you launch the TEMPEST software. This option is only available when the Auto Load Dispense List option is set to True. |
To enable dispense summary:
Go to the Tools menu, click Options.
Choose Advanced.
On the Dispense Summary option, select True to enable the feature.
Click Save.
To open the dispense summary folder:
Go to the Tools menu.
Click to open the Dispense Summaries Folder.
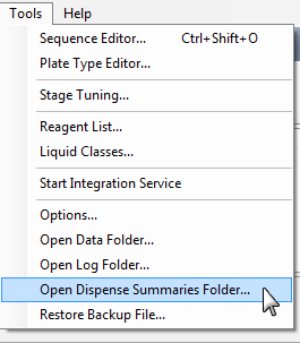
Open Dispense Summary Folder
| Option | Description |
|---|---|
| Integration Service Base Address |
The API Service host address. Define the Integration Service Base Address by manually changing the port number on your computer. |
| Service Remote Start |
Determines the setting for the integration service to run as a background process. The default setting is Deny.
|
| Option | Default Setting | Description |
|---|---|---|
| Barcode Reader Velocity in X Axis | 300 | Determines the velocity value of stage movement along the X axis when reading the plate barcode. |
| Barcode Reader Velocity in Y Axis | 200 | Determines the velocity value of nozzle head movement along the Y axis when reading the plate barcode. |
| Barcode Reader Velocity in Z Axis | 50 | Determines the velocity value of stage movement along the Z axis when reading the plate barcode. |
| Barcode Start Position* | X 0 Y 0 Z 0 | Determines the X, Y, and Z position where the barcode laser starts reading a plate barcode. |
| Barcode Stop Position* | X 0 Y 0 Z 0 | Determines the X, Y, and Z position where the barcode laser stops reading a plate barcode. |
*You can tune the barcode laser’s start and stop positions from the Barcode Position Editor in the Tools menu.
| Option | Description |
|---|---|
| Password protected settings | Determines whether the security mode will be activated. |
| Password | Determines the security password used. |
| Backup Email Address | Determines the email address for the security backup. |
| Option | Default Setting | Description |
|---|---|---|
| Support Smart Pump Box | False | Select this option to True to automatically turn off the pump box controller when the TEMPEST instrument is in idle mode and turn it back on when the TEMPEST instrument is active. This feature is only available with the new Smart Pump Box device (V3). |
| Option | Description |
|---|---|
| MailTo | Determines the email address to which error notifications will be sent. |
| MailFrom | Determines you to fill in the field with your email address. The system will use the specified email address to send Scan and Dispense log. |
| IsNotifyImmediately | Determines whether the system will automatically send an email notification to FORMULATRIX team support, in the event of an error. |
| SMTPServer | Determines the SMTP server associated with your email address. |
| SMTPPort | Determines the SMTP port number associated with your email address. |
| SMTPUserName | Determines the SMTP user name associated with your email address. |
| SMTPPassword | Determines the SMTP password used. |
| SMTPEnableSSL | Enables you to choose if your SMTP server supports SSL. |
| AttachLogFile | Enables the system to send zipped log files via email. |
| ShowSMTPWarning | Shows the SMTP warning in the event of an error. |
Note: Click Save when you are finished managing your data configuration setting on the Options menu.
Important: To restore the default settings value as needed, click the Restore Default Values button, and then click Yes to continue. This will automatically reset your current protocol setup to the default settings, without modifying each option one by one. Always check and save the protocol with a different name to ensure any previously modified settings are saved, especially if the protocol may be used for future experiments. This way, you can safely refresh the dispense settings to default without worrying about losing your customized settings.

|
|
| TEC-V35R621
|