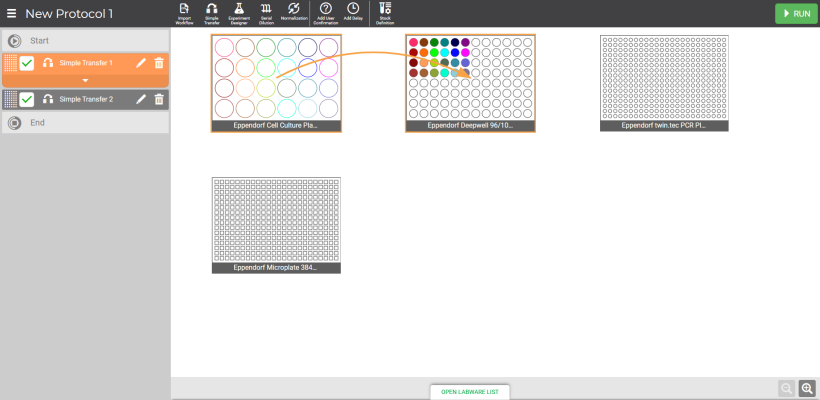
In this section, you will learn how to create a Simple Transfer step and learn about the List of Transfers Panel.
The Simple Transfer step supports 3 transfer modes:

Simple Transfer Pipetting Step in the Protocol Editor Window
Follow the instructions below to create a simple transfer step.
On the navigator bar, click the Simple Transfer button  .
.
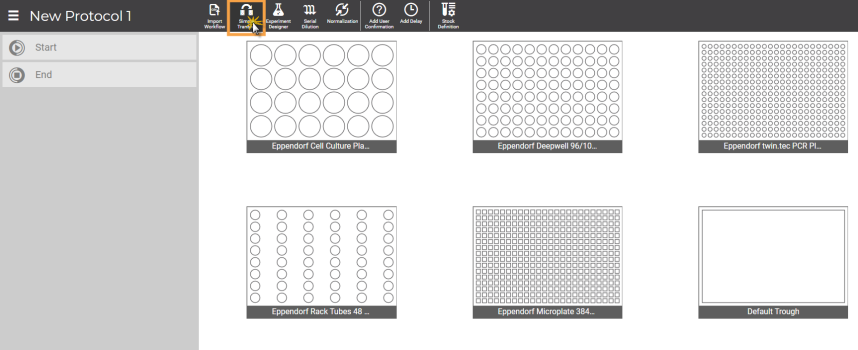
Select the Simple Transfer Mode
Click the desired Source labware from the available labware on the virtual deck, then click NEXT.
Note: You can only select one labware for the source location. The Source labware can also be assigned as the destination.
Select the desired Destination labware from the virtual deck. You can select up to nine labware (including the Source labware) for the destinations.
Click NEXT to continue.
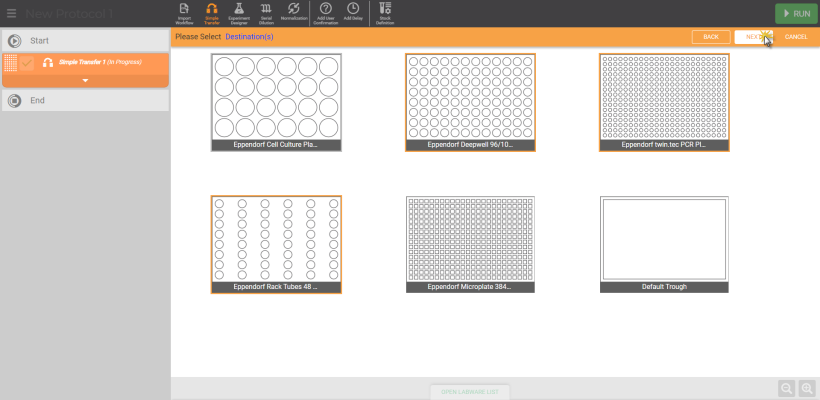
Selecting the Destination Labware from the Virtual Deck
In the Simple Transfer window, begin with selecting sources by either one of the ways detailed below:
Click-on or drag the desired well locations in the labware to select your sources. To deselect any of the selected source location(s), just click on them a second time.
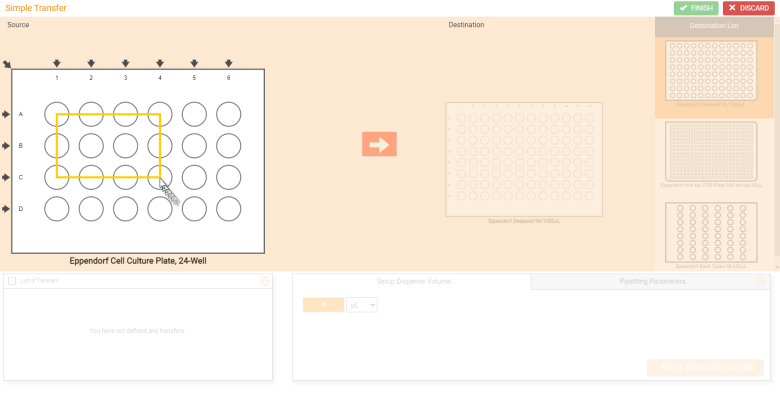
Selecting the Source Wells Over the Desired Location
Click the Row arrow_22x22.png) to select source locations in a row or click the Column arrow
to select source locations in a row or click the Column arrow to set a source group location in that column. You can also click the top-left arrow
 to select all wells at once as a group. If you want to remove any of the selected group source location(s), just click the Column button
 or top-left arrow
 .
.
Important: For group mapping, the Destination labware must have the same or larger number of wells than the Source labware.
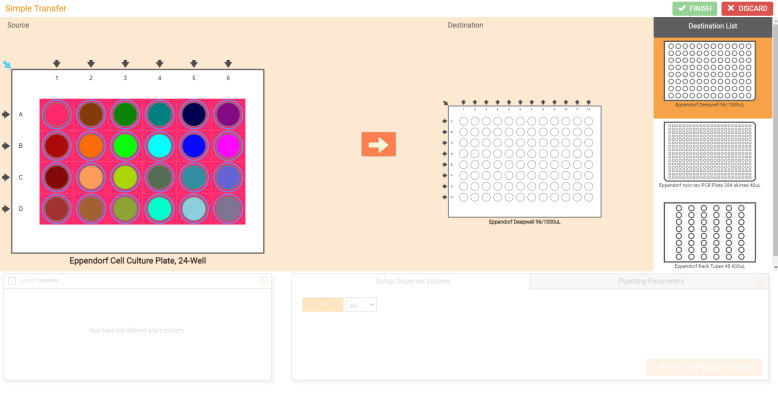
Selecting the Group Source Location in the Simple Transfer Window
When you are done, click the arrow button to move on to the destination selection. You can switch back and forth between the source and destination labwares.
Select the destination labware under the Destination List located at the right side of the Simple Transfer window, or directly map the source to the destination location on the current labware by the following means:
Click-on or drag-over the desired locations on the labware to select your destinations.
OR
If you have set a column-based group source, you can directly click the Column button to assign the group source to a column on the Destination labware. You can also click the top-left arrow
 to select all wells as the destination locations at once.
OPTIONAL: If you are using a Destination labware with larger number of wells, you can select multiple wells by using different patterns to speed up the process. Select the applicable mapping pattern(s) that is available at the right side of the current Destination labware.
Important: The well selection patterns will only appear if you use the 96-Well labware as the source, and the 384-Well labware as the destination.

Selecting Well Patterns in the Destination Labware
Define the dispense volume in µL or mL under the Setup Dispense Volume tab, then click APPLY DISPENSE VOLUME when you’re done.
Tip: Press Enter on your keyboard to apply the volume on the Setup Dispense Volume tab quicker.
Important: To proceed, you must map all sources onto all applicable Destination labware by repeating steps 5 to 8 for any new sources.
OPTIONAL: If you want to use multiple pieces of labware for the destination, select the available labware from the Destination List and choose from the following options:
To use a different source: Go back to the source location and repeat steps 5-8. Select different sources if only there are available wells in the source labware that haven’t been mapped to the previous labware.
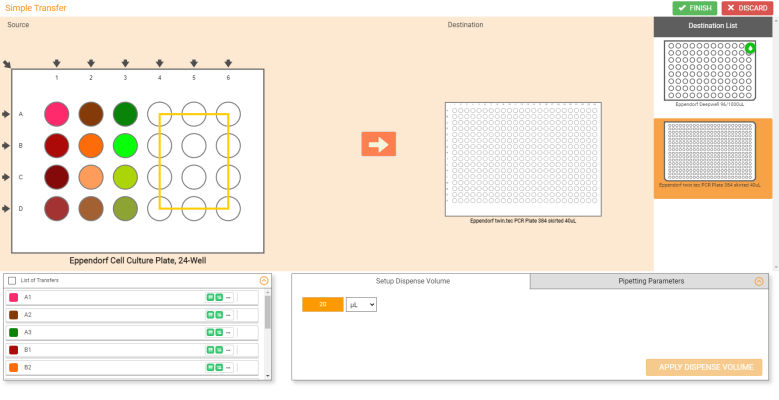
Select the Available Wells to Use Different Source
OR
To use the same source: Select the desired source(s) from the List of Transfers located at the at the bottom-left side of your page. Select the desired destination locations, and set the volume in the Setup Dispense Volume panel. Click APPLY DISPENSE VOLUME when you’re done.
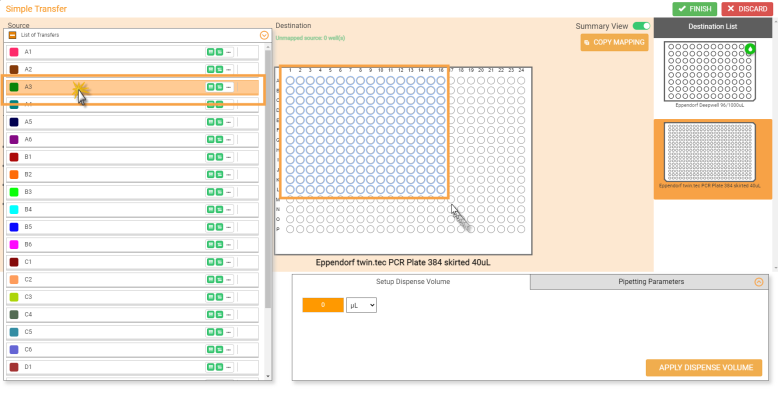
Select the Same Source from the List of Transfers Panel
Tips: You can also copy the transfer pattern of the current destination to another destination that has the same number of wells. To do so, click the COPY MAPPING button on the labware with the desired pattern and then go to the desired tarsget labware and click the PASTE MAPPING button.
OPTIONAL: Before saving the Simple Transfer step, you can modify the following items:
To modify a single source volume, click the desired well and type the desired new value in the provided field in the Setup Dispense Volume tab and click APPLY DISPENSE VOLUME.
To modify a group source volume, click on a well of the desired group in the Destination labware, and type the new value in the provided field in the Setup Dispense Volume tab. Then, click APPLY DISPENSE VOLUME.
Note: If you modify a well containing multiple sources, the modified volume will be applied to all sources in the particular well.

Modifying a Well Containing Multiple Sources
In the List of Transfers panel, you can map more sources to the available destination location by following these steps:
To assign a single source to more well(s) in the Destination labware, select the desired source in the List of Transfers. Then, click or drag over the available well(s) on the current Destination labware. Set the volume in the Setup Dispense Volume panel, and click APPLY DISPENSE VOLUME.
Important: Set the volume to 0, the selected source will be removed from the selected well(s).
To assign more column group(s) to the Destination labware, select the desired column group in the List of Transfers. Then, click the Column button on the available locations. Set the volume in the Setup Dispense Volume panel, and click APPLY DISPENSE VOLUME.
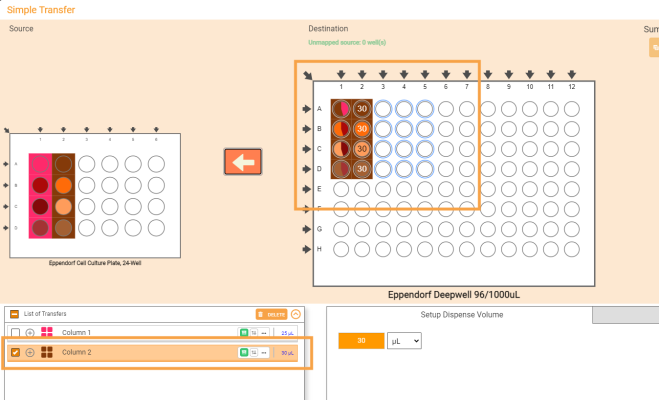
Mapping More Column Group of Sources to the Destination Labware Using the Existing Source
Important: If you remove a source or group of sources from either the Source labware or List of Transfers, all destinations for that source(s) will be deleted as well.
Removing the source from the Source labware
To remove the source from the Source labware, choose from the following options:
Click the well of the desired mapped source in the Source labware or click the Column or Diagonal arrow button
 of the desired group of sources. Then, click CONFIRM to remove the stock.
OR
In the List of Transfers panel, located at the bottom-left side of your screen, select the desired source or click the selection box next to each source. Then, click the DELETE button.
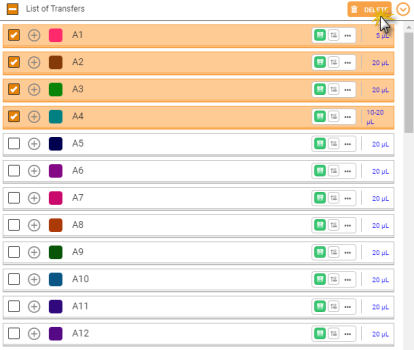
Removing Multiple Sources from the List of Transfers Panel
Removing source from the Destination labware
To remove the mapped source from the Destination labware, choose from the following options:
Click the desired well in the Destination labware, and set the volume to 0. Then, click APPLY DISPENSE VOLUME.
OR
In the List of Transfers panel, click the dropdown button located next to each source, and select the desired destination locations. When you’re done, click DELETE.
All transfers created in the software are assigned with the default pipetting parameters. This default settings can be changed, but it is possible to change the pipetting parameters on-the-fly within the protocol.
First, select one or multiple transferred sources from the List of Transfers panel.
Go to the Pipetting Parameters tab under the Destination labware, and then open the pipetting parameters by selecting it from the Pipetting Profile field.
Important: The default pipetting parameters settings cannot be modified. To be able to modify the settings, you will need to create a new pipetting profile or switch to a non-default profile For more information, see Using the Pipetting Parameters.
Click the Expand button  and edit the parameters accordingly from the Pipetting Parameters tab.
Click APPLY when you’re done.
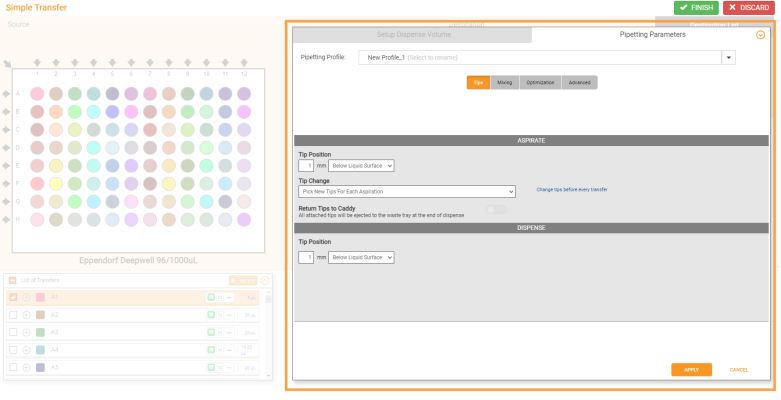
Pipetting Parameters Tab in the Simple Transfer Window
Click FINISH to save the pipetting task and return to the Protocol Editor page.
Note: If you want to create more pipetting tasks using Simple Transfer, repeat steps 1-10. If you want to edit the pipetting step, click the Edit Card button on the desired pipetting step in the Protocol Editor page, and modify it as needed. To rename the pipetting step, click on the step name and begin typing a new name. Then, click anywhere on the blank space of the page or press Enter on your keyboard to save.
Important: Modifying a saved pipetting step cannot be undone and might affect all associated steps in that protocol. Ensure to check the steps before modifying.
The List of Transfers panel—that is located at the bottom-left corner of your screen—consists of a list of sources in the Simple Transfer pipetting task. This panel will automatically appear after you have mapped the sources in the source labware to the destination labware. In the List of Transfers panel, you can easily view and select sources or mapped destinations, remove them, edit volumes, or move the destination location.
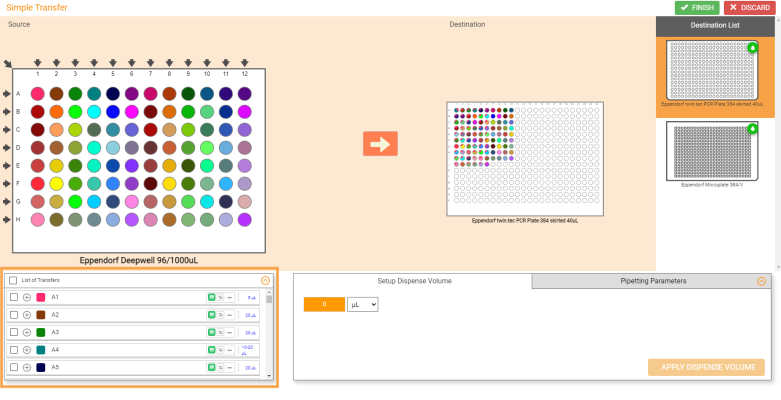
List of Transfers Panel in the Simple Transfer Window
See the image and descriptions below for the detailed options in the List of Transfers panel.
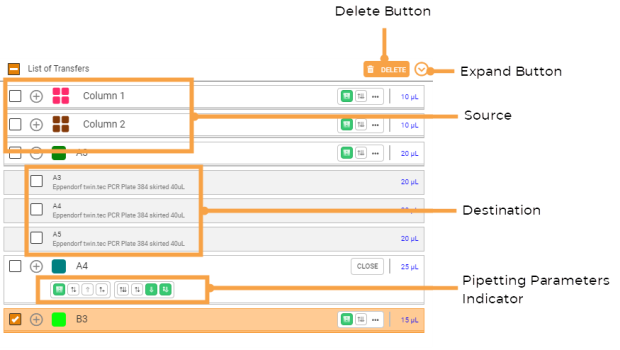
List of Transfers Panel
| Name | Description |
|---|---|
| Delete Button |
Use the DELETE button to remove the selected sources in the List of Transfers panel. See Creating a Simple Transfer for more information. Important: Deleting a source from the List of Transfers panel will remove all its mapped destinations. For more information, see Removing Stocks. |
| Expand Button | Click the Expand/Collapse button to show more/less sources on the list. to show more/less sources on the list. |
| Source | Shows you the list of sources in the source labware. It can be a single, multiple, or group of wells. Each source is indicated by a different color. Next to the color indicator, you can see the source location in the source labware, such as well A1 or columns 1. |
| Destination |
Shows you the list of destinations that have been mapped for a given source. It can be a single, multiple, or group locations. To see the list of destinations well positions, click the Expand/Collapse button |
| Pipetting Parameters Settings Indicator |
In the List of Transfers panel, you can see the dispense volume (in µL or mL) for each source. You can also see the active pipetting parameters settings that are assigned to the source. Click on the indicator button to see all of the active and inactive settings.
Pipetting Parameters Indicators and Dispense Volume on the Source The active settings are indicated by the green icons, while the white icons indicate the inactive settings. Hover over to each icon to see the settings name. For more information, see Pipetting Parameters. |
| FLOi8Q-V13R021
|