Creating Daughter Plates (Plate Copying)
When you create daughter plates, you tell the NT8 to aspirate solution from a deep well block and dispense it into a second plate, known as a daughter plate. This Quick Start Guide teaches you how to set up the hardware and the software in order to copy a plate.
If you want to copy a deep well block using a single plate, follow the instructions under Option 1.
If you want to copy a deep well block to two or three plates, follow the instructions under Option 2.
Set Up the NT8 Hardware
Place the HV tip caddy and deep well block on the NT8. Place the MRC 2 Well Crystallization plate on microplate station 2.
Option 1: Set Up the NT8 Control Software Using the Plate Copy Template
Prerequisite:
A plate copy template is preinstalled with your software. It creates a task list that uses a MRC 2 Well Crystallization plate as the daughter plate.
To use this template:
Click the Open Task List button
 in the Task List
panel.
in the Task List
panel.OR
Click the File menu and select Load Task List.
Open the Sample folder and select the Plate Copy MRC2 50 uL task list.
Click Open.
Once the task list is properly generated, click the Run Task List button
 to execute the Task List.
Option 2: Manually Set Up the NT8 Control Software
Mimic the NT8’s physical setup with the software:
Under the associated plate station on the software, click the downward arrow and select the MRC 2 Well Crystallization Plate from the Plate Selection window.
On the Deep Well station, click the downward arrow and select the appropriate deep well plate from the Plate Selection window.
Add the Pick Tip command to the Task List by double-clicking the HV Tip Caddy image.
Click the Add Repeat Task button
 on the Task List to
mark the beginning of tasks that will repeat on each column of your
plates.
on the Task List to
mark the beginning of tasks that will repeat on each column of your
plates.Instruct the NT8 to aspirate from the Deep Well block:
Double-click the deep well plate image to open the Task Details window.
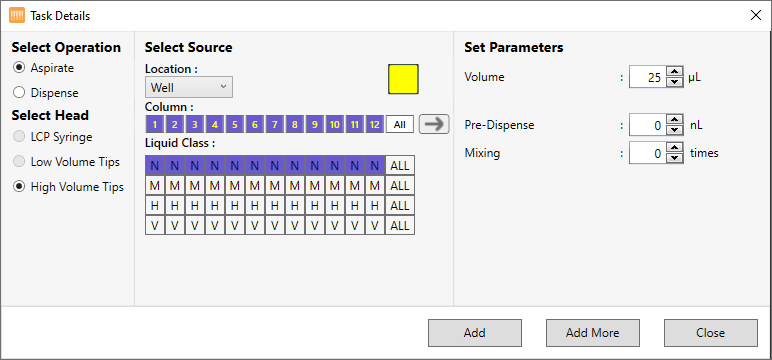
Task Details Window
Under Select Operation, select Aspirate. The High Volume Tips in the Select Head section is automatically selected.
Under Column, select the desired column from which you’ll aspirate the solution. To select multiple columns, click the first desired column, then hold the Shift key and click the last desired column.
Under Liquid Class, select a liquid class.
Next to Volume, type the volume you wish to aspirate.
OPTIONAL: Set the extra volume to be aspirated after aspirating the targeted volume in the Pre-Dispense box.
OPTIONAL: Next to Mixing, set the desired mixing cycles to be performed by the NT8. This option determines the number of times the NT8 will mix the solution before aspirating it from the deep well block.
Click Add.
OR
Click Add More if you want to add another aspirate task.
Instruct the NT8 to dispense to the daughter plate:
Double-click the microplate that you want to dispense into to open the Task Details window.
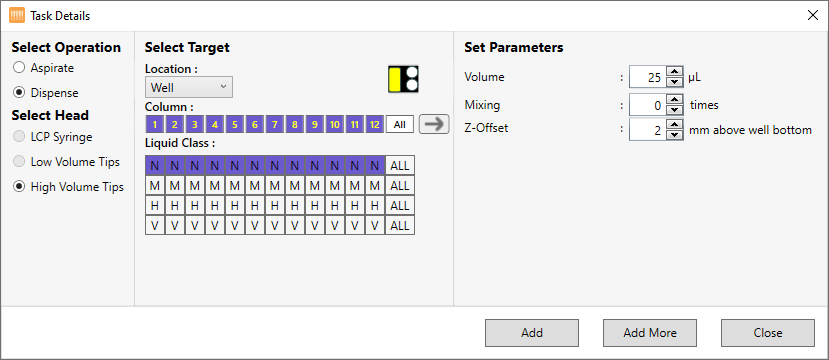
Task Details Window
Verify that Dispense is selected under Select Operation.
Make sure that the well is selected in the Select Target image. If selected, it is highlighted in yellow, as shown in the image below. If not, click the well to select it.

Selecting Target Area
Confirm that columns 1-12 are selected under Column. (If selected, they appear in dark blue.) If not, click column 1, then press and hold the Shift key and click column 12 to select all columns.
Select a liquid class from the Liquid Class list.
Type a volume to dispense in the Volume box.
OPTIONAL: Next to Mixing, type the number of times you want the NT8 to mix the solution before dispensing.
Next to Z-Offset, type the distance you’d like the pipette tip to stop at before dispensing the solution to the daughter plate.
Click Add.
OPTIONAL: Repeat step 4 and 5 for each additional daughter plate if you are copying from one deep well block to multiple daughter plates.
Add the Dispose Tip command by double-clicking the HV Tip Caddy again.
OPTIONAL: Save your Task List by clicking the Save Task List button
 .
.OR
Click the File menu and select Save Task List.
Run the Task List
Click the Run Task List button to execute the Task List.
The NT8 head moves to the HV Tip Caddy, picks up a column of tips, moves
to the deep well and aspirates solution, then moves to the daughter
plate and dispenses solution. Finally, the NT8 head moves back to the HV
Tip Caddy and disposes the used tips in the empty column, then picks up
new tips from the next column and repeats the process until your
daughter plate is created.
Warning
If the notification below appears after running a plate copy task, it is highly recommended that you lubricate the plate copy plungers immediately to prevent aspiration or dispense issues, or tip attachment issues.
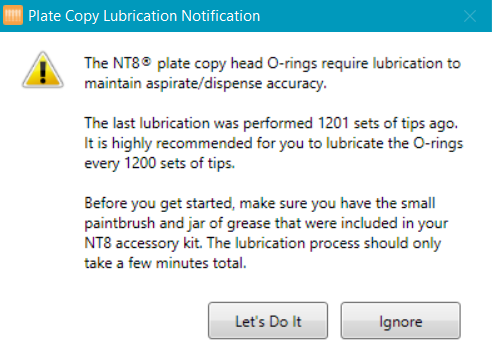
A Notification Message to Lubricate the Plate Copy Plungers
Related Topics