V3 Hardware Overview
To begin, the two major components of the NT8 are the head and deck. Both are located at the front of the NT8 instrument. The head primarily contains tools to aspirate and dispense liquids, and the deck contains plates, tip caddies, the protein source, and the wash and waste stations.
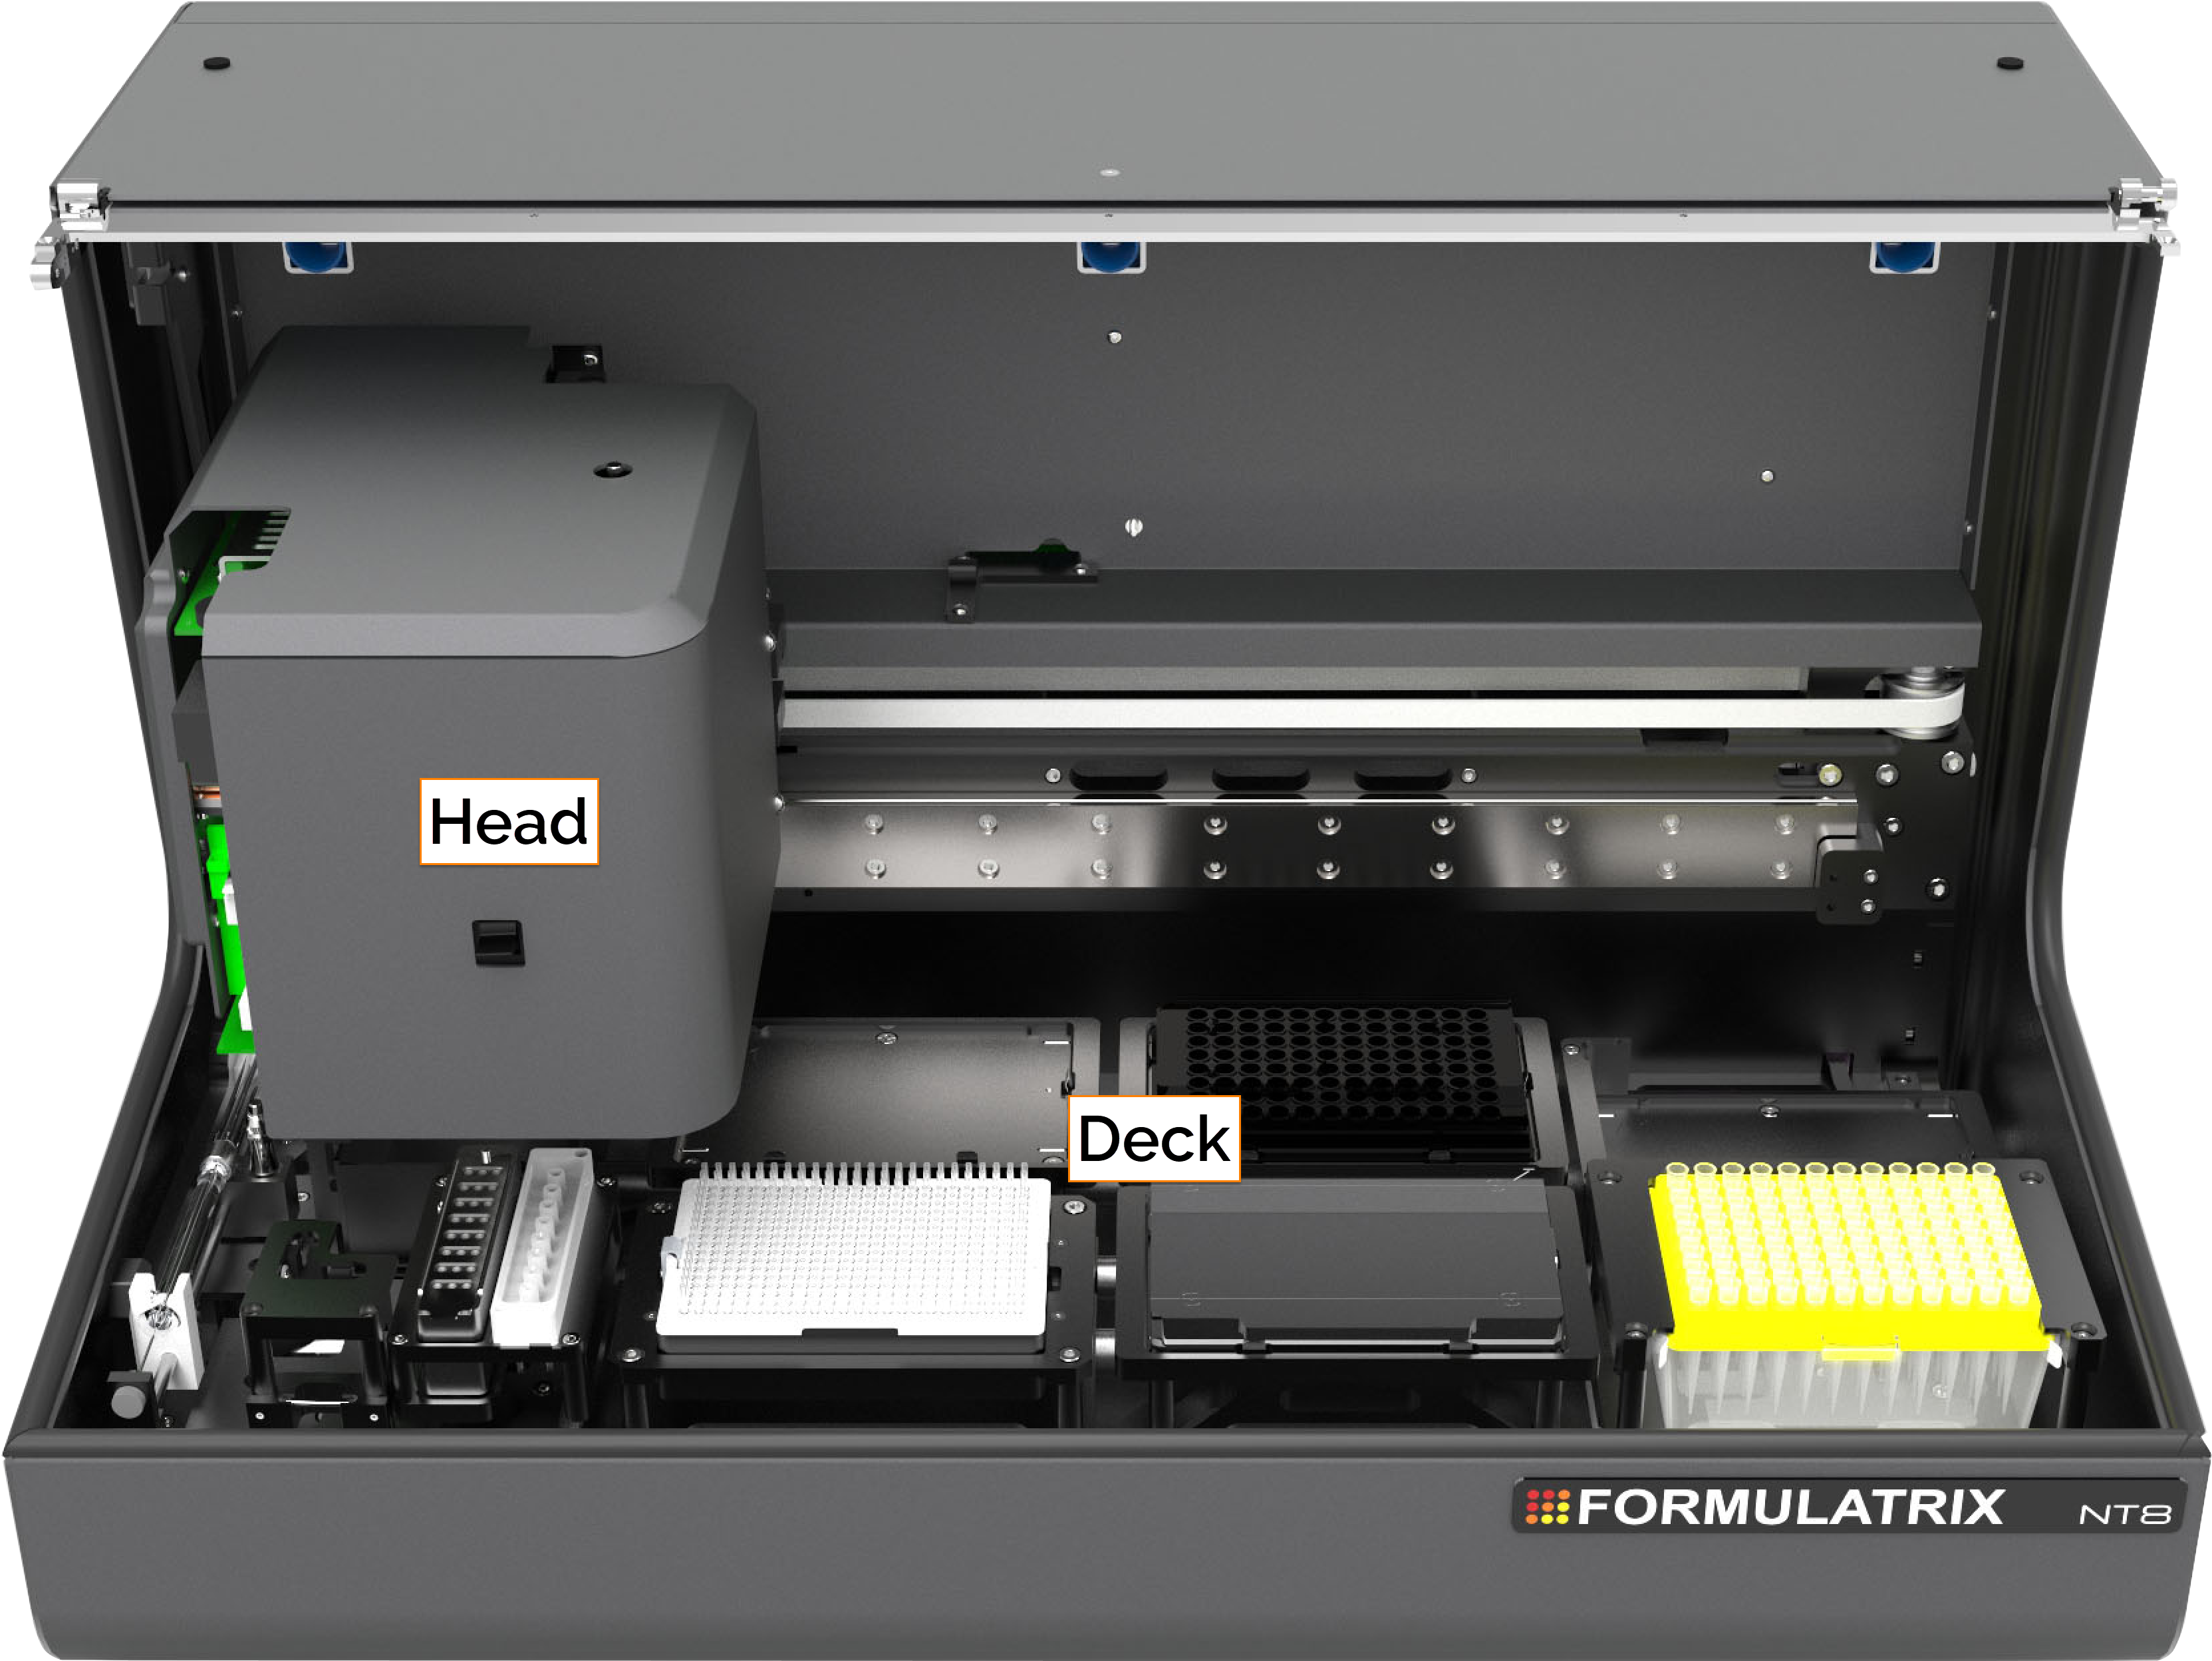
The NT8 V3 Hardware - Front View
The NT8 Deck
Located at the front of the instrument, the NT8 deck contains everything needed for your dispenses including the plates, protein source, and tips.
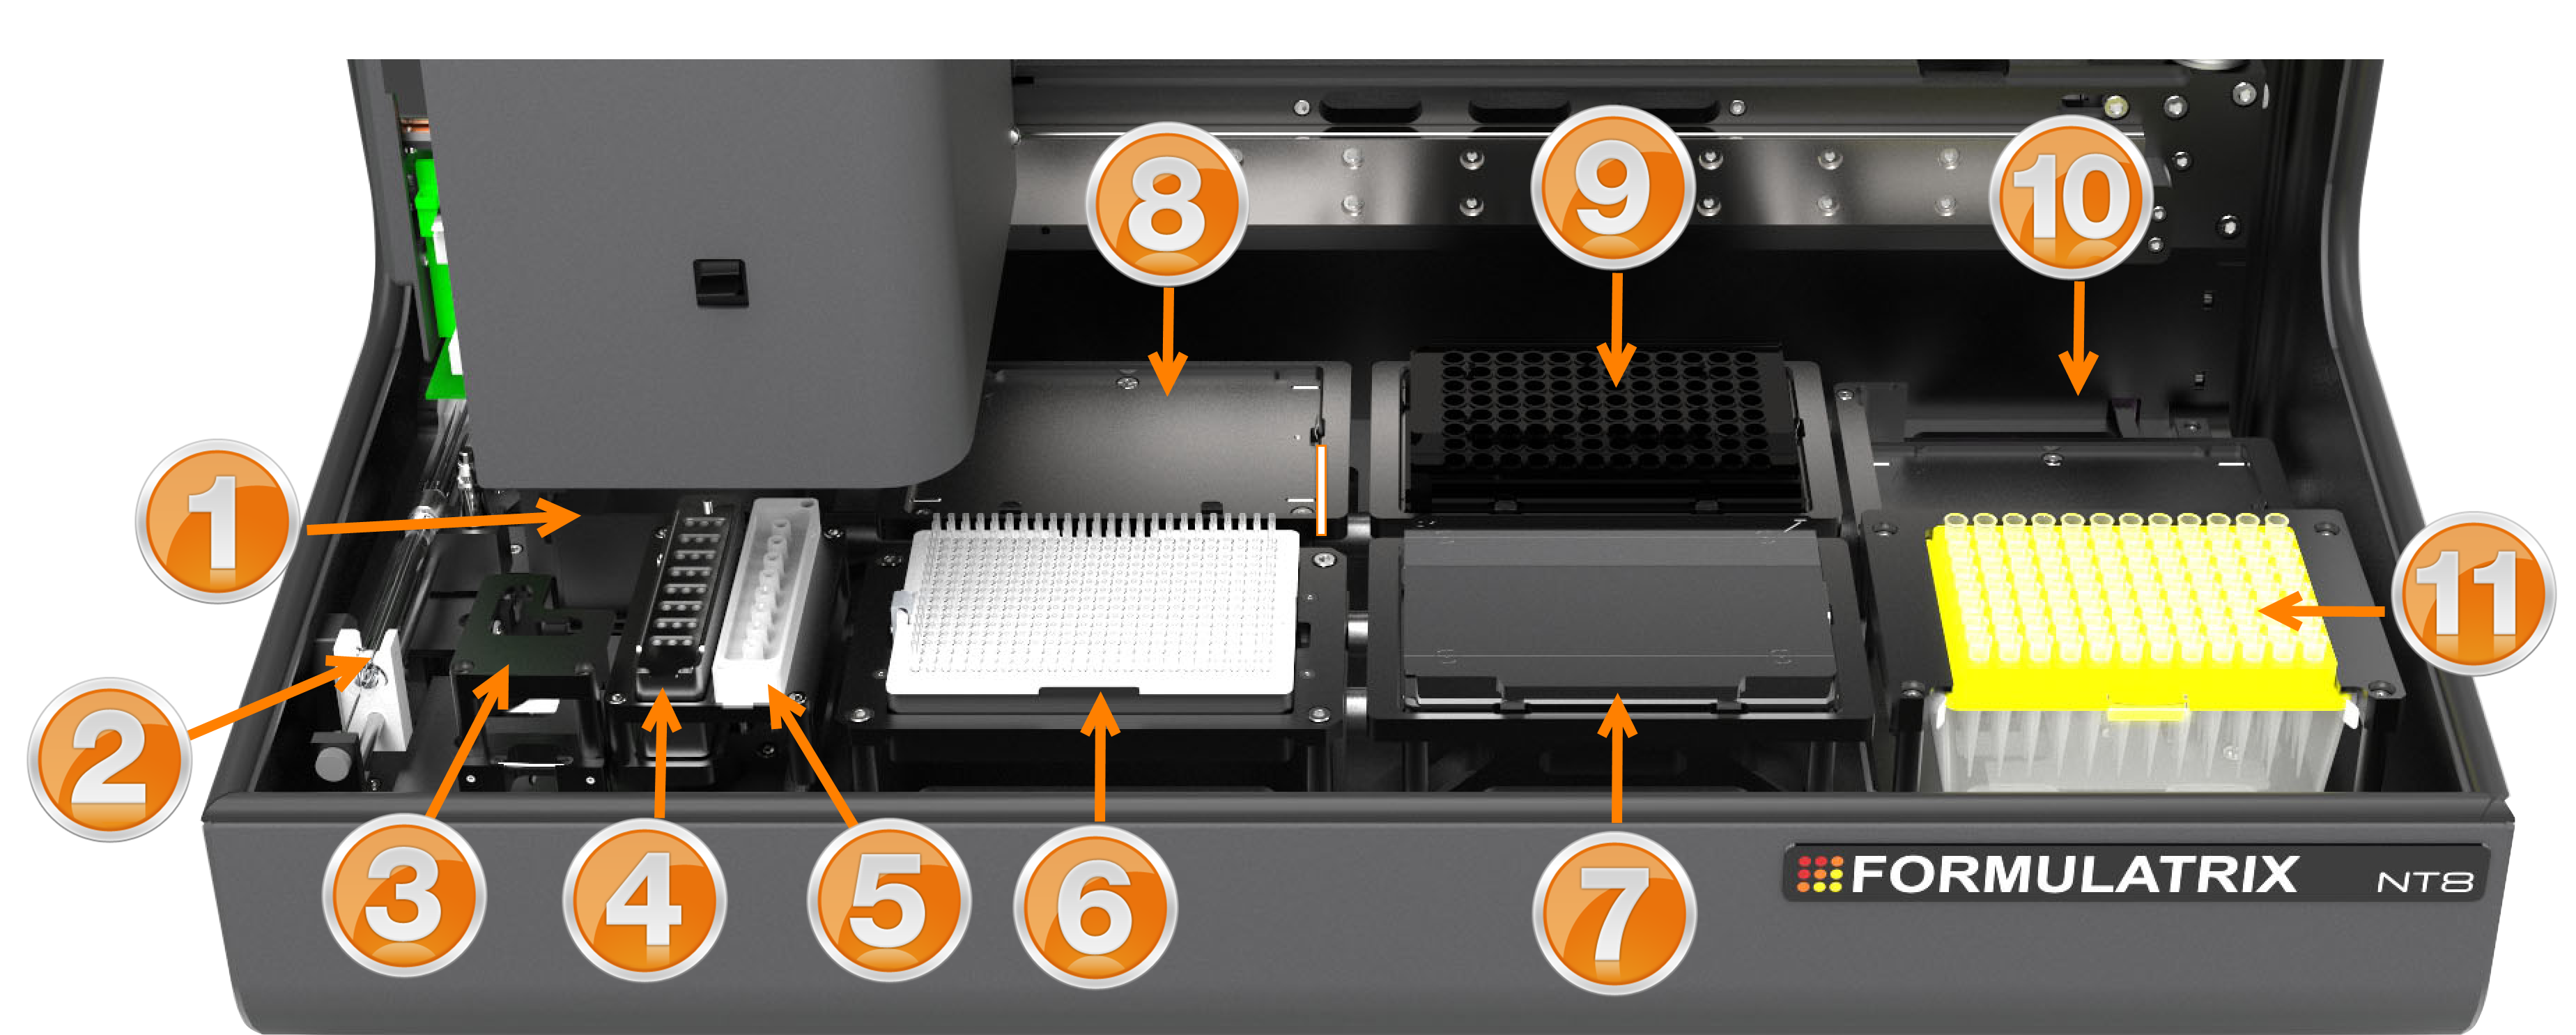
The NT8 Deck
The NT8 deck is divided into the following stations:
Note
Please refer to the NT8 hardware picture above to see the position of each station.
Waste Station
The waste station is where the NT8 disposes of low volume (LV) tips.
OPTIONAL: LCP Mixing Station
This option is only available if you purchase NT8 with the LCP option. The LCP Mixing Station saves you time from manually mixing lipids and protein solution. Syringes are installed on the mixing station and the plungers will move from side to side until the liquid is homogenous. The mixing speed is also adjustable to meet your needs. Please read Preparing LCP Samples for detailed instructions.
OPTIONAL: LCP Calibration Station
NT8 with an LCP Option includes a Calibration Station for your LCP syringe. The calibration process is fully automatic and should be done after you mount the syringe on the NT8 head. Read Attaching The LCP Syringe for more information.
Protein Source Station
The protein source station stores protein sample before it is dispensed into a plate. It is included in the NT8 accessories kit. The NT8 supports both low volume (LV) and high volume (HV) protein blocks, both of which come with a sensor that helps the NT8 Control Software to automatically detect the type of protein block being installed in the hardware.
Protein Block
When you purchase NT8, two protein blocks (low volume and high volume) come prepackaged in the accessories kit. Each protein block has three columns of eight drops each (24 total). The low volume protein block is capable of holding 3 μL while high volume protein block is capable of holding 13 μL. The protein sample is stored inside a disposable protein tray that is placed on top of the protein block and is secured by a magnet clamp.
Wash Station
The Wash Station is used to wash low volume pipette tips, allowing you to reuse them and reduce environmental waste. You can define the wash duration to meet your needs too!
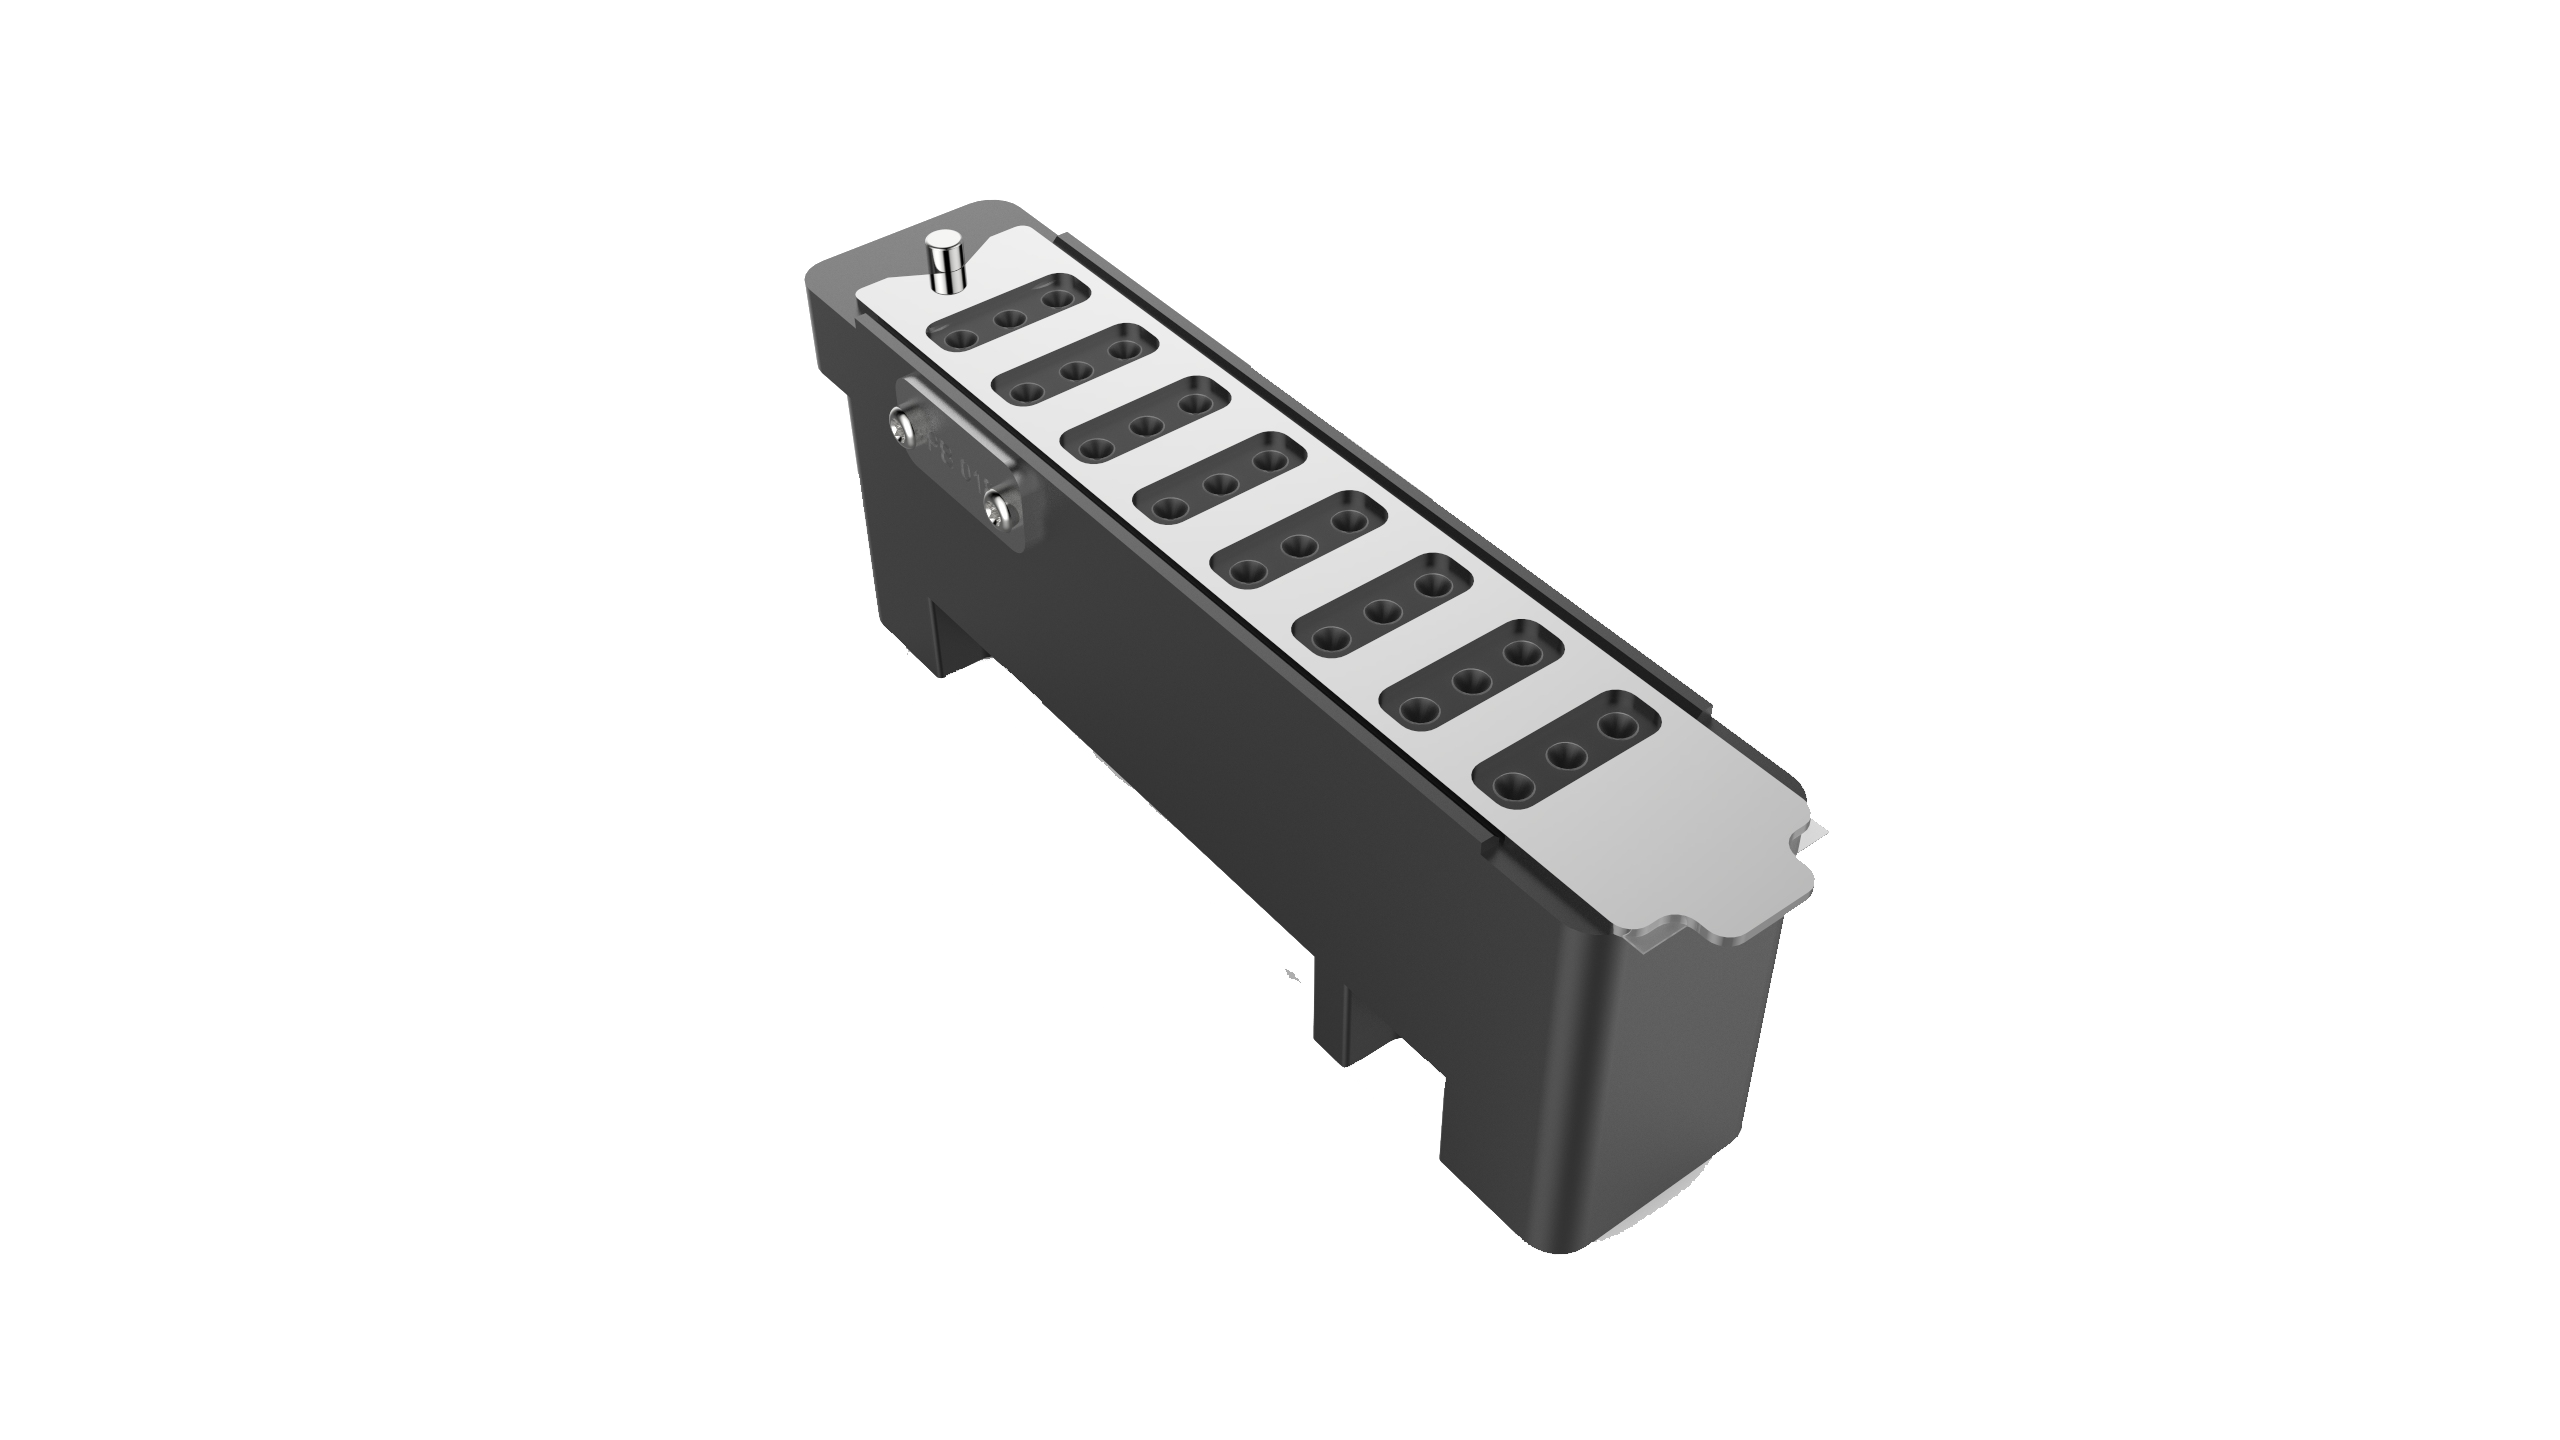
Low Volume (LV) Tip Caddy Station
The Low Volume (LV) tip caddy station is a repository that holds up to 384 replacement LV tips. Use these tips to aspirate protein sample from the protein tray.
,
,
Protein Stations
On the NT8 deck, there are designated areas for three SBS footprint microplates. Three microplates can be placed on the deck to transfer reagents from one plate to another. A hanging drop cover sheet can be placed on station #1 for setting hanging drops.
The NT8 accessories kit also includes a reference plate, which is useful for tuning plate station 1, 2, and 3 to get accurate dispense locations. The reference plate has four crosshairs (indicated by orange circles in the picture below) in every corner for reference points. The crosshair that is located near the A1 symbol represents well A1 on a microplate.
Note
The reference plate can also be used as a medium to attach the LCP plate and cover sheet necessary for LCP and hanging drop experiments.
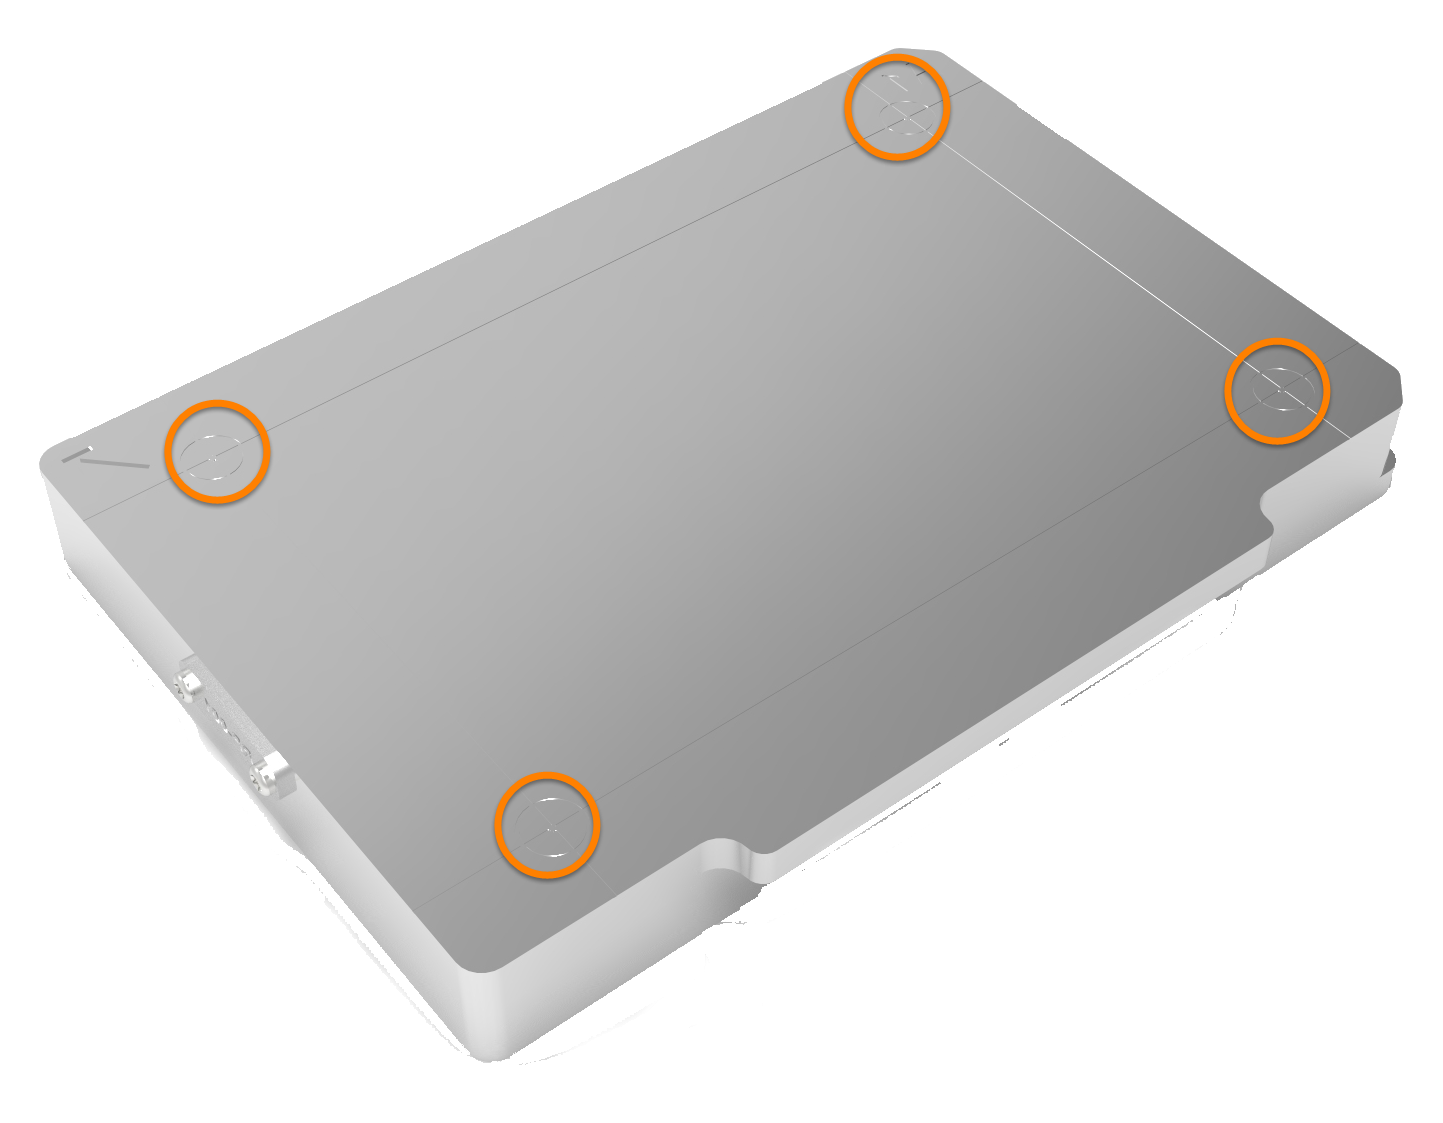
Reference Plate
OPTIONAL: High Volume (HV) Tip Caddy Station
The HV tip caddy station presents in the NT8 deck if you purchase NT8 with this option. The HV Tip Caddy Station holds up to 96 replacement HV tips for the system.
OPTIONAL: Deep Well Station
The deep-well station is compatible with 96 deep-well plates, which are used to copies of your experiments.
The NT8 Head
The NT8 head contains tools for aspirating and dispensing liquids stored in the plates or trays on the NT8 deck. You can tell the NT8 to move the head forward and backward, up and down, or to the right or left.
What you can find on the NT8 head:
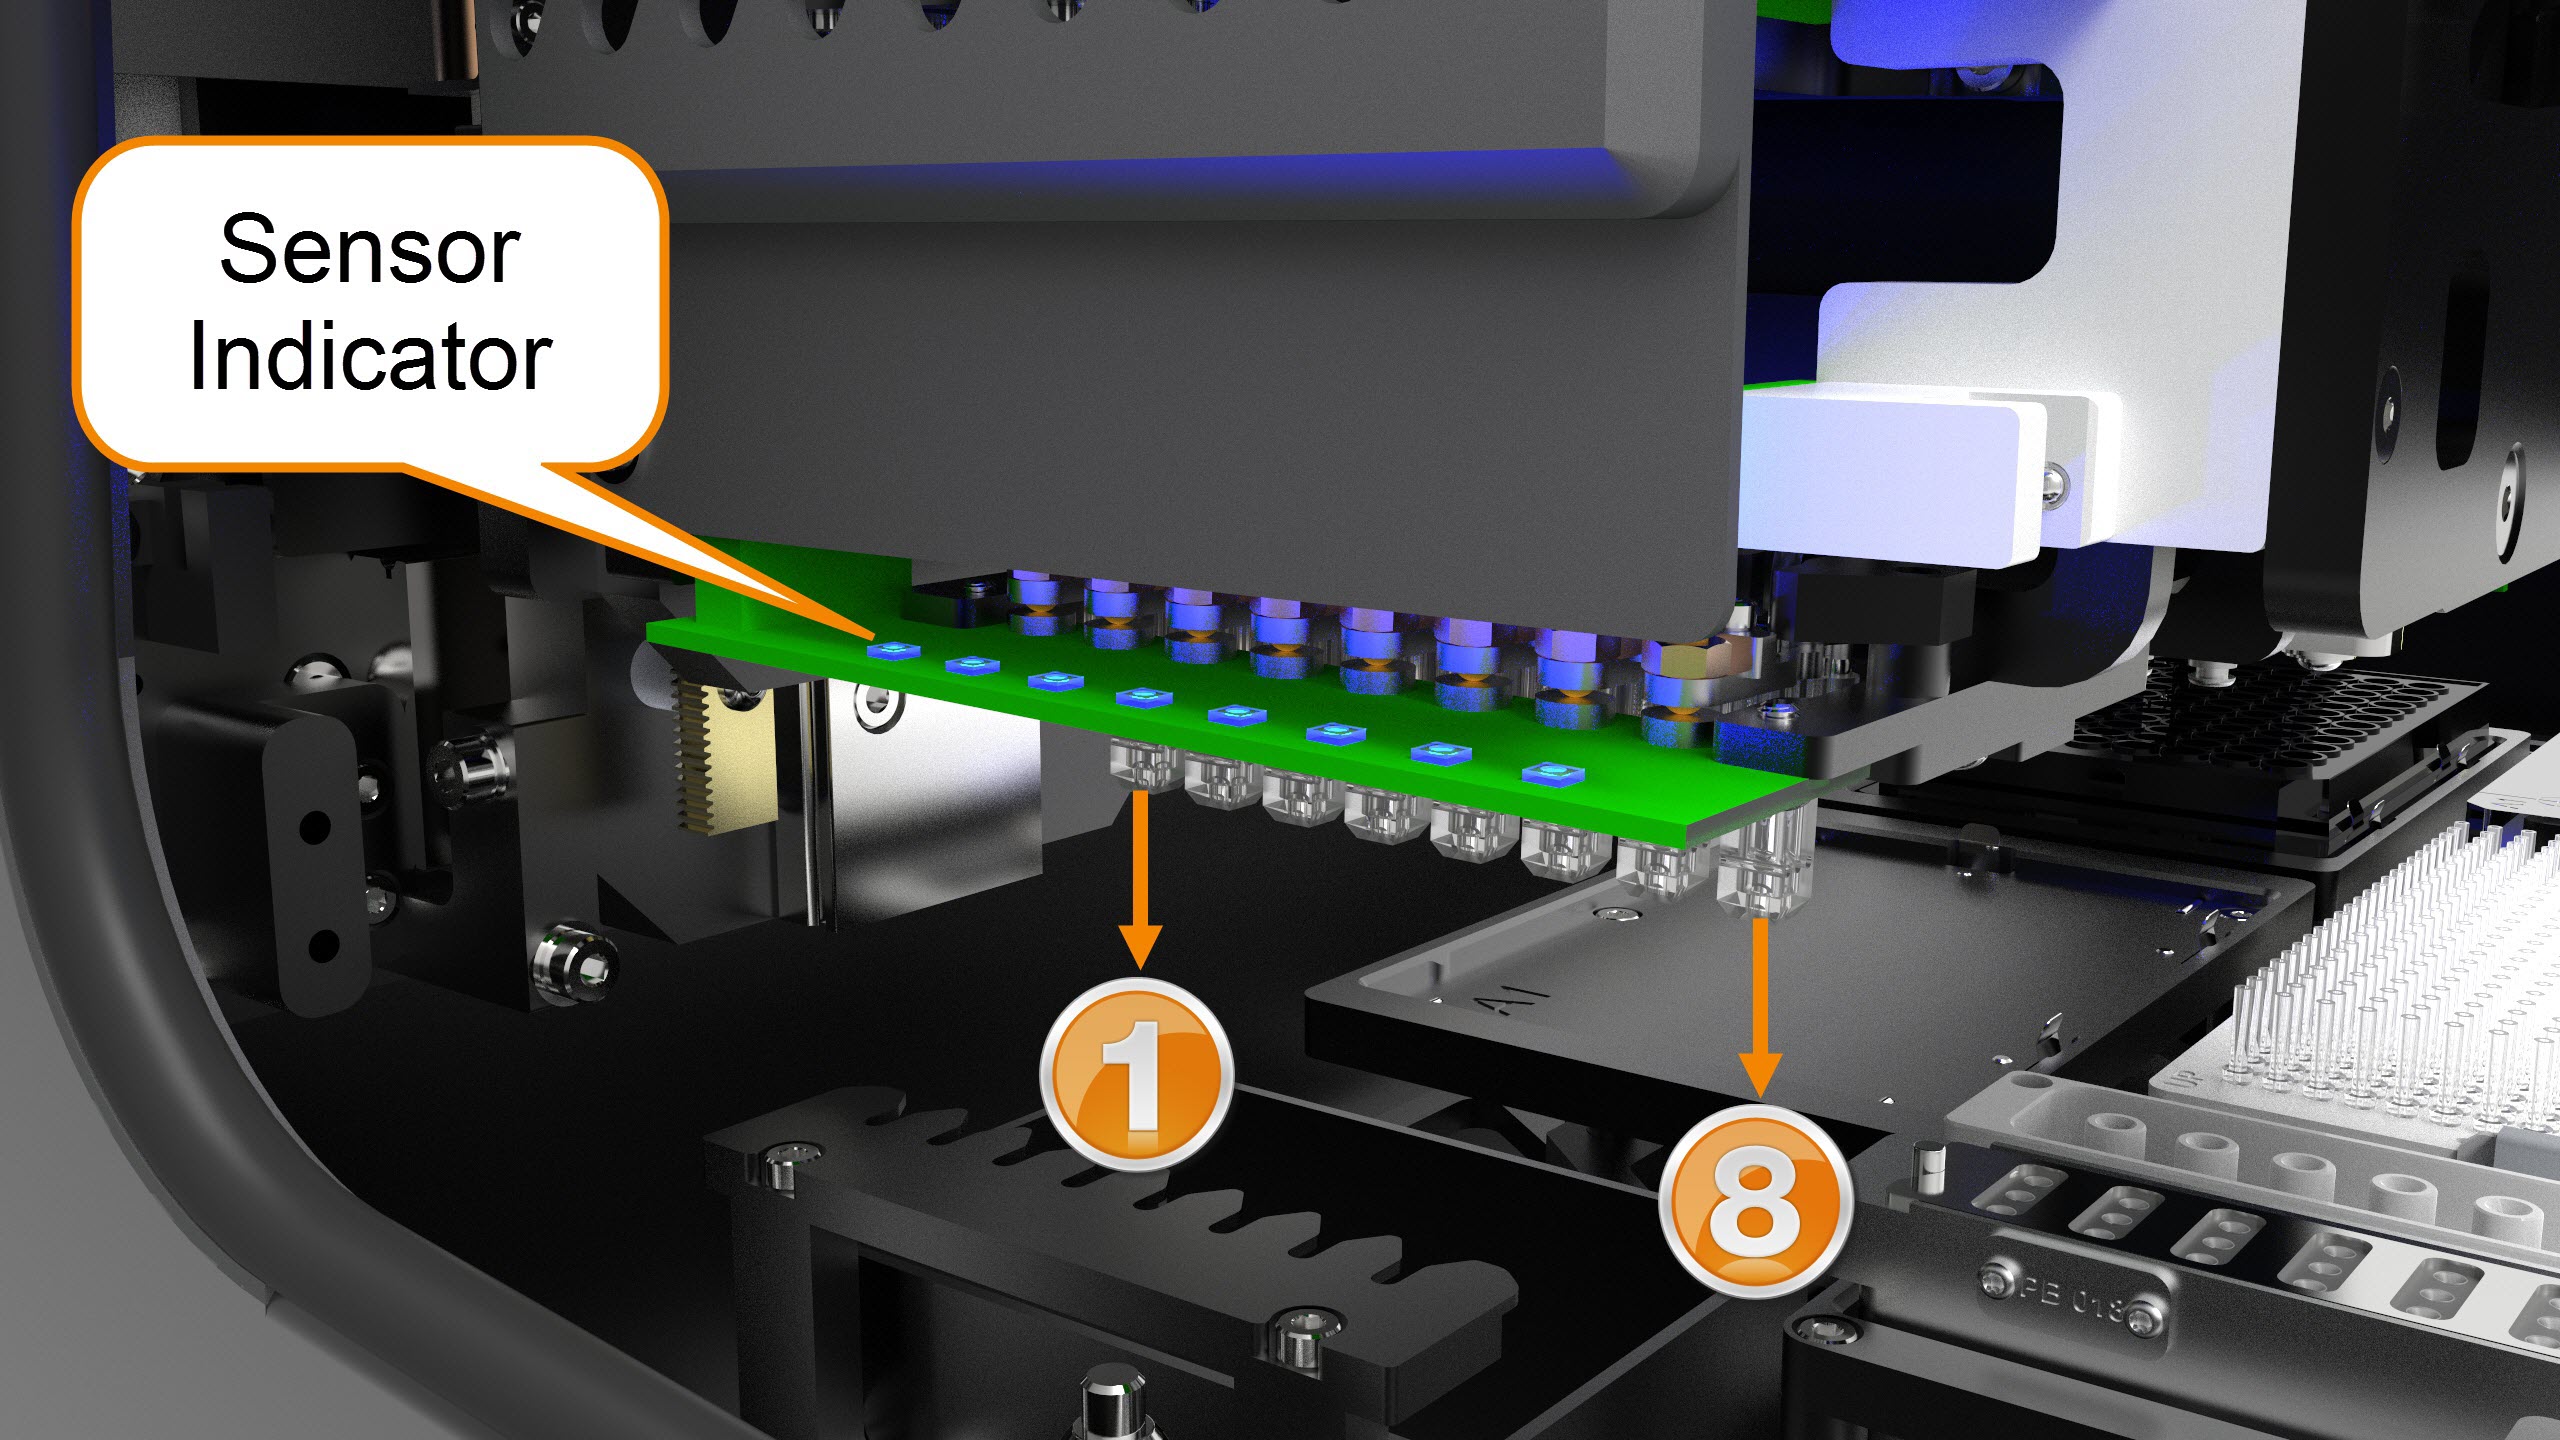
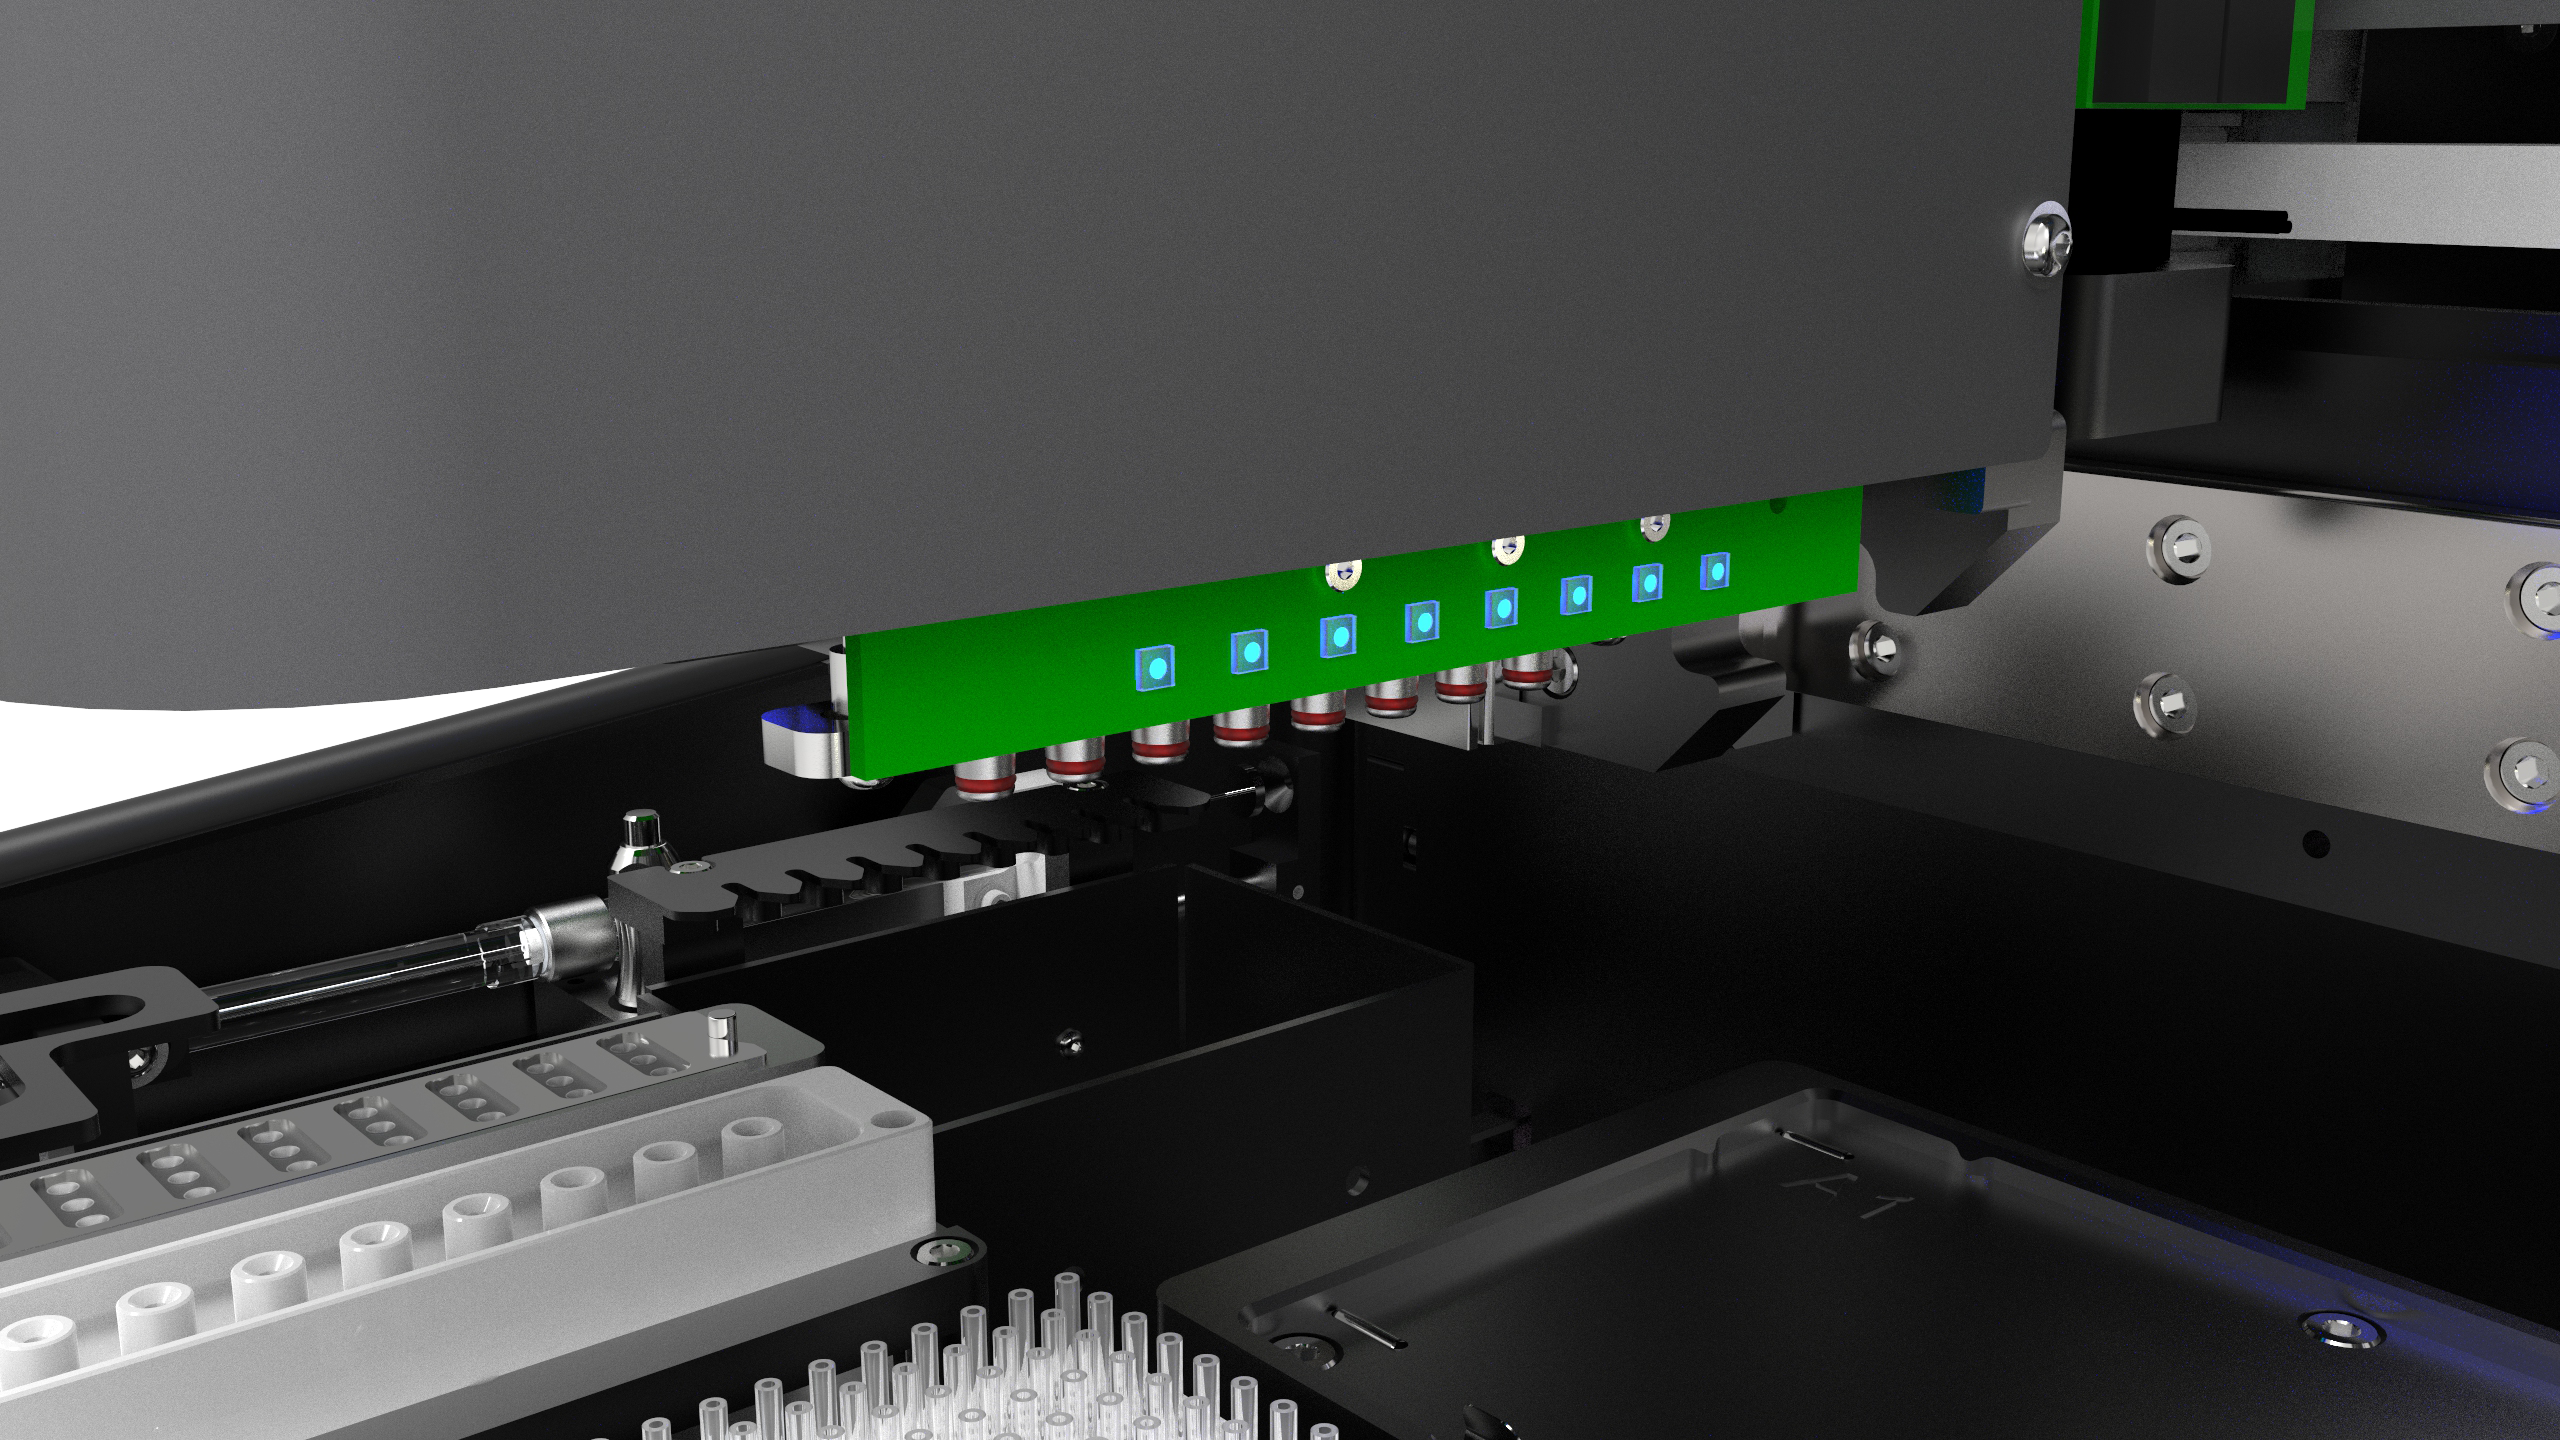
Low Volume (LV) Tip Attachments
Located in the bottom-left corner of the NT8’s head, LV tip attachments are where you install the LV tips for use in aspiration and dispense. There are up to 8 tip attachments (known as flexible fingers), that can travel independently +/- 0.5 mm vertically. This ensures pipette tips to contour to uneven plate surfaces.
All tips are also equipped with a sensor that indicates when a tip touches the surface, allowing the NT8 to drive down the surface of plate carefully. The tips will retract slightly away from the surface, allowing for a perfect dispense gap to set drops. This way, bubbles are eliminated and drop precision is improved.
Note
If the tip is touching a surface, the sensor will be off; otherwise it will be bright blue, as seen in the picture below.
Low Volume (LV) Tips Attachments
Note
When you see a tip number referenced in the text, 1 is the tip closest to the back of the instrument and 8 is the one closest to the front.
OPTIONAL: High Volume (HV) Tip Attachments
HV tip attachments are located in the bottom-right corner of the NT8’s head and are used for plate copy experiment. Each HV tip attachment is equipped with a sensor that detects contact with the liquid surface in a deep well plate. The HV tip attachment uses 200 μL pipette tips (eight at a time) to aspirate liquid from a deep well block and transfer it to a crystallization plate.
High Volume (HV) Tip Attachments
OPTIONAL: Lipidic Cubic Phase (LCP) Syringe Mount
If your NT8 includes the LCP option, there is an LCP Syringe Mount on the front left side of the NT8 head. It is compatible with a Hamilton LCP syringe.
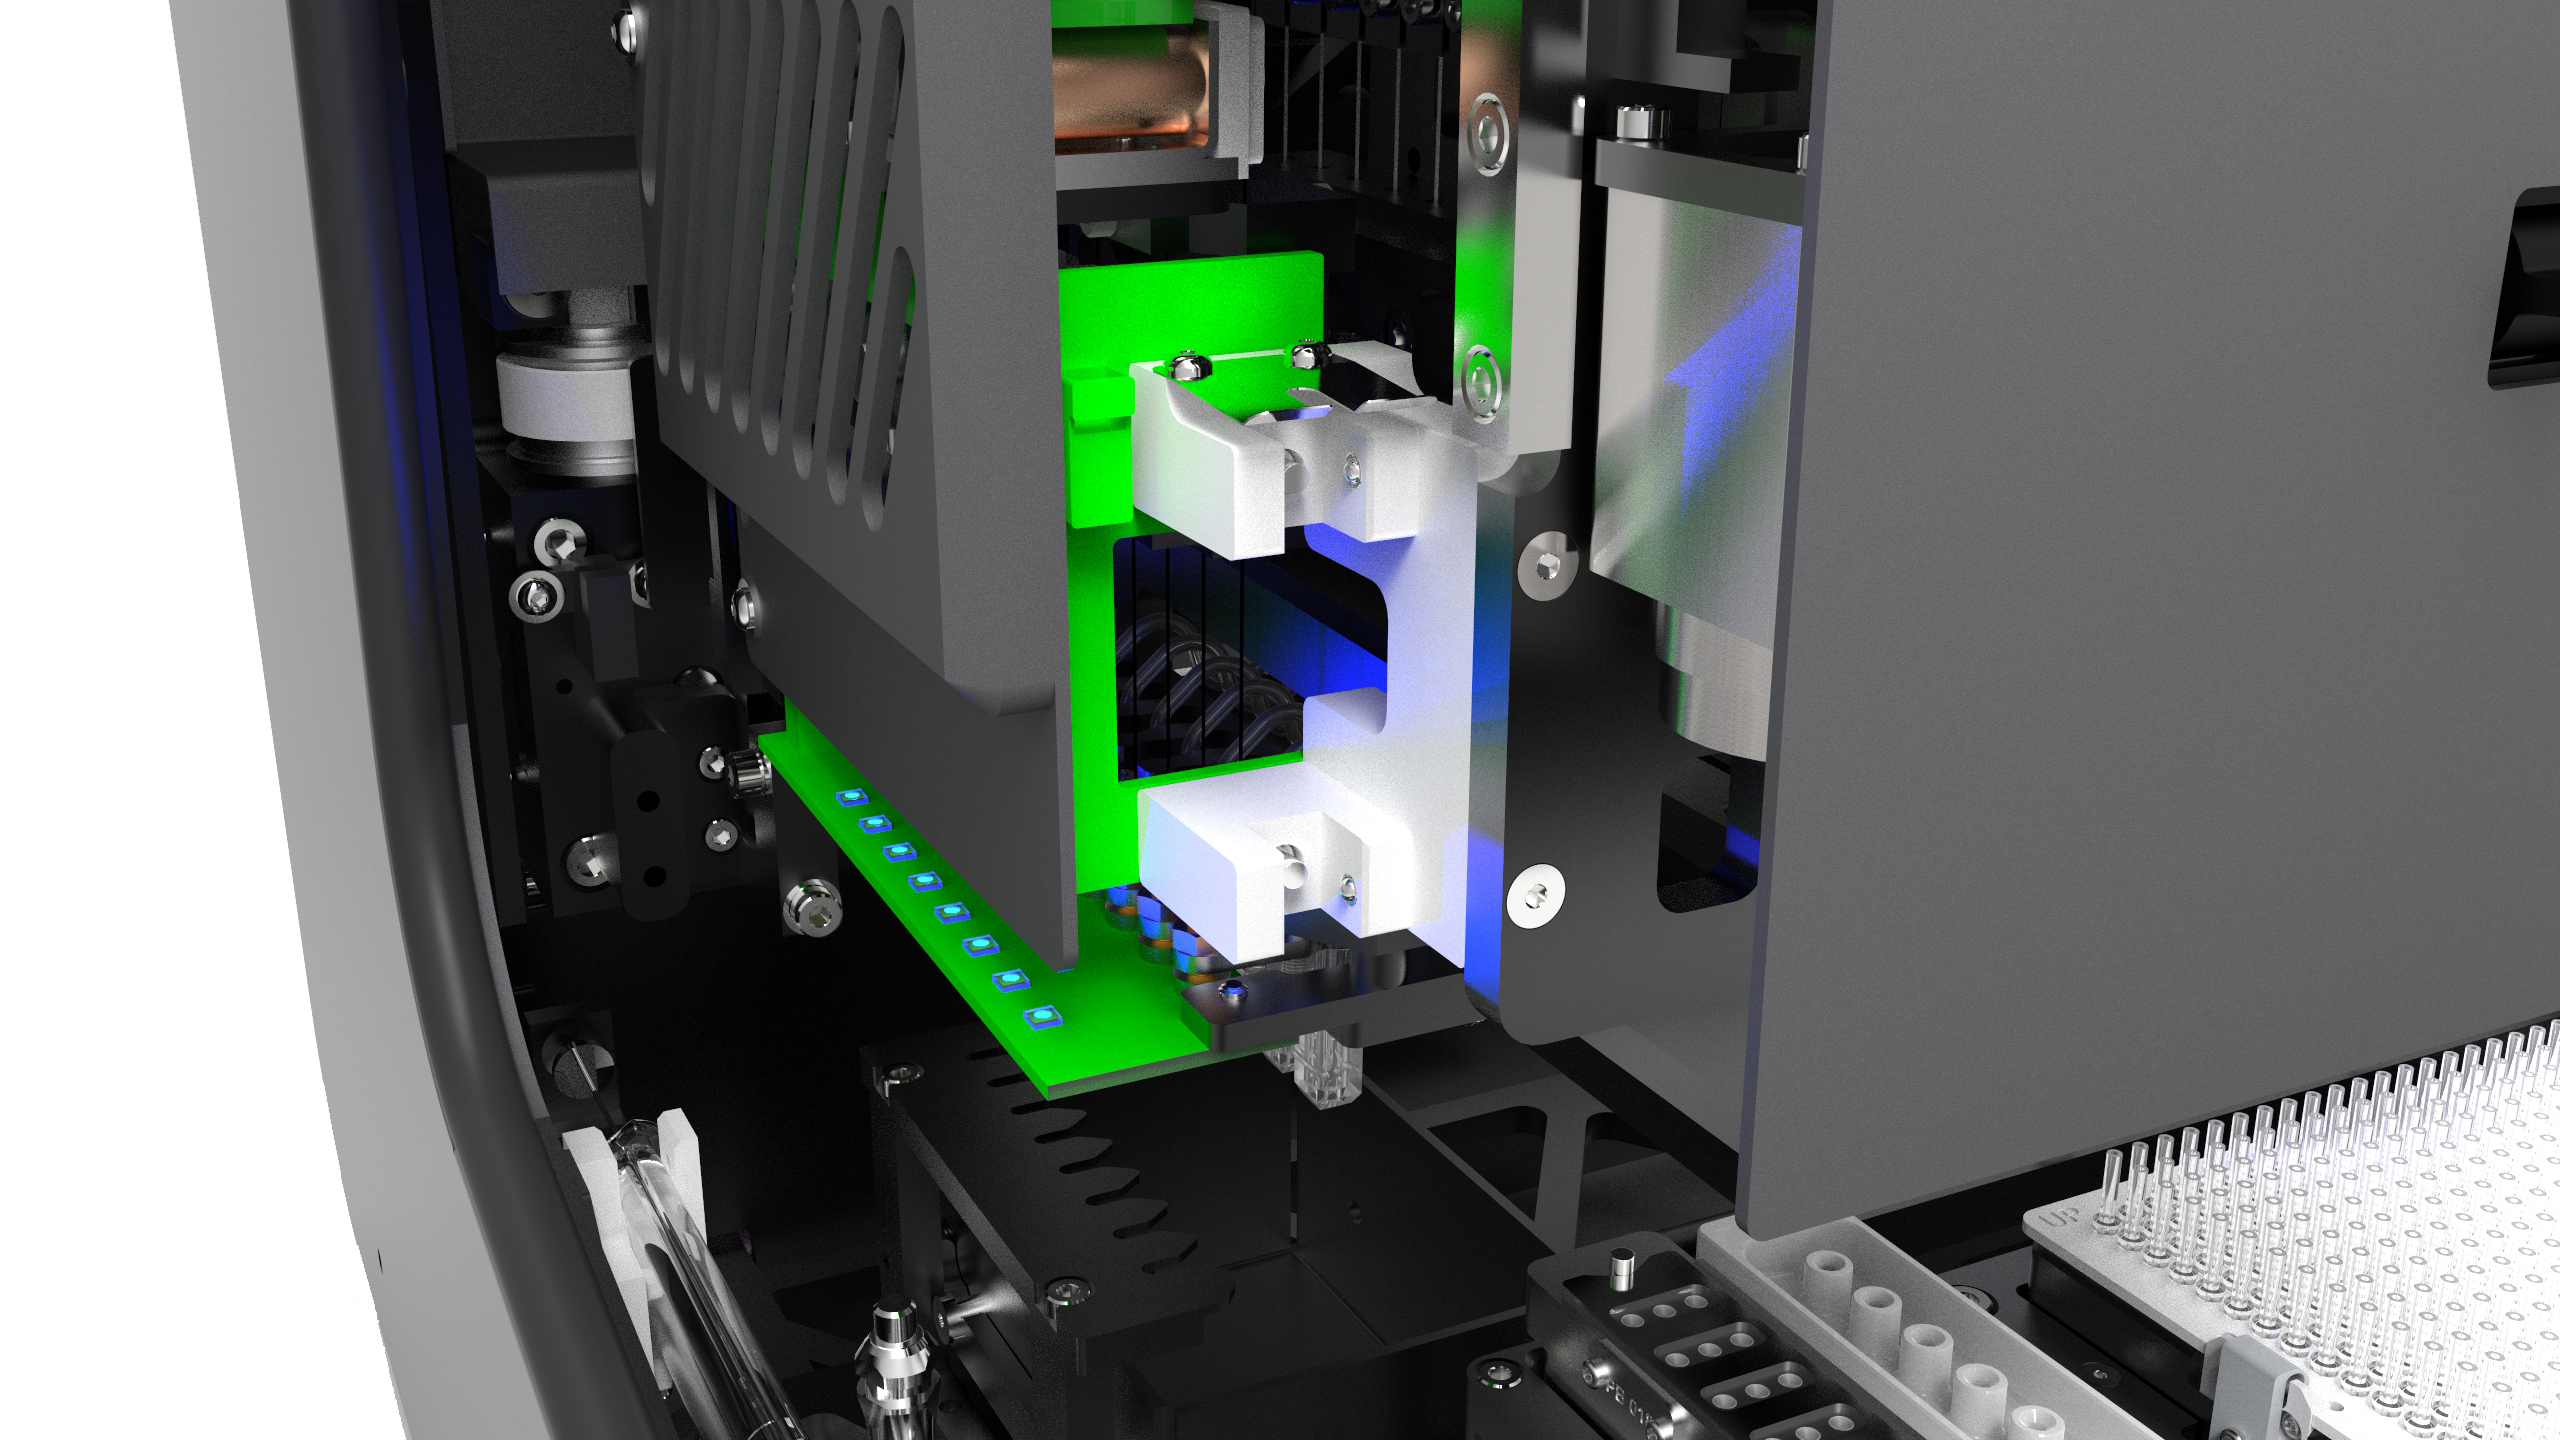
LCP Syringe Mount
OPTIONAL: Lipidic Cubic Phase (LCP) Lever
Adjust the LCP Syringe Mount.
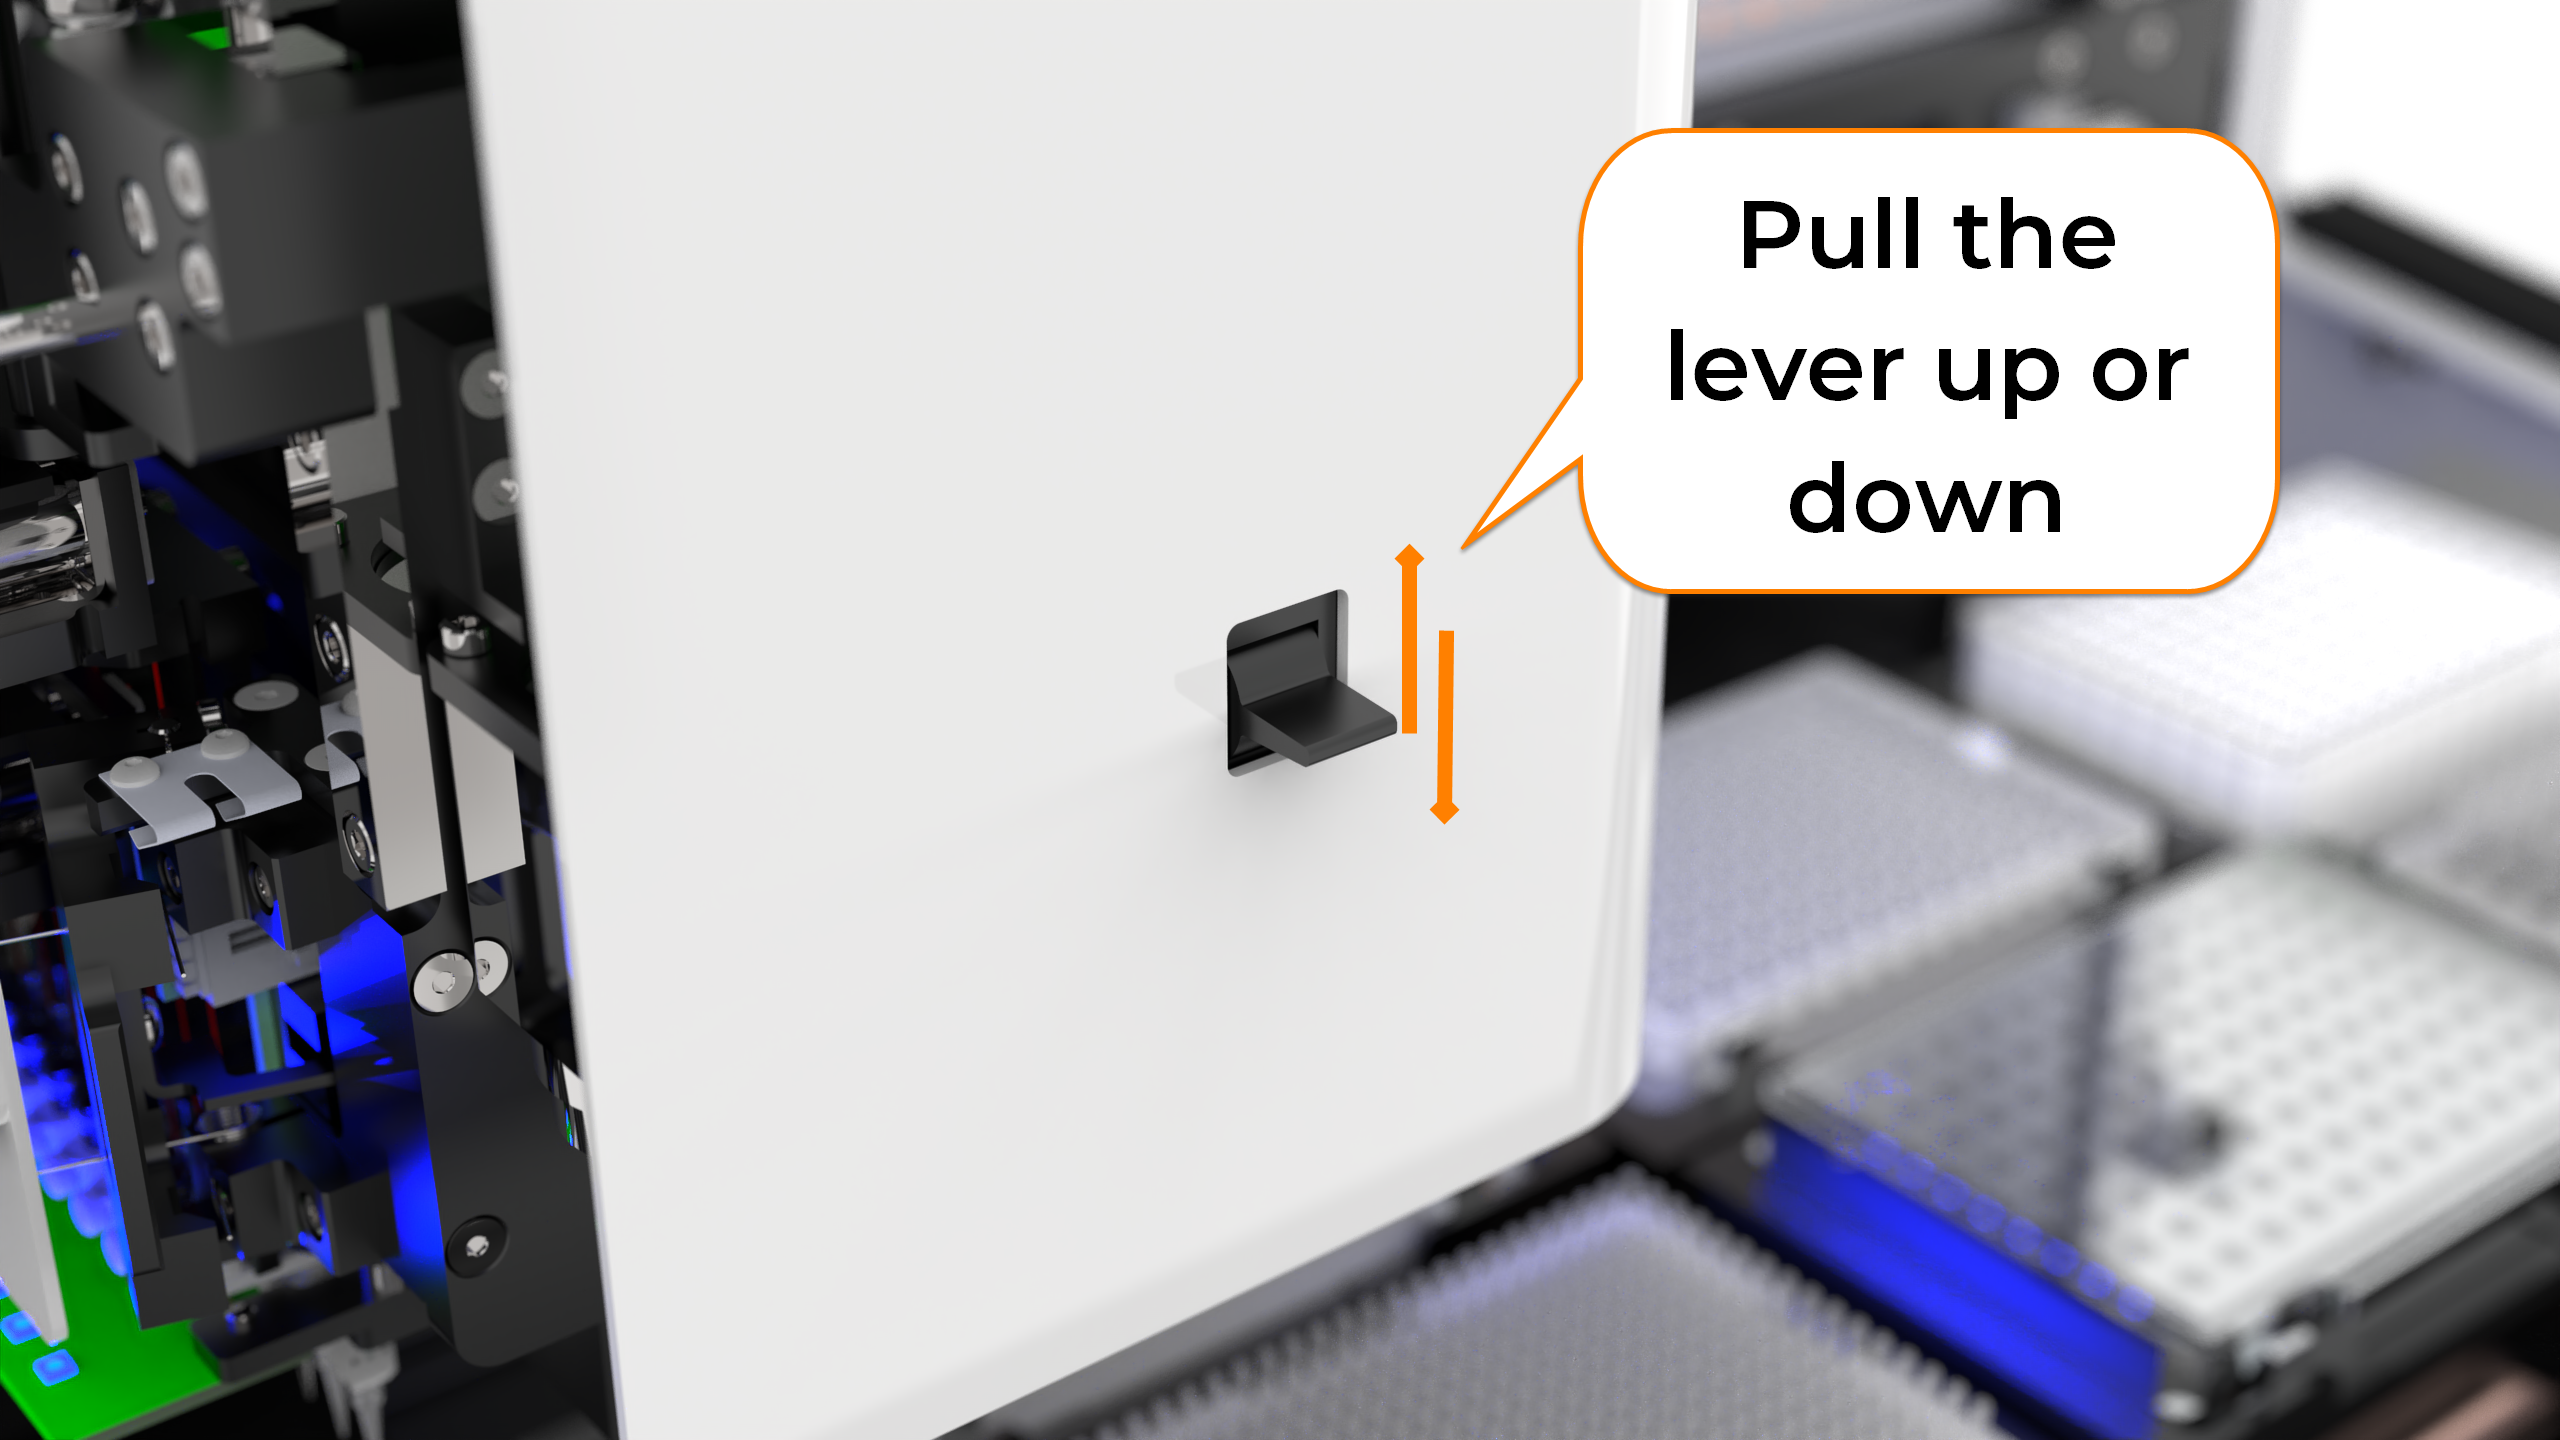
LCP Lever
Note
You can adjust the lever speed and height to fit the LCP syringe by clicking the Setup Joystick Speed button in the LCP Syringe Control panel and moving the lever button on the NT8’s head up and down, as needed.
Related Topics