LCP Experiments
Given the nature of an LCP experiment, the set up for an LCP dispense requires more hardware setup than other experiments. This tutorial walks you through hardware setup, provides two options for setting up the dispense in the software, running the LCP dispense, and finally attaching the LCP coverslip to the LCP base plate.
Set Up the NT8 Hardware
Prepare LCP Samples.
Place the LV tip caddy in its station and the microplate on Plate Station 2.
Prepare the LCP Plate:
Spray the LCP plate with a duster to remove any contaminants.
Peel off the brown packing tape.
Dab 2-3 drops of 70% Isopropanol to the reference plate surface before placing it on Plate Station 1. This way, the LCP plate will not slide out of the reference plate during the dispense process.
Align the four corners of drop locations to the crosshairs on the reference plate and affix the LCP plate to the reference plate.
Attach the LCP Syringe.
Use the lever to dispense a small amount of LCP sample from the syringe to prevent clogging and remove any air from the needle. This action will clear the tip of the syringe. Thus, the liquid will be at the perfect dispense level. Wipe the tip of the LCP syringe with a chem wipe.
The sensors on the NT8 will detect the presence of the LCP syringe. A dialog box will open asking if you want to calibrate the syringe. Click Yes.
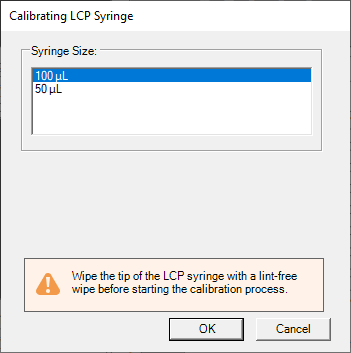
Calibrating LCP Syringe Dialog Box
Select the size of your LCP syringe and click OK. The NT8 will start calibrating the LCP syringe.
Option 1: Set Up the Software Using the LCP Template
An LCP dispense template is preinstalled with your software. You may use it if you plan to combine 800 nL well solution with 50 nL LCP drops.
To use this template
Click the Open Task List button
 in the Task List
panel.
in the Task List
panel.OR
Click the File menu and select Load Task List.
Open the Sample folder and select the LCP 50 nL Monolein And 800 nL Well Solution task list.
Click Open.
Once the selected task list is properly generated, click the Run Task List button
 to execute the Task List.
Option 2: Manually Set Up the Software
On Plate Station 1, click the downward arrow in the Select Plate Type field and select the LCP Plate Adapter from the Plate Selection window.
Click the downward arrow under Plate Station 2 and find the plate type you used for your well solution.
Add the Pick Tip command to the Task List by double-clicking the LV Tip Caddy image.
Click the Add Repeat Task button
 in the Task List
panel to mark the beginning of tasks that will be repeated for every
column.
in the Task List
panel to mark the beginning of tasks that will be repeated for every
column.Add the Wash Tip command to the Task List by double-clicking the Wash Station image. The default wash time is 2 seconds. You can adjust it by double-clicking the Wash Tip action in the Task List panel.
Instruct the NT8 to aspirate from well solution:
Double-click the image of the plate containing your well solution to open the Task Details window.
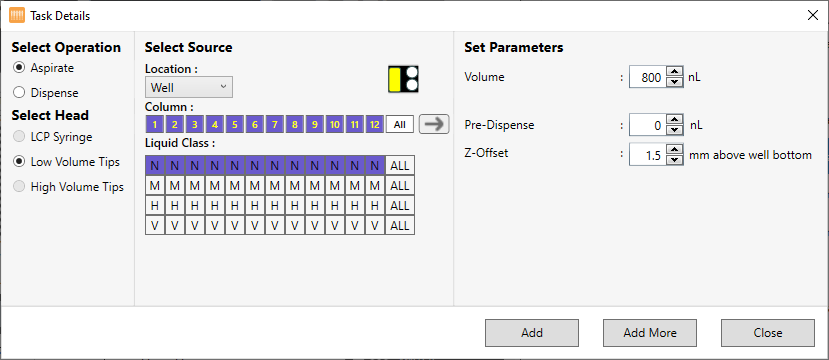
Task Details Window
Under Select Operation, select Aspirate. The Low Volume Tips under Select Head is automatically selected.
Under Location drop-down list, select Well. The selected location is highlighted in yellow.

Selecting Target Area
To select multiple columns, click the first desired column, then hold the Shift key and click the last desired column.
Select a Liquid Class from the Liquid Class list.
Next to Volume, type the volume you want to aspirate from each well.
Set the additional volume to be aspirated after aspirating the targeted volume in the Pre-Dispense box.
Next to Z-Offset, type the distance from the bottom of the well you want the tip to aspirate from.
Click Add.
Instruct the NT8 to dispense the LCP sample:
Double-click the LCP Plate Adapter image on Plate Station 1 to open the Task Details window.
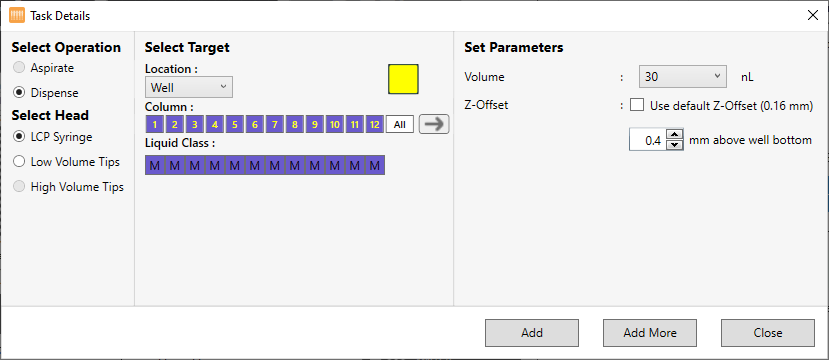
Task Details Window
Under Select Operation, click Dispense. The LCP Syringe under Select Head is automatically selected.
Under Column, click column 1, then press and hold the Shift key and click column 12 to select all columns.
Select a Liquid Class from the Liquid Class list.
Next to Volume, select the amount of LCP sample you want to dispense to each drop.
Next to Z-Offset, type the distance from the bottom of the well you want the tip to start dispensing.
Click Add to add the task to the Task List.
Instruct the NT8 to dispense the well solution to the drop:
Double-click the LCP Plate Adapter image on Plate Station 1 to open the Task Details window.
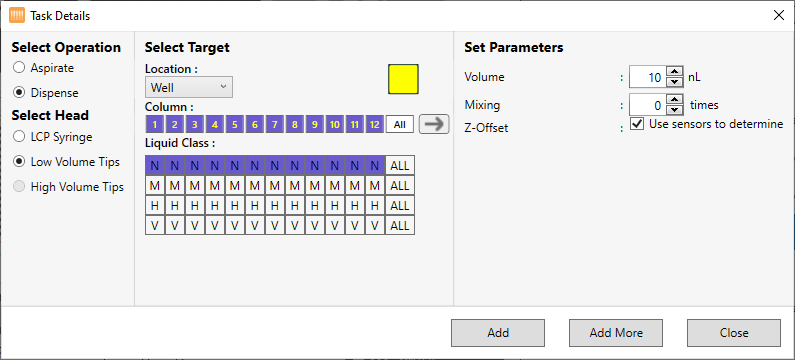
Task Details Window
Under Select Operation, click Dispense. The Low Volume Tips under Select Head is automatically selected.
Under Column, click column 1, then press and hold the Shift key and click column 12 to select all columns.
Select a Liquid Class from the Liquid Class list.
Next to Volume, select the amount of protein sample you want to dispense to each drop.
OPTIONAL: Next to Mixing, set the number of times you want the protein to be mixed prior to dispensing.
Next to Z-Offset, enter the distance the tips should travel before dispensing your drops. It is strongly recommended that you use the default offset as set by the software.
Click Add to add the task to the Task List.
Click End Repeat in the Task List to select it.
Double-click the Waste Station image to add the Dispose Tip command to the Task List.
Run the LCP Dispense
Click the Run Task List button to execute the Task List.
The NT8 picks up the LV tips, washes them, aspirates from the microplate
containing the well solution, then dispenses the LCP sample across a
column and then dispenses a column of well solution to the LCP sample
drops. This process repeats for each column you specified for the LCP
plate. After the NT8 has completed the tasks for each column, it
disposes the tips in the waste station.
Attach the LCP Coverslip
Gently place the coverslip on the dispensed LCP plate. Use a roller or spatula to apply force to the coverslip to affix the coverslip to the base plate.
Related Topics