Hanging Drop Experiments
Setting up a hanging drop experiment with the NT8 involves six basic steps:
When you set up a hanging drop experiment with the NT8, you must remember to set up the dispense in the opposite direction by clicking the dispense direction arrow. This is because you will flip the plate when you put the plate seal on the MRC 2 Well Crystallization Plate.
Power On the NT8 and Start the Software
Connect the NT8 to your computer using the USB cable.
Find the power switch located on the back-right of the NT8 and turn it on.
Double-click the NT8 icon on your computer’s desktop. It will take a few moments for the NT8 Control Software to load while the NT8 initializes. The instrument indicator on the bottom-left corner of the software will turn green when the NT8 is connected and ready to use.
Set Up the NT8 Hardware
Place the LV tip caddy in its station and the microplate on Plate Station 2.
Attach the Plate Seal to the reference plate:
Tear off the tab at the angled side of the Plate Seal. Then, carefully remove the liner from the entire seal.
Dab a small amount of 70% Isopropanol on the reference plate. This helps adhere the Plate Seal to the reference plate during the dispense.
Using the crosshairs to align the Plate Seal to the reference plate, fasten the Plate Seal to the microplate.
Important
The angled corners of the plate seal should be at the right side of the reference plate. After the dispense, you will flip the reference plate horizontally to the right to place the Plate Seal on the experiment plate.
Place the reference plate on a microplate station (angled corners of plate seal should be at the right).
Place the protein strip on the protein block, and put the protein strip clamp on top of the protein strip to hold it in place. You will pipette your protein into the protein block after you set up the software.
Option 1: Set Up the NT8 Software Using the Hanging Drop Templates
A hanging drop experiment template is preinstalled with your software. You may use it if you plan to combine 100 nL protein with 100 nL well solution for a 200 nL dispense.
To use this template:
Click the Open Task List button
 in the Task List
panel.
in the Task List
panel.OR
Click the File menu and select Load Task List.
Open the Sample folder and select the Hanging Drop MRC2 100 nL Protein And 100 nL Well Solution task list.
Click Open.
Once you make sure everything is all set, click the Run Task List button
 to execute the Task List.
Option 2: Manually Set Up the NT8 Software
Mimic the NT8’s physical setup with the software:
Under the associated plate station on the software, click the downward arrow and select the correct microplate that you are used during hardware setup from the Plate Selection window.
Select the plate station on which you put the reference plate during hardware setup, click the downward arrow and select the UVP Hanging Drop Plate Seal from the Plate Selection window.
Double-click the LV Tip Caddy image to add the Pick Tip command to the task list.
Click the Add Repeat Task button
 on the Task List to
start the beginning of tasks that will be repeated on every column of
a plate.
on the Task List to
start the beginning of tasks that will be repeated on every column of
a plate.Double-click the Wash Station image to add the Wash Tip command to the task list. The default Wash Time is two seconds. You can adjust it by double-clicking the Wash Tip action in the Task List panel.
Tell the NT8 to aspirate protein from the protein block:
Double-click the Protein Block image to open the Task Details window.
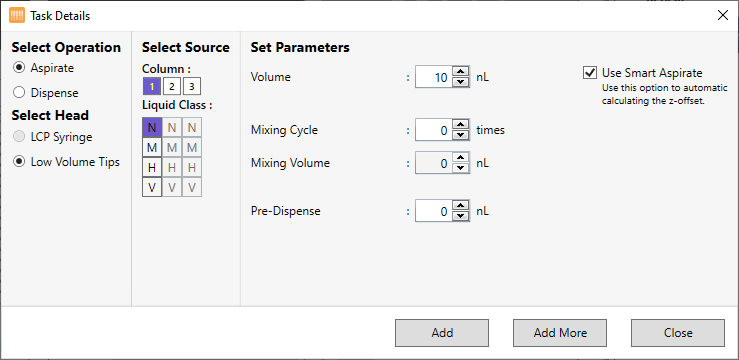
Task Details Window
Under Select Operation, select Aspirate. The Low Volume Tips under Select Head is automatically selected.
Under Column, select the column where you’ll aspirate the protein from.
Select a Liquid Class from the liquid class list.
Next to Volume, enter the volume to be aspirated.
OPTIONAL: Next to Mixing Cycle, enter the number of times you want the volume to be mixed.
OPTIONAL: Next to Mixing Volume, set the volume to be mixed.
OPTIONAL: Set the additional volume to be aspirated after aspirating the targeted volume in the Pre-Dispense box.
OPTIONAL: You may opt for Custom Aspirate to determine the tip height during an aspiration task. However, we recommend that you use Smart Aspirate so that the tip height will automatically adjust to the remaining volume in the protein tray. Smart Aspirate is enabled by default.
Click Add.
Instruct the NT8 to aspirate solution from the microplate:
Double-click the plate image to open the Task Details window.
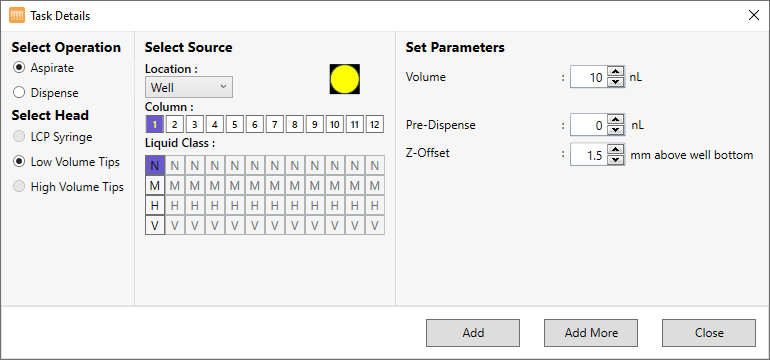
Task Details Window
Under Select Operation, select Aspirate. The Low Volume Tips under Select Head is automatically selected.
To select multiple columns, click the first desired column, then hold the Shift key and click the last desired column.
Select a liquid class from the liquid class list.
Next to Volume, enter the volume you wish to aspirate from the well.
Set the extra volume to be aspirated after aspirating the targeted volume in the Pre-Dispense box.
Next to Z-Offset, select the height you want the pipette tips to stop at before aspirating from the well.
Click Add.
Instruct the NT8 to dispense the solution to the Plate Seal:
Double-click the Plate Seal image in Plate Station 1 to open the Task Details window.
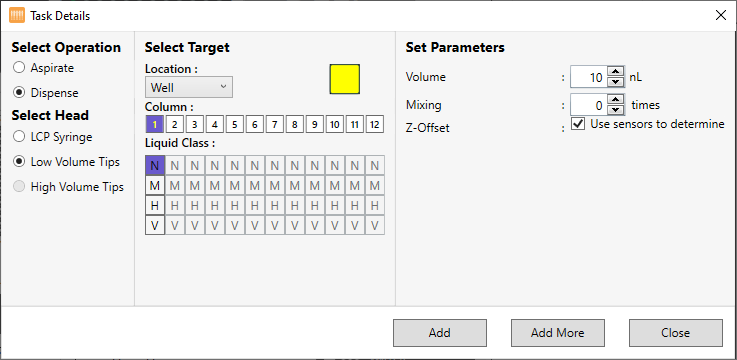
Task Details Window
Verify that Dispense is selected under Select Operation. The Low Volume Tips under Select Head is automatically selected.
Verify that columns 1-12 are selected next to Column (if selected, they appear in dark blue). If not, click column 1, then press and hold the Shift key and click column 12 to select all columns.
Select a liquid class from the liquid class list.
Next to Volume, enter the desired dispense volume (generally the combined volume of the well solution and the protein volume).
OPTIONAL: Set the number of time you want the solution to be mixed in the Mixing field before being dispensed.
Next to Z-Offset, enter the distance the tips should travel before dispensing your drops. It is strongly recommended that you use the default offset as set by the software.
Click Add.
Click End Repeat in the Task List to select it.
Double-click the Waste Station to add the Dispose Tip command to the Task List.
OPTIONAL: Save your Task List by clicking the Save Task List button
 .
.OR
Click the File menu and select Save Task List. Your task list will look like this.
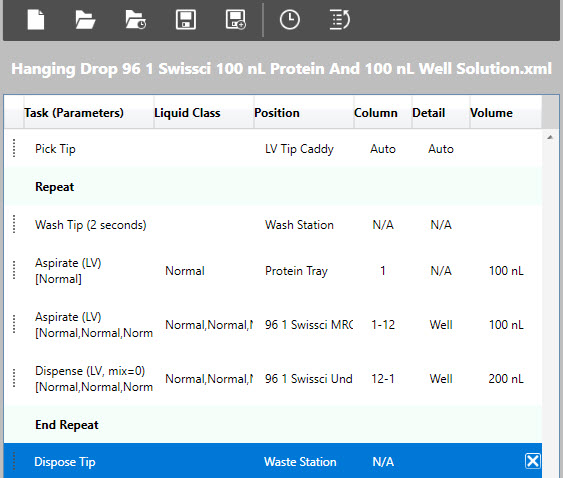
Hanging Drop Task List
Add Protein to the Protein Block
There are two ways you can add the protein sample to the protein block. Follow step 1 to pipette the sample manually and follow step 2 to tell the NT8 to dispense the protein sample using an LCP syringe.
Using a hand pipette, pipette the protein to be used in the sitting drop experiment into the protein block.
Note
After the task list has been created, the volume of protein to add to the wells of the protein block will be indicated at the bottom of the protein block image.
Run the Hanging Drop Dispense
Click the Run Task List button to execute the Task List.
The NT8 head moves to the LV Tip Caddy, picks up a column of tips, then
washes them at the wash station. Next, the NT8 will aspirate protein
from the protein block, then aspirate solution from the microplate well.
Finally, the NT8 will dispense the hanging drops to the Plate Seal. This
series of actions will be repeated on each column specified. Finally,
the NT8 will dispose the used tips into the waste station.
Transfer the Hanging Drops to the Microplate
When the dispense is done.has completed, take the microplate and place it on the HD seal jig transfer. The A1 position should be at the top-left corner.
Place the Plate Seal and the reference plate on the microplate by carefully flipping it over horizontally above the microplate. Use the three steel pins to guide the reference plate into place. The angled edges of the Plate Seal should match the angled edges of the microplate. Once in place, press down firmly.
Carefully slide the reference plate to the right. The adhesive surface on the Plate Seal should keep it in place while you remove the reference plate.
Use a microplate seal roller to secure the Plate seal to the microplate surface to assure each well is properly sealed.
Related Topics