Plate Stations 1, 2, and 3
NT8 provides up to three Plate Stations on the deck that you can use to add aspirate and dispense commands for sitting drop, hanging drop, LCP, and plate copy dispenses.
You can use any Plate Stations for sitting drop experiments. Similarly, you can transfer screens from a Deep Well block to a microplate using any Plate Stations available on the deck. Use Plate Station 1 to set your LCP and hanging drop dispenses.
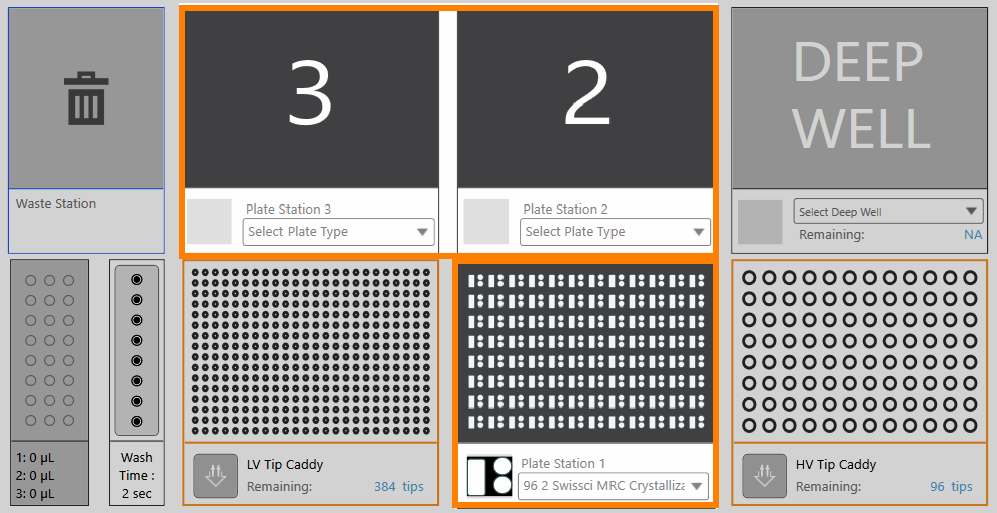
Plate Stations 1, 2, and 3
Prerequisite:
You have added the LV Pick Tip command to the Task List.
To set aspirate and dispense commands:
Select the desired microplate from the Select Plate Type dropdown list located on each Plate Station.
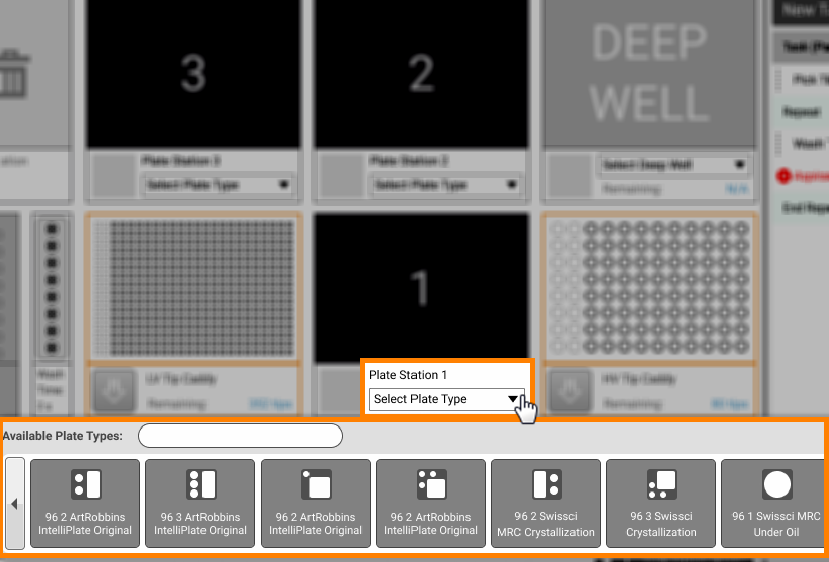
Selecting Microplate
Note
You must use Plate Station 1 if you are dispensing LCP drops.
OPTIONAL: If you want to add commands for every well on a plate, click the Add Repeat Task button
 in the Task List
panel.
in the Task List
panel.Double-click the selected microplate to display the Task Details window.
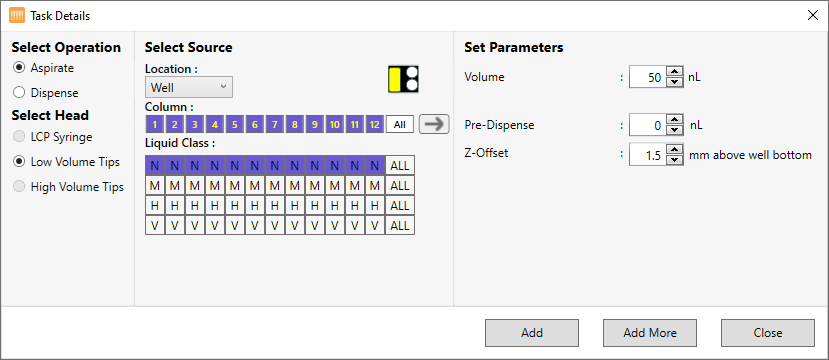
Task Details Window for Creating an Aspirate Task
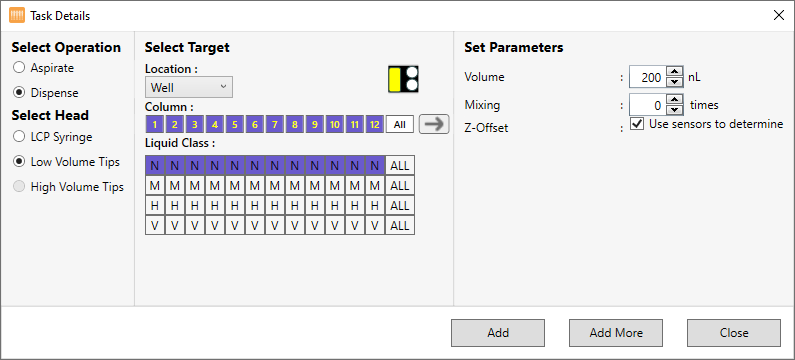
TTask Details Window for Creating a Dispense Task
Then, refer to the table below as a guide to use the Task Details window.
Note
The Task Details information and Select Source/Target image may vary depending on the plate type in use.
Show me what the Task Details window consists of
Select Operation
Provides two options: Aspirate and Dispense. NT8 can dispense different volumes to different columns on a plate with any of the heads. To do so, you need to create a second dispense task with the second desired volume. For example, you can dispense 50 nL of monoolein to columns 1-6, and 80 nL to columns 7-12
Select Head
Represents three available heads: LCP Syringe, Low Volume Tips, and High Volume Tips. This section is automatically selected based on the head attached to the hardware.
Select Source/Select Target
The area description will change according to the option you choose in the Select Operation area.
Aspirate → Select Source
Dispense → Select Target
This section is divided into three parts:
Location: From the dropdown list, you can select which location you want the NT8 to perform the aspirate or dispense task to.
Column: Represents the well column numbers. Select the desired well column number by clicking on the corresponding number. For multiple selection, click All or hold the Shift key and click the desired well column number. If a column is selected, it appears in dark blue. The NT8 will perform the action on the selected number(s).
The All button will be available if the Repeat command on the Task List is selected.
OPTIONAL: Click on the arrow next to the Column field to reverse the aspirate/dispense direction. This step is required for a dispense task in hanging drop experiments.
Liquid Class: Provides four liquid class options [Normal (N), Medium (M), High (H), and Very High (V)]. It’s important to select the correct liquid class for each liquid, and on a column-by-column basis when necessary. You can apply the liquid class to individual well columns if the Repeat command on the Task List is selected.
Set Parameters
This section is divided into the following parameters:
Volume: Set the liquid volume in nL to be aspirated or dispensed by typing a value into the Volume field. You can also click the up or down arrows to increase or decrease the volume.
Pre-Dispense: For Aspirate tasks only. The Pre-Dispense field allows you to aspirate additional volume for both LV and HV tips after aspirating the targeted volume, then dispense the extra volume immediately. This is to prevent any air gap, thus ensuring accurate dispense.
Mixing: Determines the number of times you want the NT8 to mix the HV and LV sample and well solution before dispensing. The tips mix the liquid by aspirating and dispensing it a specified number of times.
Z-Offset: Enables you to change the Z-offset value. The Z-offset value is the clearance between the tips or LCP tip and plate surface. (Dispense only) If you select the use sensors to determine checkbox, the system will automatically adjust the Z-offset.
Add
Adds the command(s) to the Task List and closes the Task Details window.
Add More
Adds the command(s) to the Task List and waits for you to define the next task.
Close
Exits the Task Details window.
Related Topics