Important
This web help is an outdated version. Visit the latest version (NT8 v4.8) here.
What’s New in This Release
NT8 version 4.7 introduces software enhancements and features to help you conduct experiments more effectively. This brief overview explains what’s new in NT8 version 4.7.
Software Improvements
Adding New Deep Well Plates Without Datasheet
NT8 version 4.7 has been improved for a better user experience. It is now possible to add new Deep Well plates to the plate library without the datasheet. Simply select “I don’t have the plate datasheet.” in the New Plate Type wizard and follow the on-screen instructions. Read Adding New Deep Well Plates for more information.
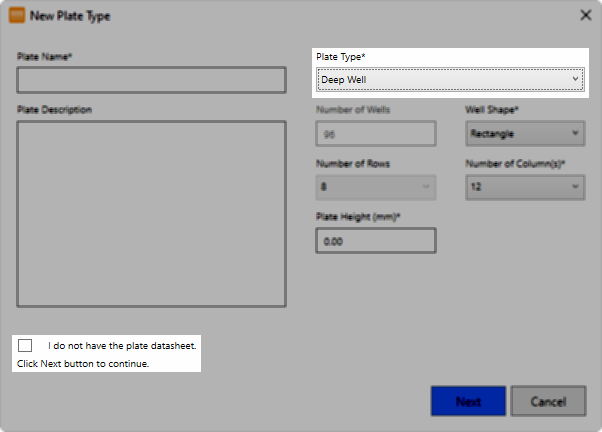
A Checkbox to Allow Adding New Deep Well Plates without Datasheet
New Plate Type Library UI for Faster and Easier Plate Searching
NT8 4.7 makes it easier to locate specific plates in the Plate Type Library by including the new search and filter features:
The smart Search Plate feature helps you find a specific plate faster. Enter the keyword for the plate you’re looking for, and the results will appear instantly.
The additional filters for Plate Type, Number of Wells, and Visibility are a great way to show a group of plates that belong to a particular category. To clear the filters, click Reset Filter.
The Recent Search feature saves your keywords in case you need them again. So you don’t have to type the keywords again when looking for similar plates. When you no longer need the keywords, simply remove them by clicking the X button.
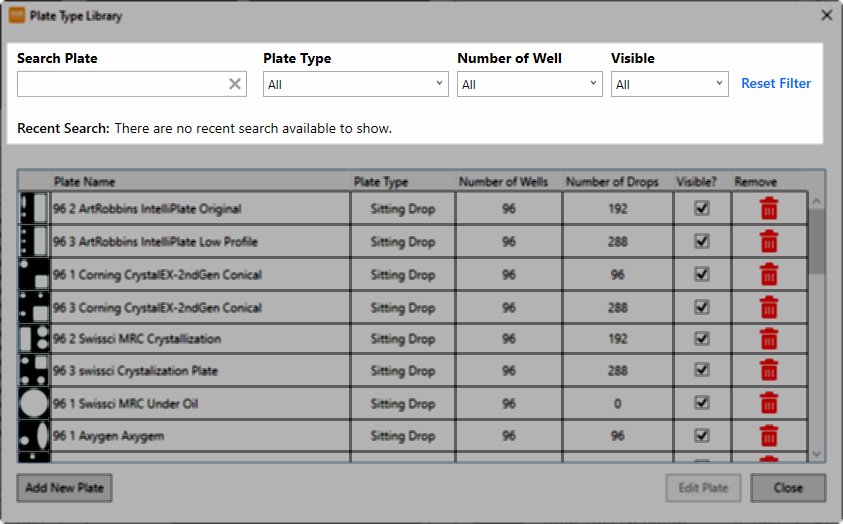
A New Plate Type Library User Interface to Search Plates
Easily Remove a ROCK MAKER Plate Definition From the Plate Type Editor
The ROCK MAKER Plate Definition field has been added to the Plate Type Editor’s user interface. It allows you to easily remove the ROCK MAKER Plate Definition from the Plate Type Editor wizard. This is to ensure that the plate in ROCK MAKER does not refer to the plate in NT8. In addition, an RM plate can only refer to one assigned NT8 plate. Previously, the user had to delete the ROCK MAKER Plate Definition via the plate file.
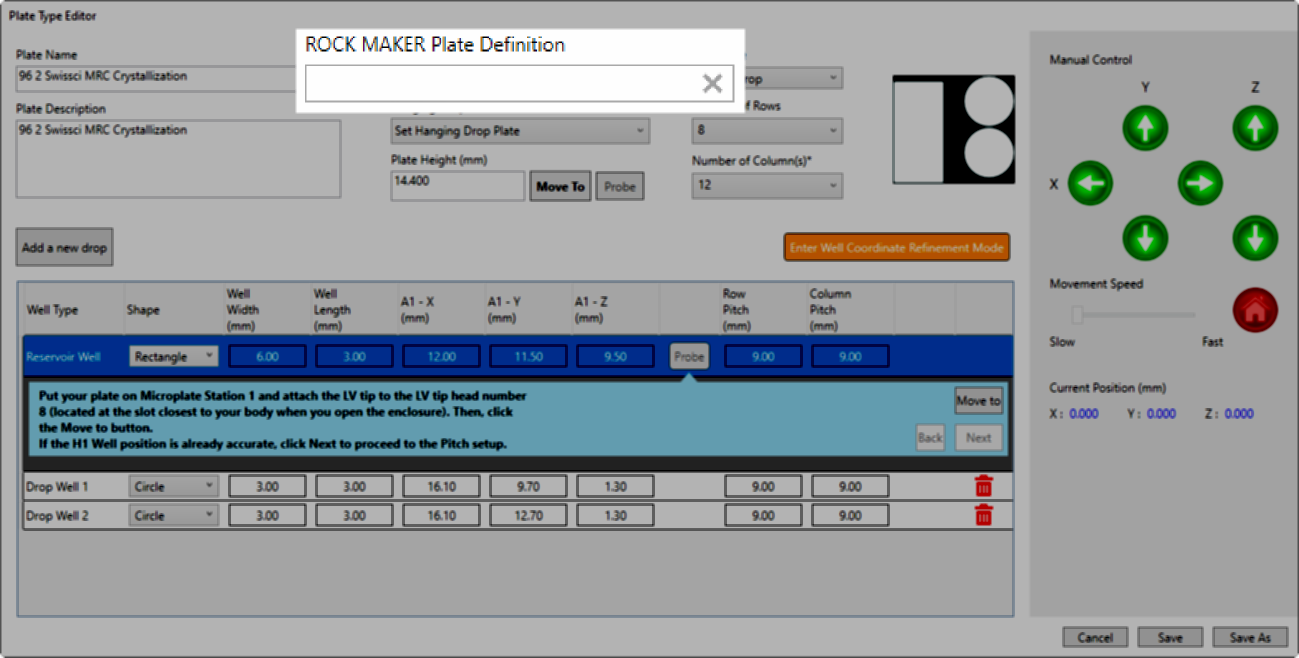
A ROCK MAKER Plate Definition Field on Plate Type Editor Wizard

Many of the best NT8 updates have been suggested by our awesome user community!
Have a great idea on how to make NT8 better? Let us know by contacting us at support@formulatrix.com.
Previous Releases
Version 4.6
NT8 version 4.6 introduces software enhancements and features to assist you in conducting experiments more effectively. Find out what’s new in NT8 version 4.6 in this brief overview.
Hardware Improvements
New NT8 V4 Reference Plate Design for Efficient Motor Movements
Reference Plate design has been redesigned to enhance motor movements during Auto-Calibration, thus:
Allowing the sensor to move without exceeding the travel limit during calibration in stations 2, 3, and Deep Well. This also resolves the travel limit issue that occurred in Auto-Calibration previously.
Allowing you to set up the offset of Plate Stations 2, 3, and Deep Well using “WallToTargetOffset” in the behavior config.
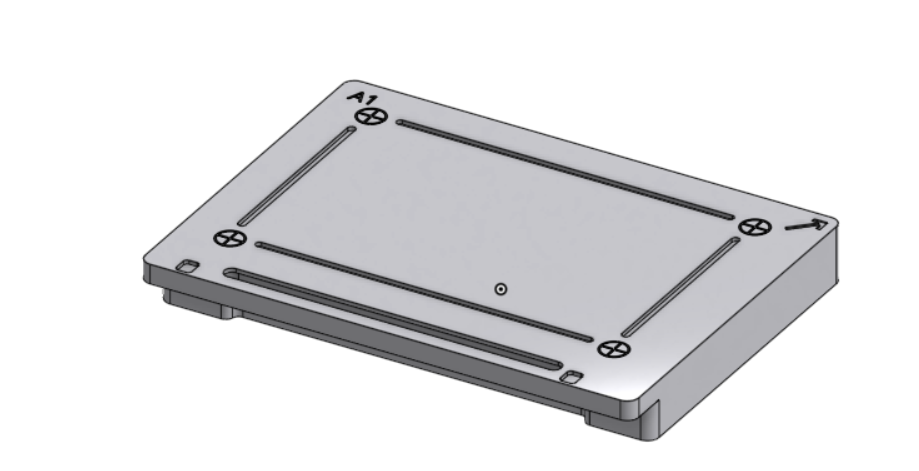
NT8 V4 Reference Plate
Software Improvements
(NT8 V4 Only) Manual Control for LCP Mixer Calibration
Now, you have access to the Manual Control in the LCP Mixing Calibration. This feature lets you control the Deck Station’s position without removing the LCP Mixer during the calibration. Previously, to adjust the Deck Station’s position manually, the LCP Mixer had to be removed first.
Checkbox to Enable the Manual Control in the LCP Mixing Calibration
ROCK MAKER Integration (RMI) with Run 24-Well Plate Experiments
NT8 now supports configuration for a 24-well plate experiment on the ROCK MAKER Integration page. Simply load the barcode into the ROCK MAKER Integration. Strikethroughs on the Protein Block to indicate wells where you should not put the protein. Ensure the Waste Station supports the 4-tips ejection method before conducting a 24-well plate experiment on RMI. Go to Working with 24 Well Plate Type for more details.
Run 24-Well Plate Experiments on ROCK MAKER Integration (RMI)
Monitor Required Tips in the Task List and ROCK MAKER Integration (RMI)
The Total Tips Needed feature has been added to the Task List and the RMI to easily monitor the number of required tips. This improvement helps you figure out how many LV and HV tips are required to conduct your task. The Task List and the RMI have different methods for configuring the total number of the required tips. The number of tips used in each pickup determines the amount of Total Tips Needed on the Task List. Meanwhile, the RMI allows you to configure the number of Total Tips Needed in three different ways via the Change Tips settings:
After Each Plate
When Switching Ingredients
After Every Dispense
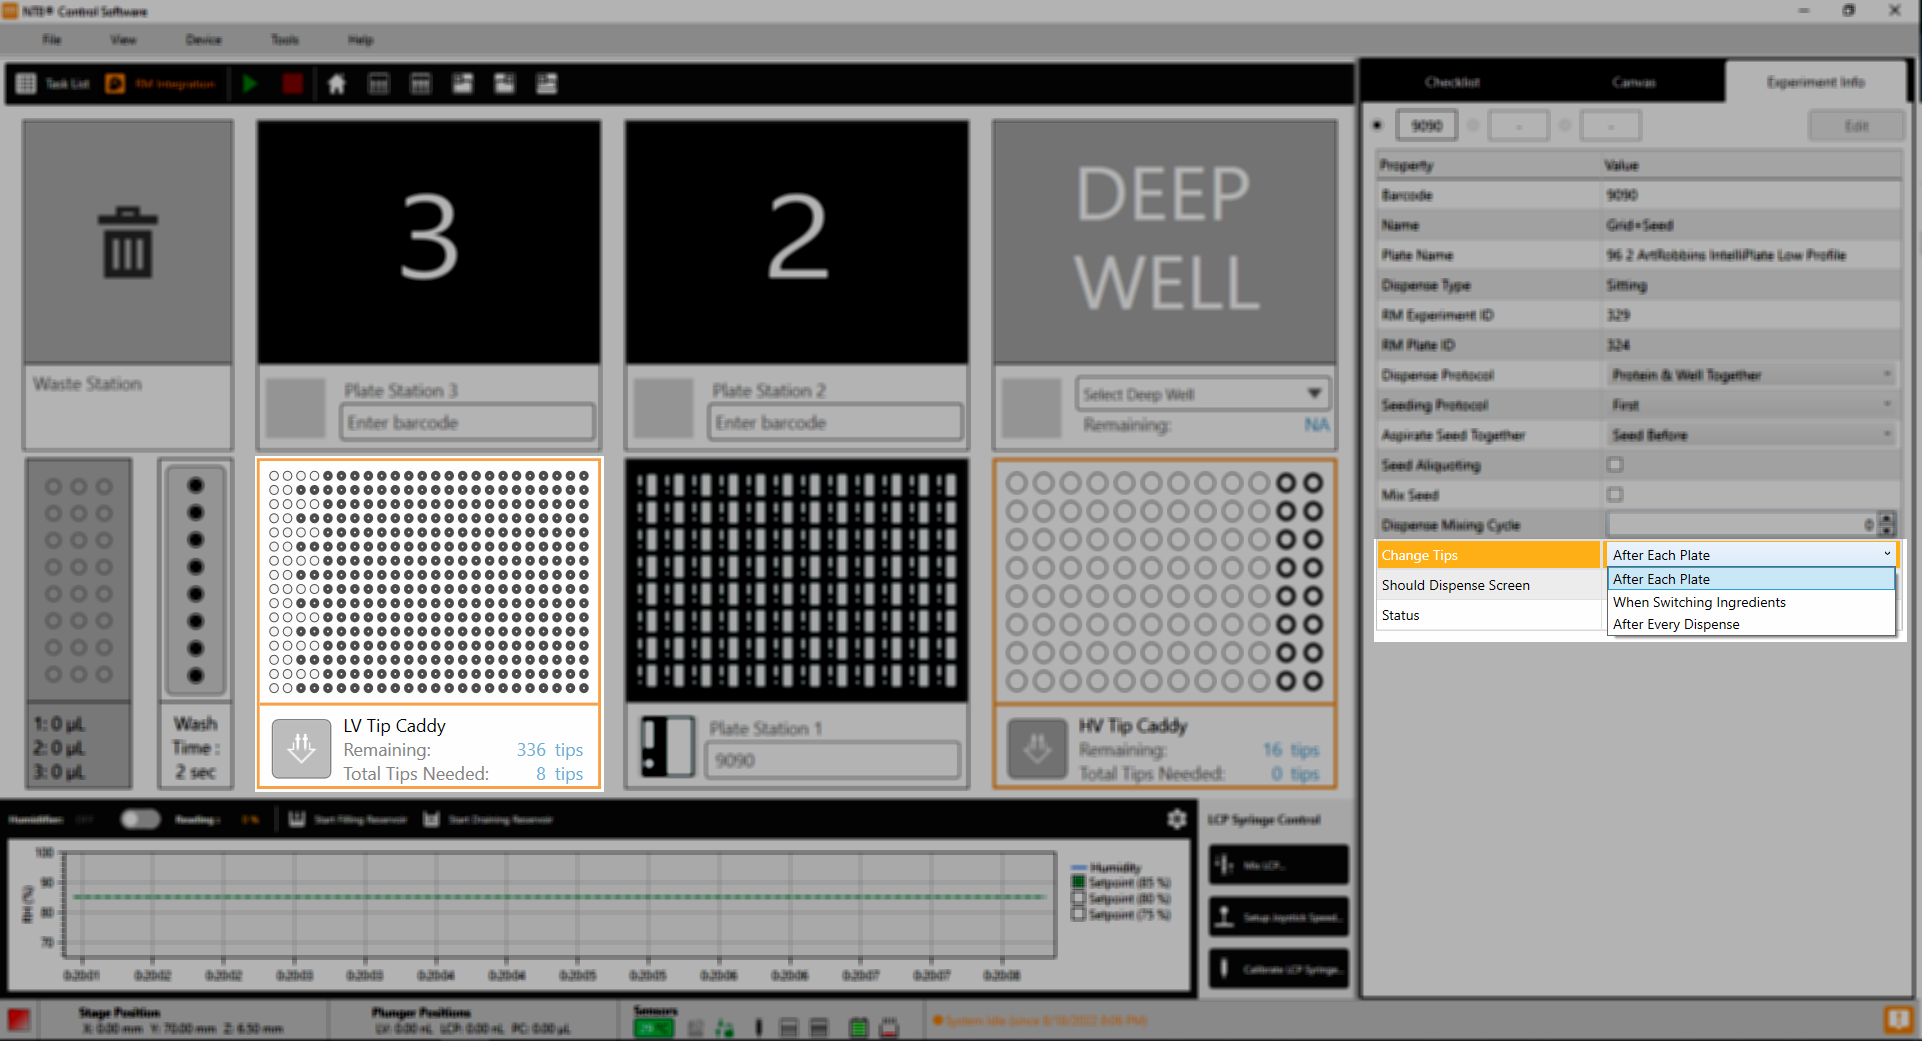
Three Different Settings to Inform the Total Tips Needed for Each Experiment on the ROCK MAKER Integration (RMI)
The Total Tips Needed feature is available on the LV Tip Caddy and HV Tip Caddy decks. An error message will appear if there are insufficient tips to complete the task. The tips will need to be refilled before you begin the task.
Note
The tip calculation is performed by the software, not by the actual sensors.
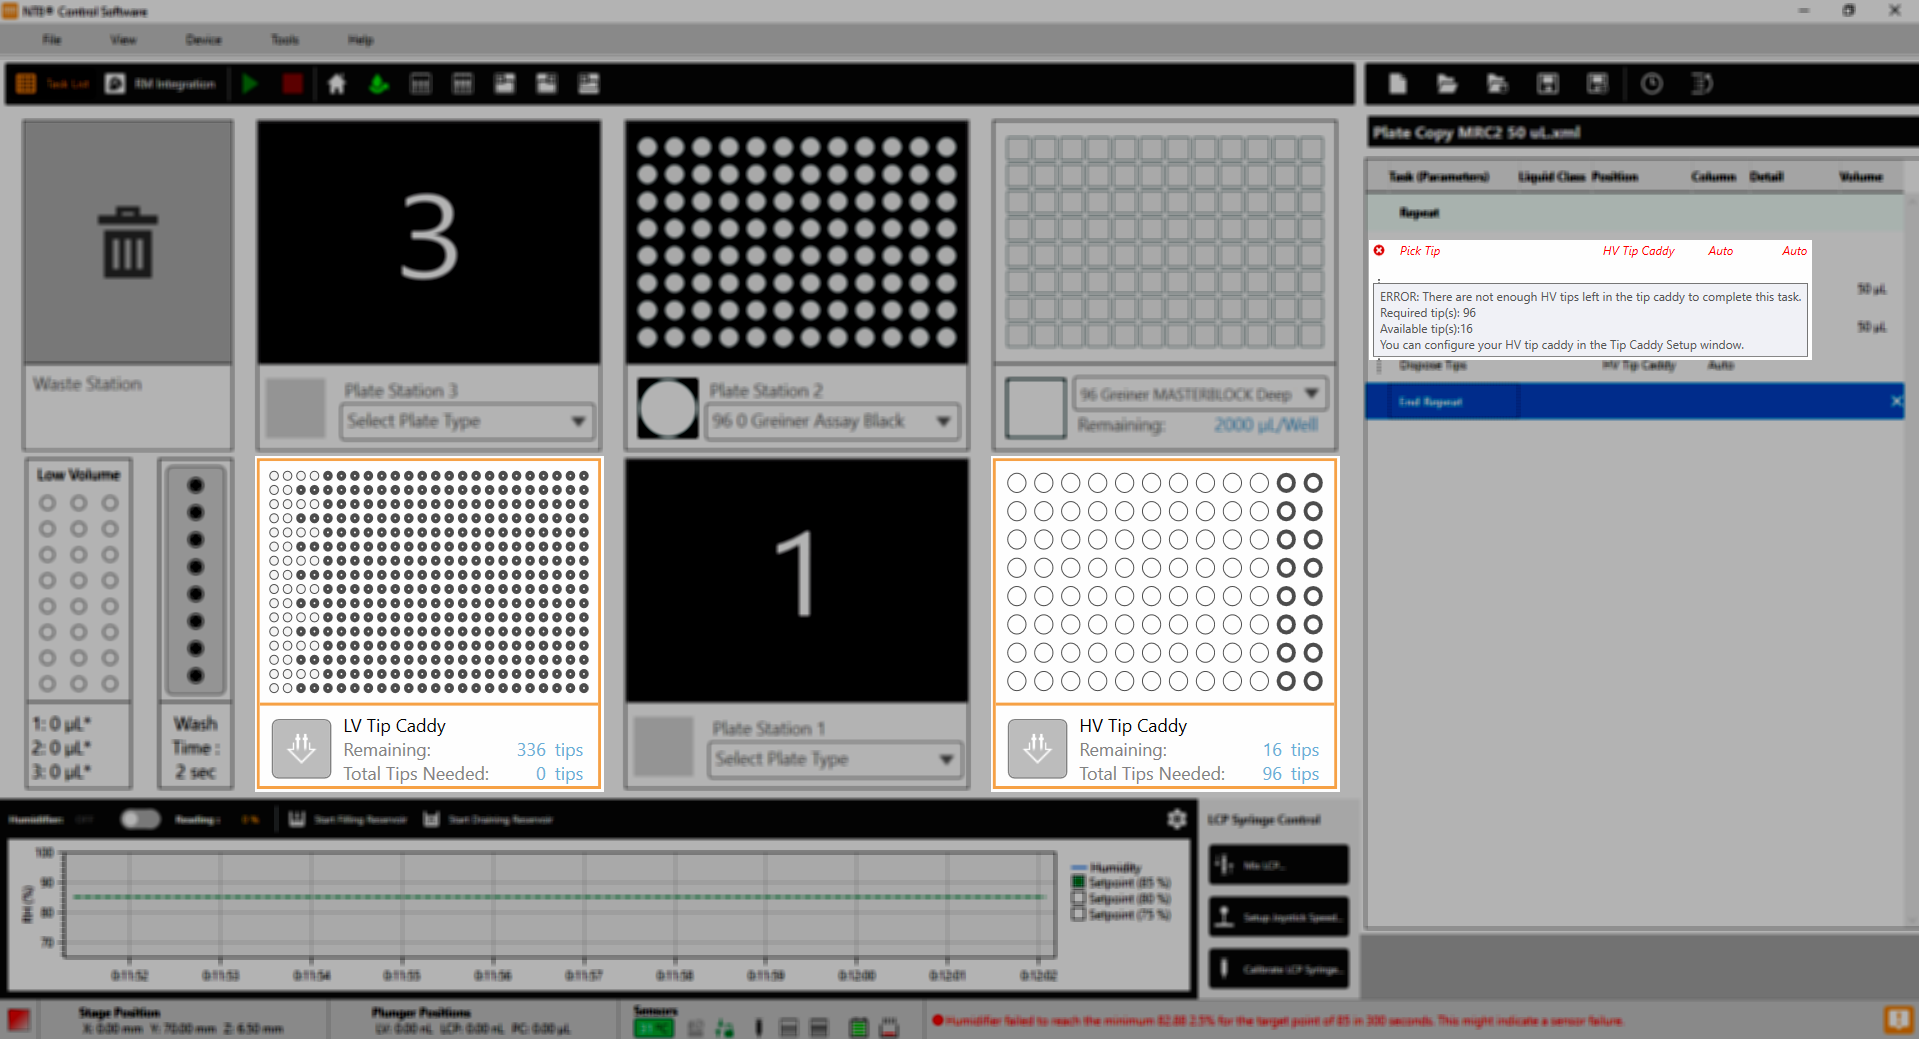
The Total Tips Needed to Inform the Required Tips to Run the Experiments on the Task List
System Priming Reminder for NT8 Performance Optimization
Maintaining the NT8’s performance and drop precision is essential. Therefore, you will receive a reminder to prime the NT8 when the system has been idle for a few days. You can prime the NT8 immediately or postpone it by selecting the Remind Me Later button. Previously, the prime reminder was only visible during the startup process.

A Reminder to Prime NT8
The software interface for the priming system also gets an improvement. We added a loading status to notify you that the system is still priming, and it will automatically disappear once the priming is complete. Previously, the loading progress was not available, which made it hard for users to know when the priming system was done. If you wish to cancel the priming, just select the Abort button.
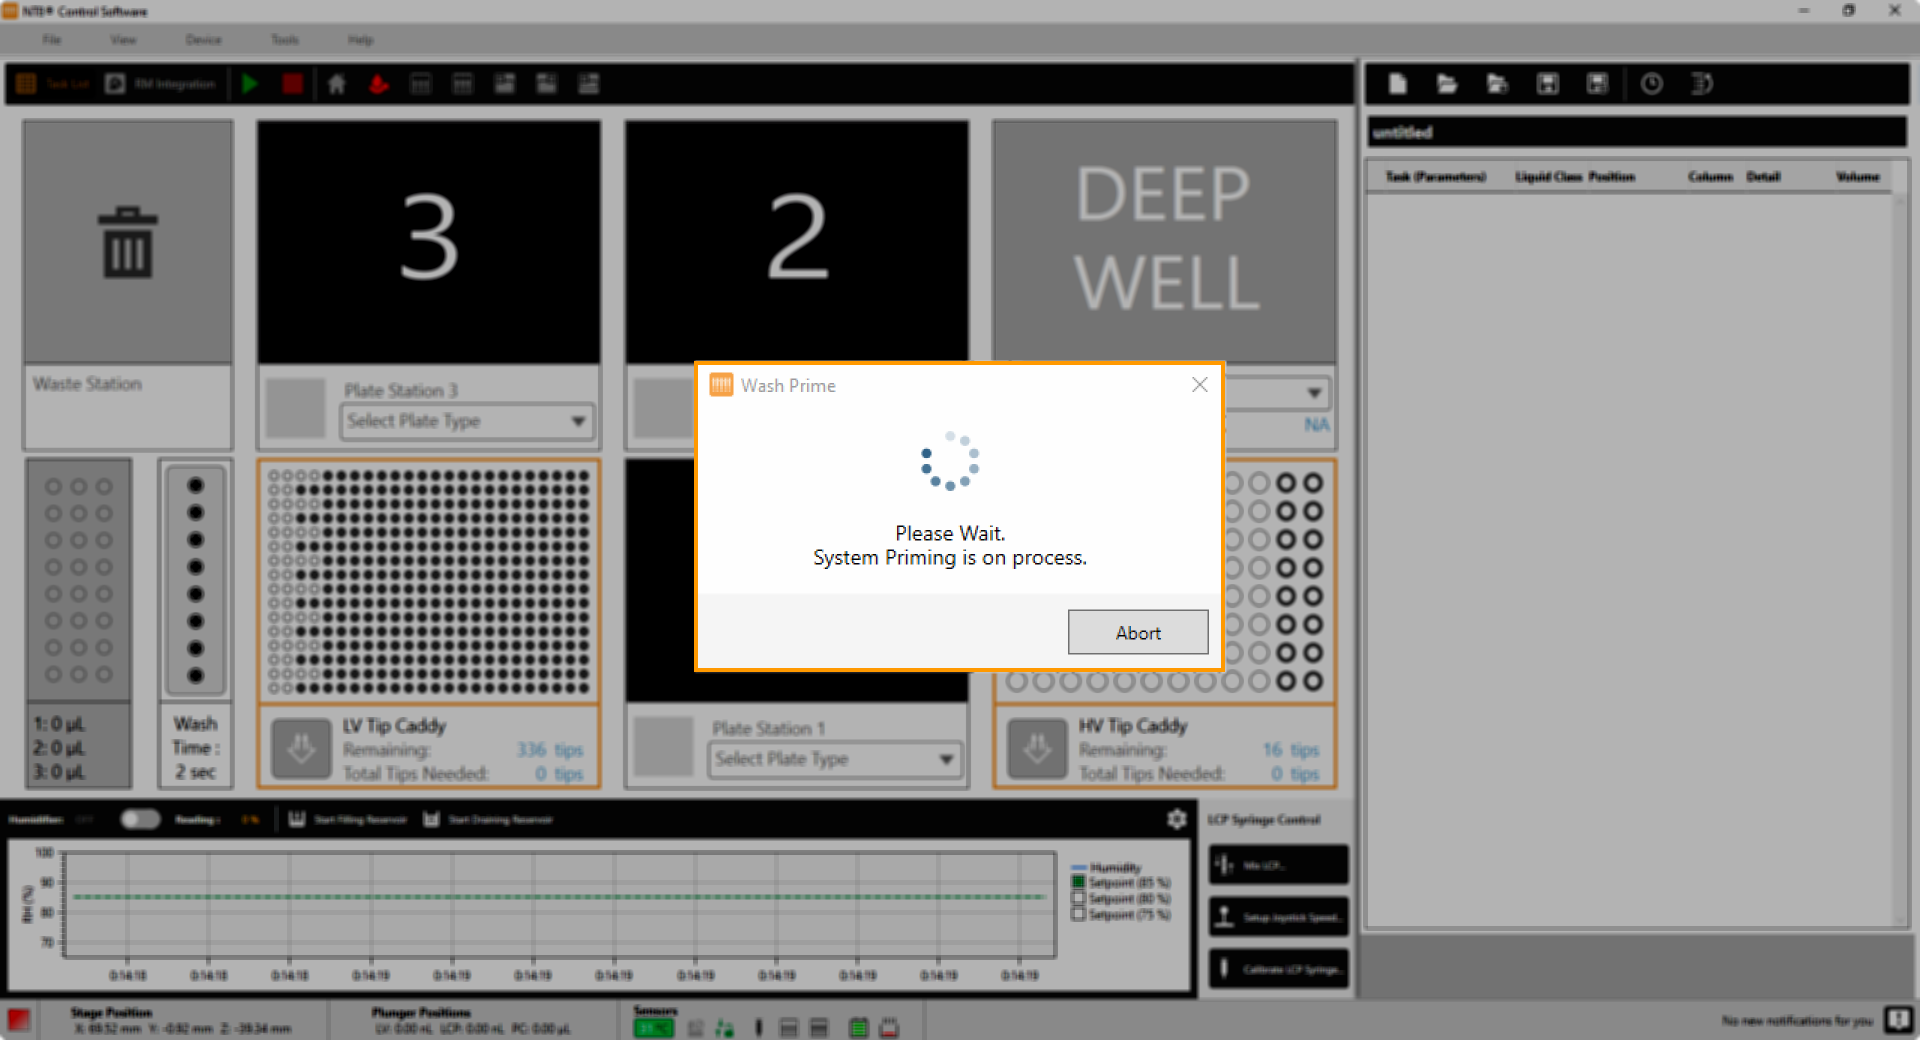
A Loading Status to Inform That the System is Still Priming
Addition of a Move To Button For A More Accurate Deep Well Plate Calibration
The Plate Type Editor window now includes a Move To button while performing a Deep Well plate calibration. It helps you move the head to the Deep Well station when you need to validate the current calibration. Previously, the button was unavailable, preventing you from verifying the Deep Well plate calibration.
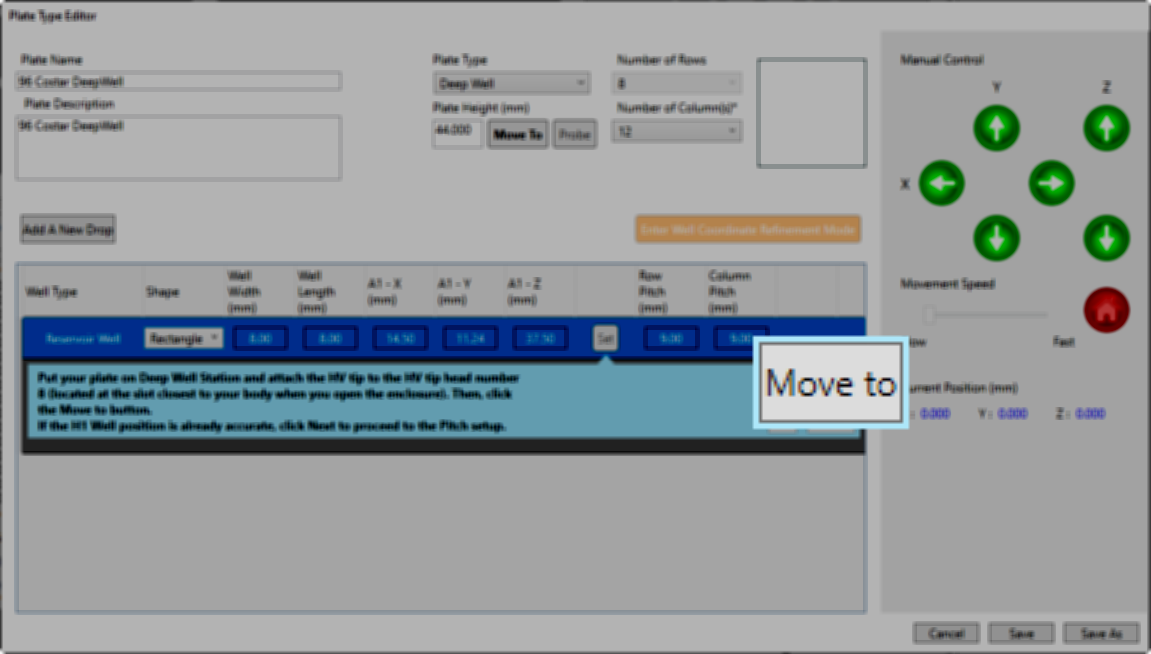
A Move To Button to Move the Head to the Deep Well Station
(NT8 V4 Hardware Only) Power Loss Detection when Board or Hardware is Reset
NT8 V4.6 supports a Power Loss Detection feature to help determine the cause of a hardware reset, which could be a brief power outage or a board issue. The position of the motors will allow the software to figure out the condition. If some motors are not homed, the board has been reset. When none of the motors is homed, the NT8 may have experienced a power loss. The log file and email will include this information for easy debugging. Hardware detection also continues to advance by automatically switching to simulation mode when the software detects that the hardware has been turned off.
Minor Software Changes:
NT8 version 4.6 added a minor improvement:
The software automatically detects the destination folder in the local installation on your hard drive when you select Advanced Install in the Hard Drive option. Previously, when the Hard Drive option in the Advanced Install was selected, the NT8 software would create a new destination folder, causing a crash.
Version 4.5
Our valuable users have encouraged us with software improvements for a better user experience. Here is a quick look at the new developments for the NT8 4.5.
Software Improvements
A Selectable Protein Source Block in ROCK MAKER (RM) Integration to Support Your Needs
NT8-RM Integration has been improved for a better user experience. You can now easily select the Protein Source Block that suits your needs: High Volume Protein Block, Low Volume Protein Block, and High Volume Multi-Source Protein Block. A dialog box will appear once you enter the barcode of an experiment, allowing you to select the type of Protein Source Block most suitable for your needs. The NT8 Control Software also provides a recommendation of Protein Source Block based on the protein volume in your experiment.
Selectable Protein Source Block in RM Integration
Enhanced 24-Well Plate Dispensing Feature
Optimized Dispensing with Both Types of Protein Source Blocks
Increase your 24-well plate dispensing performance by working with both types of Protein Blocks. You can aspirate from a standard Protein Block and a High Volume Multi-Source Protein Block on the same task list. Aspirating from both Protein Block types (the standard and the high volume multi-source ones) can facilitate you with more protein volumes for your experiment.
Aspirating from Both Types of Protein Source Blocks for 24-well Plate Dispensing
Easier 24-well Plate Dispensing
When dispensing a 24-well plate, strikethroughs now appear to indicate which wells on the protein block are not available. This makes programming which well to aspirate protein from easier when working with 24-well plates.
Strikethroughs Lining Up Each of the Unselected Well in the Software Interface
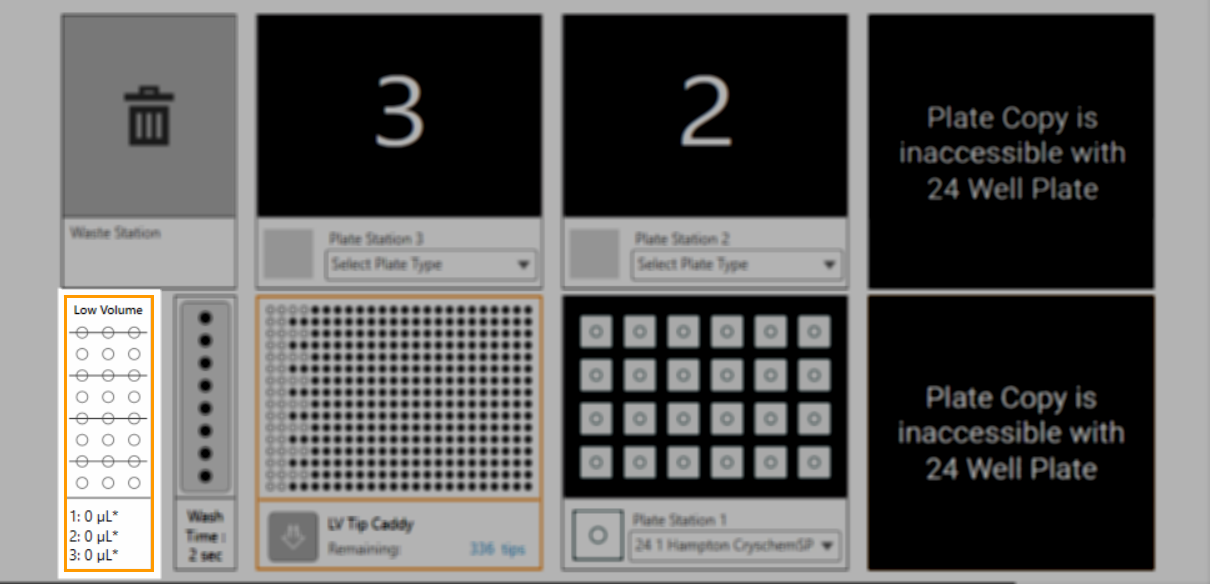
The software interface improvement also goes for the Deep Well and HV Tip Caddy Stations interface. The Deep Well and High Volume Tip Caddy stations you use to run the Plate Copy option are highlighted as “Unavailable” when using 24-well plate dispensing. This improvement aims to keep your NT8 hardware safe. A message informing you that both stations are not accessible is provided in each station to give you a visual cue that the Plate Copy option will not be available for 24-well plate dispensing.
Note
This improvement is only available for NT8 hardware purchases with the plate copy option.
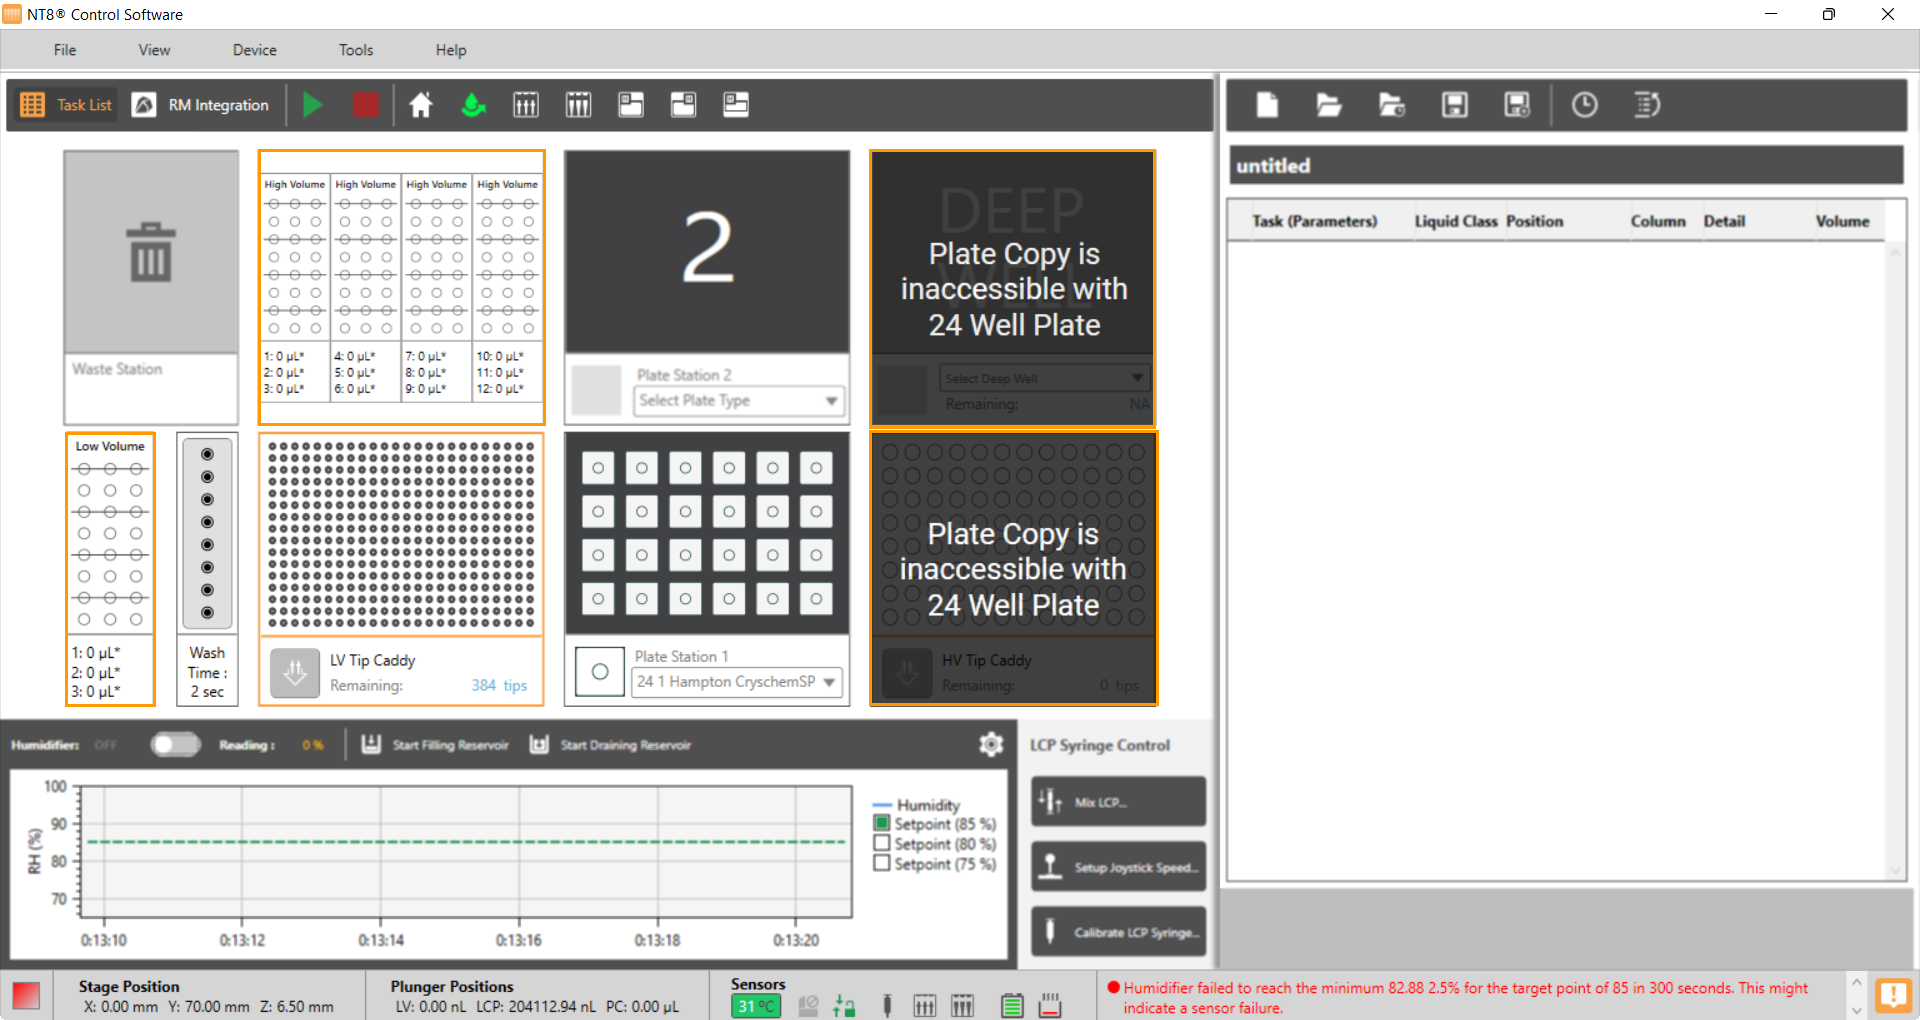
Redesigned Plate Copy Software Interface
A Redesigned Software Menu for Streamlined User Experience
NT8 4.5 comes with a redesigned Tools menu to make it easier for you to perform tasks. The Options, Touch Sensors, Calibrations, and Test Email options are categorized in a tidier section for your convenience. Find out more on Menu Bar.
Redesigned Tools Menu in the NT8 Control Software
Minor Software Changes
NT8 version 4.5 added several minor changes for your better usability including the following:
More Intuitive Auto Calibration Settings
Your keyboard and mouse have been intensified to support your Auto Calibration Settings. Your keyboard arrow keys can be used to adjust the X, Y, and Z axes, and the scroll wheel on your mouse can be used to adjust the Speed in the Manual Control field.
Adjusting the X, Y, and Z Axes with the Keyboard Arrow Keys
On top of all that, your keyboard and mouse have been configured to modify the X, Y, and Z axes instantly on the calibration result table. Click on either the X, Y, and Z axes and type the axes you think are more accurate.
Adjusting the X, Y, and Z Axes in the Calibration Result Table
A Reliable Data Backup Storage
Enjoy a more secure data backup experience with the NT8 Control Software. When you install the NT8 Control Software for the first time, you can now select the data backup location that fits your needs: Default location or Custom location. Your backup data and live data will remain safe. Read more on Backup and Restore Data.
Version 4.4
Hardware Improvements
An Improved Dispensing Feature: Accommodating 24-Well Plate Dispensing Needs
The NT8 hardware now supports 24-well plate dispensing, which includes both sitting drop and hanging drop experiments. The 24-well plate is particularly useful to scale up crystal size by setting up larger protein drop sizes. Moreover, it brings additional convenience during crystal harvesting when performing a hanging drop experiment, where crystals won’t bond to the bottom of the plates because of gravity. Take a look at the 24-well plate type below and its accompaniments:
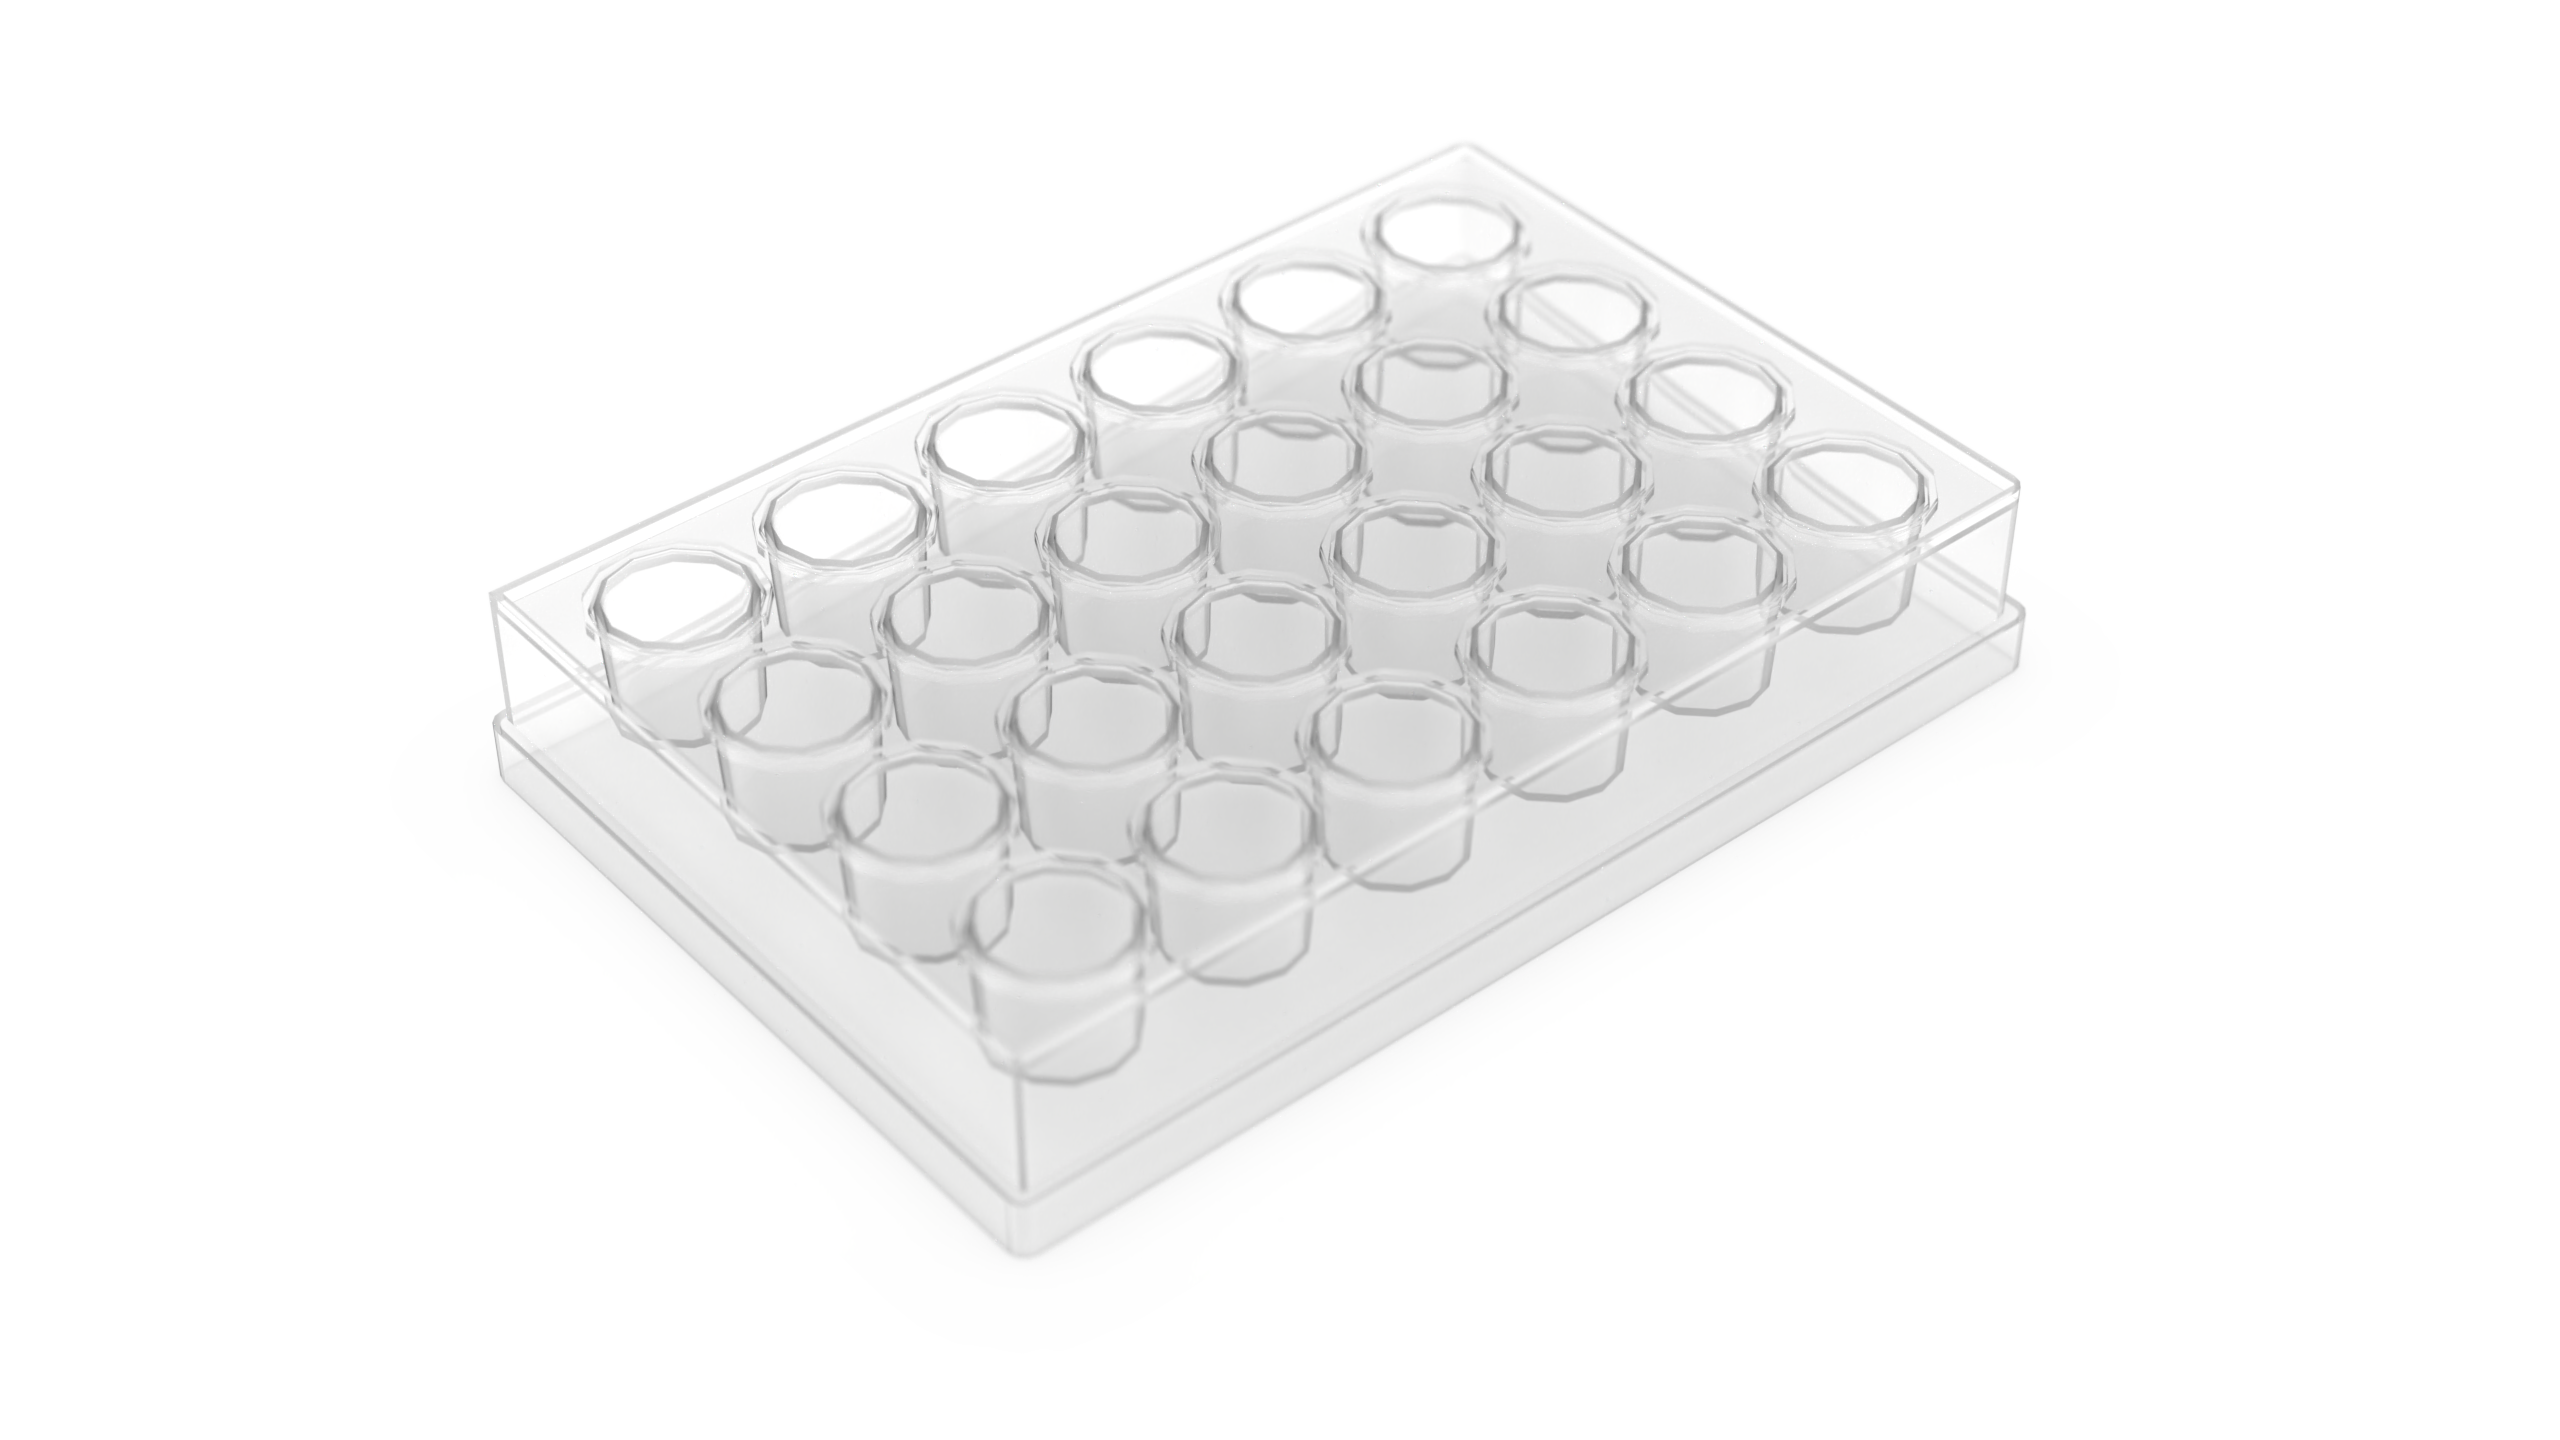
24-Well Hanging Drop Plate (Hampton VDXm Plate)
1.png)
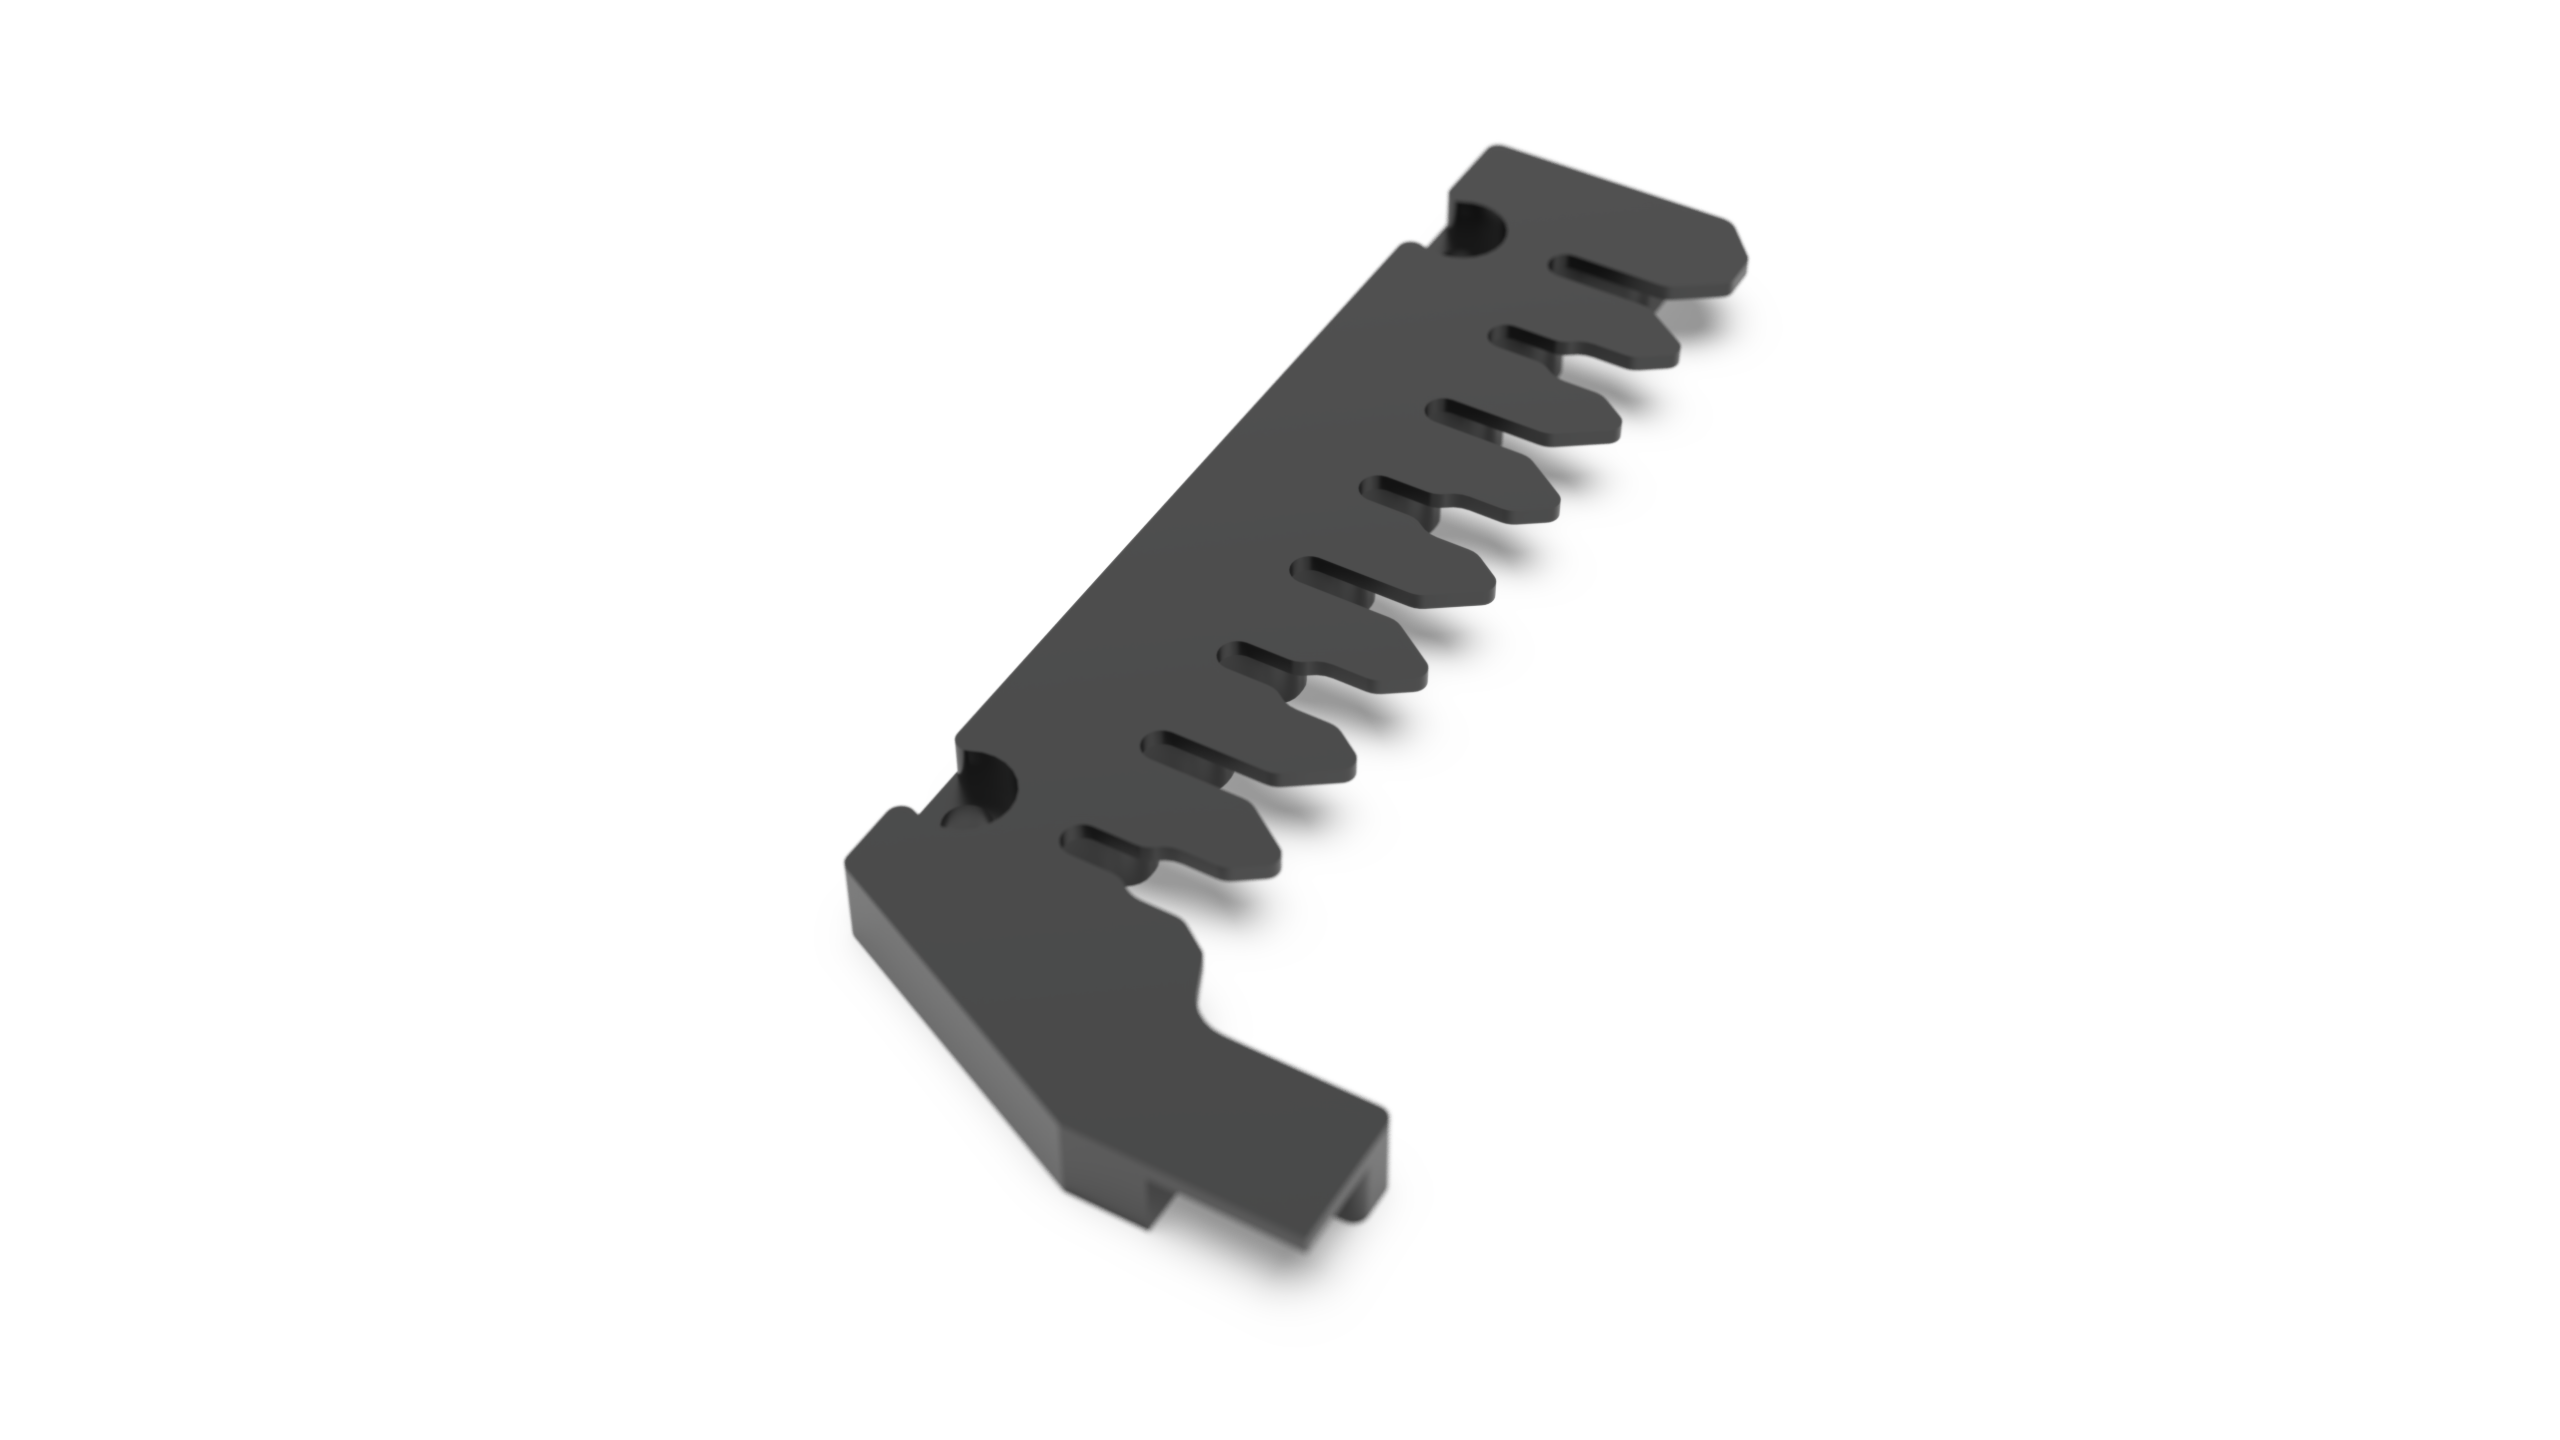
The Glass Coverslip Adapter for 24-Well Hanging Drop Plate (For Hampton VDXm Plate)
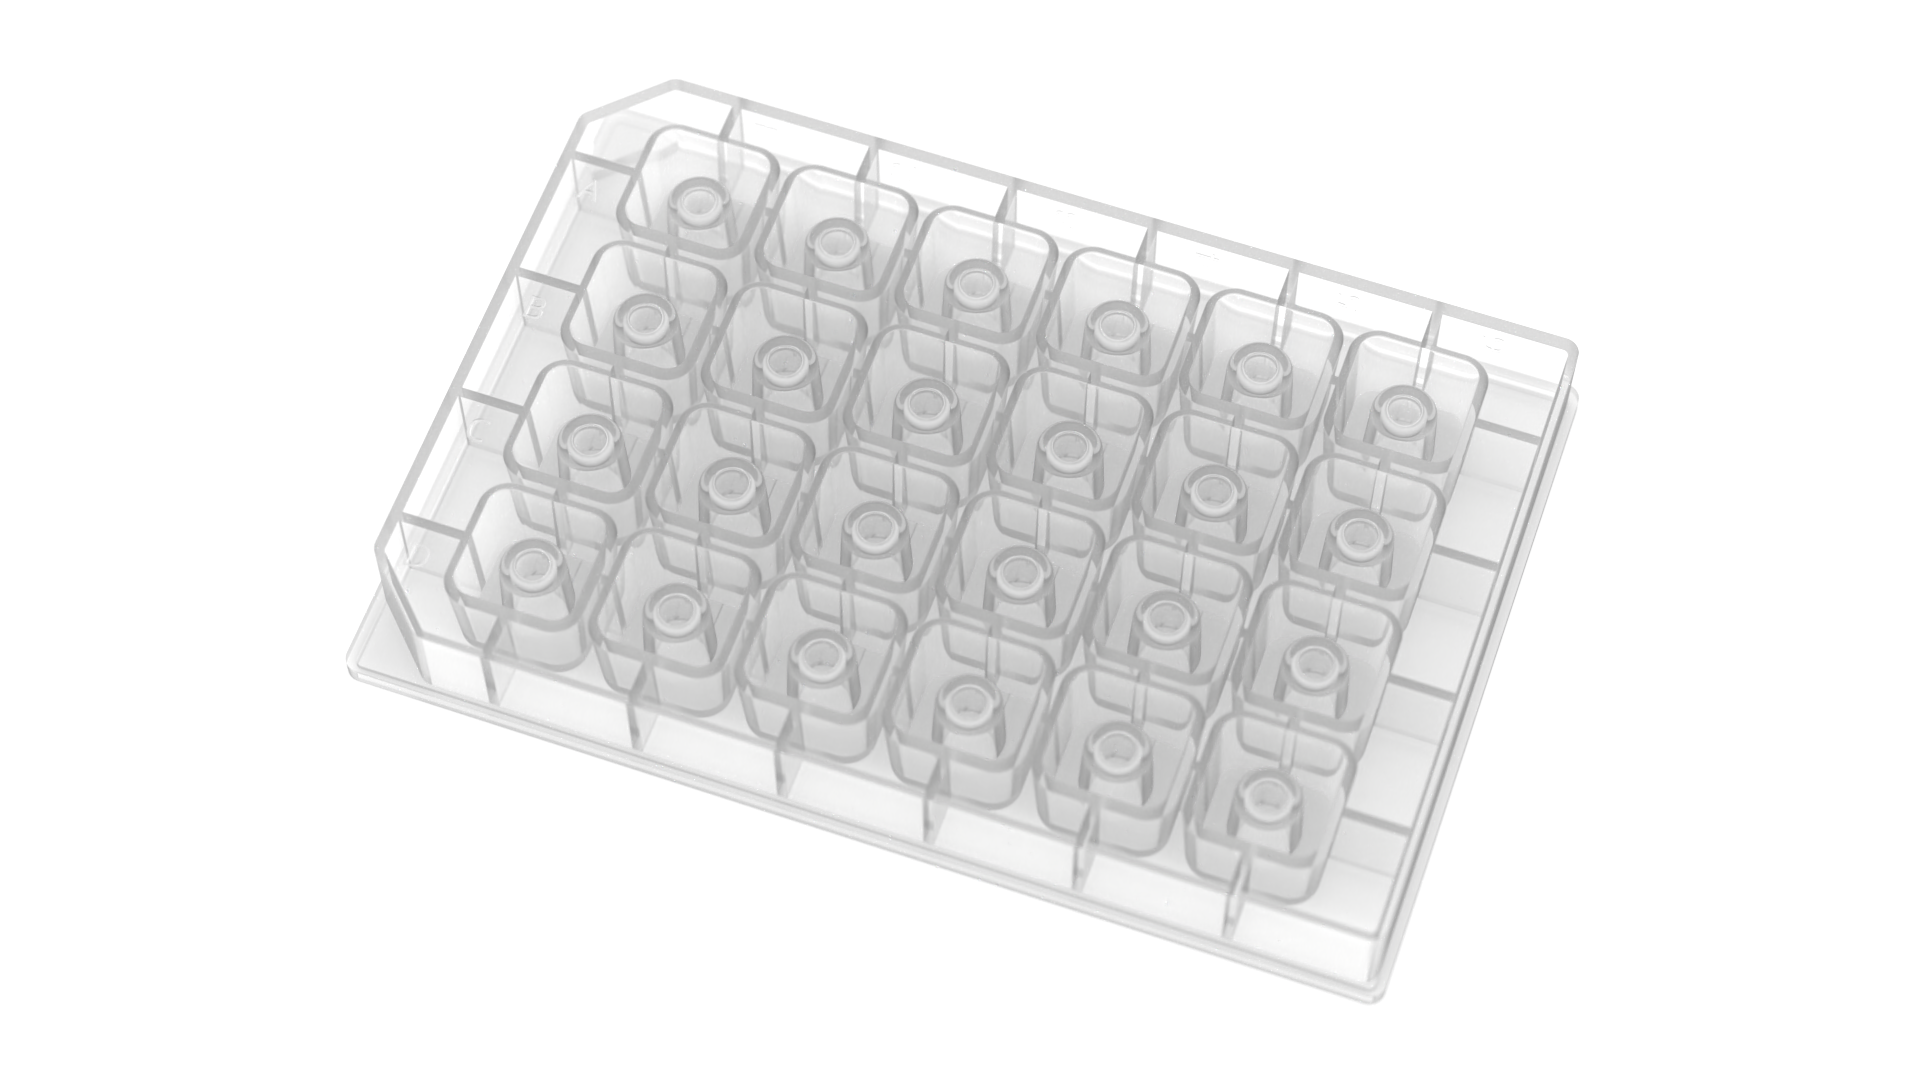
24-Well Sitting Drop Plate
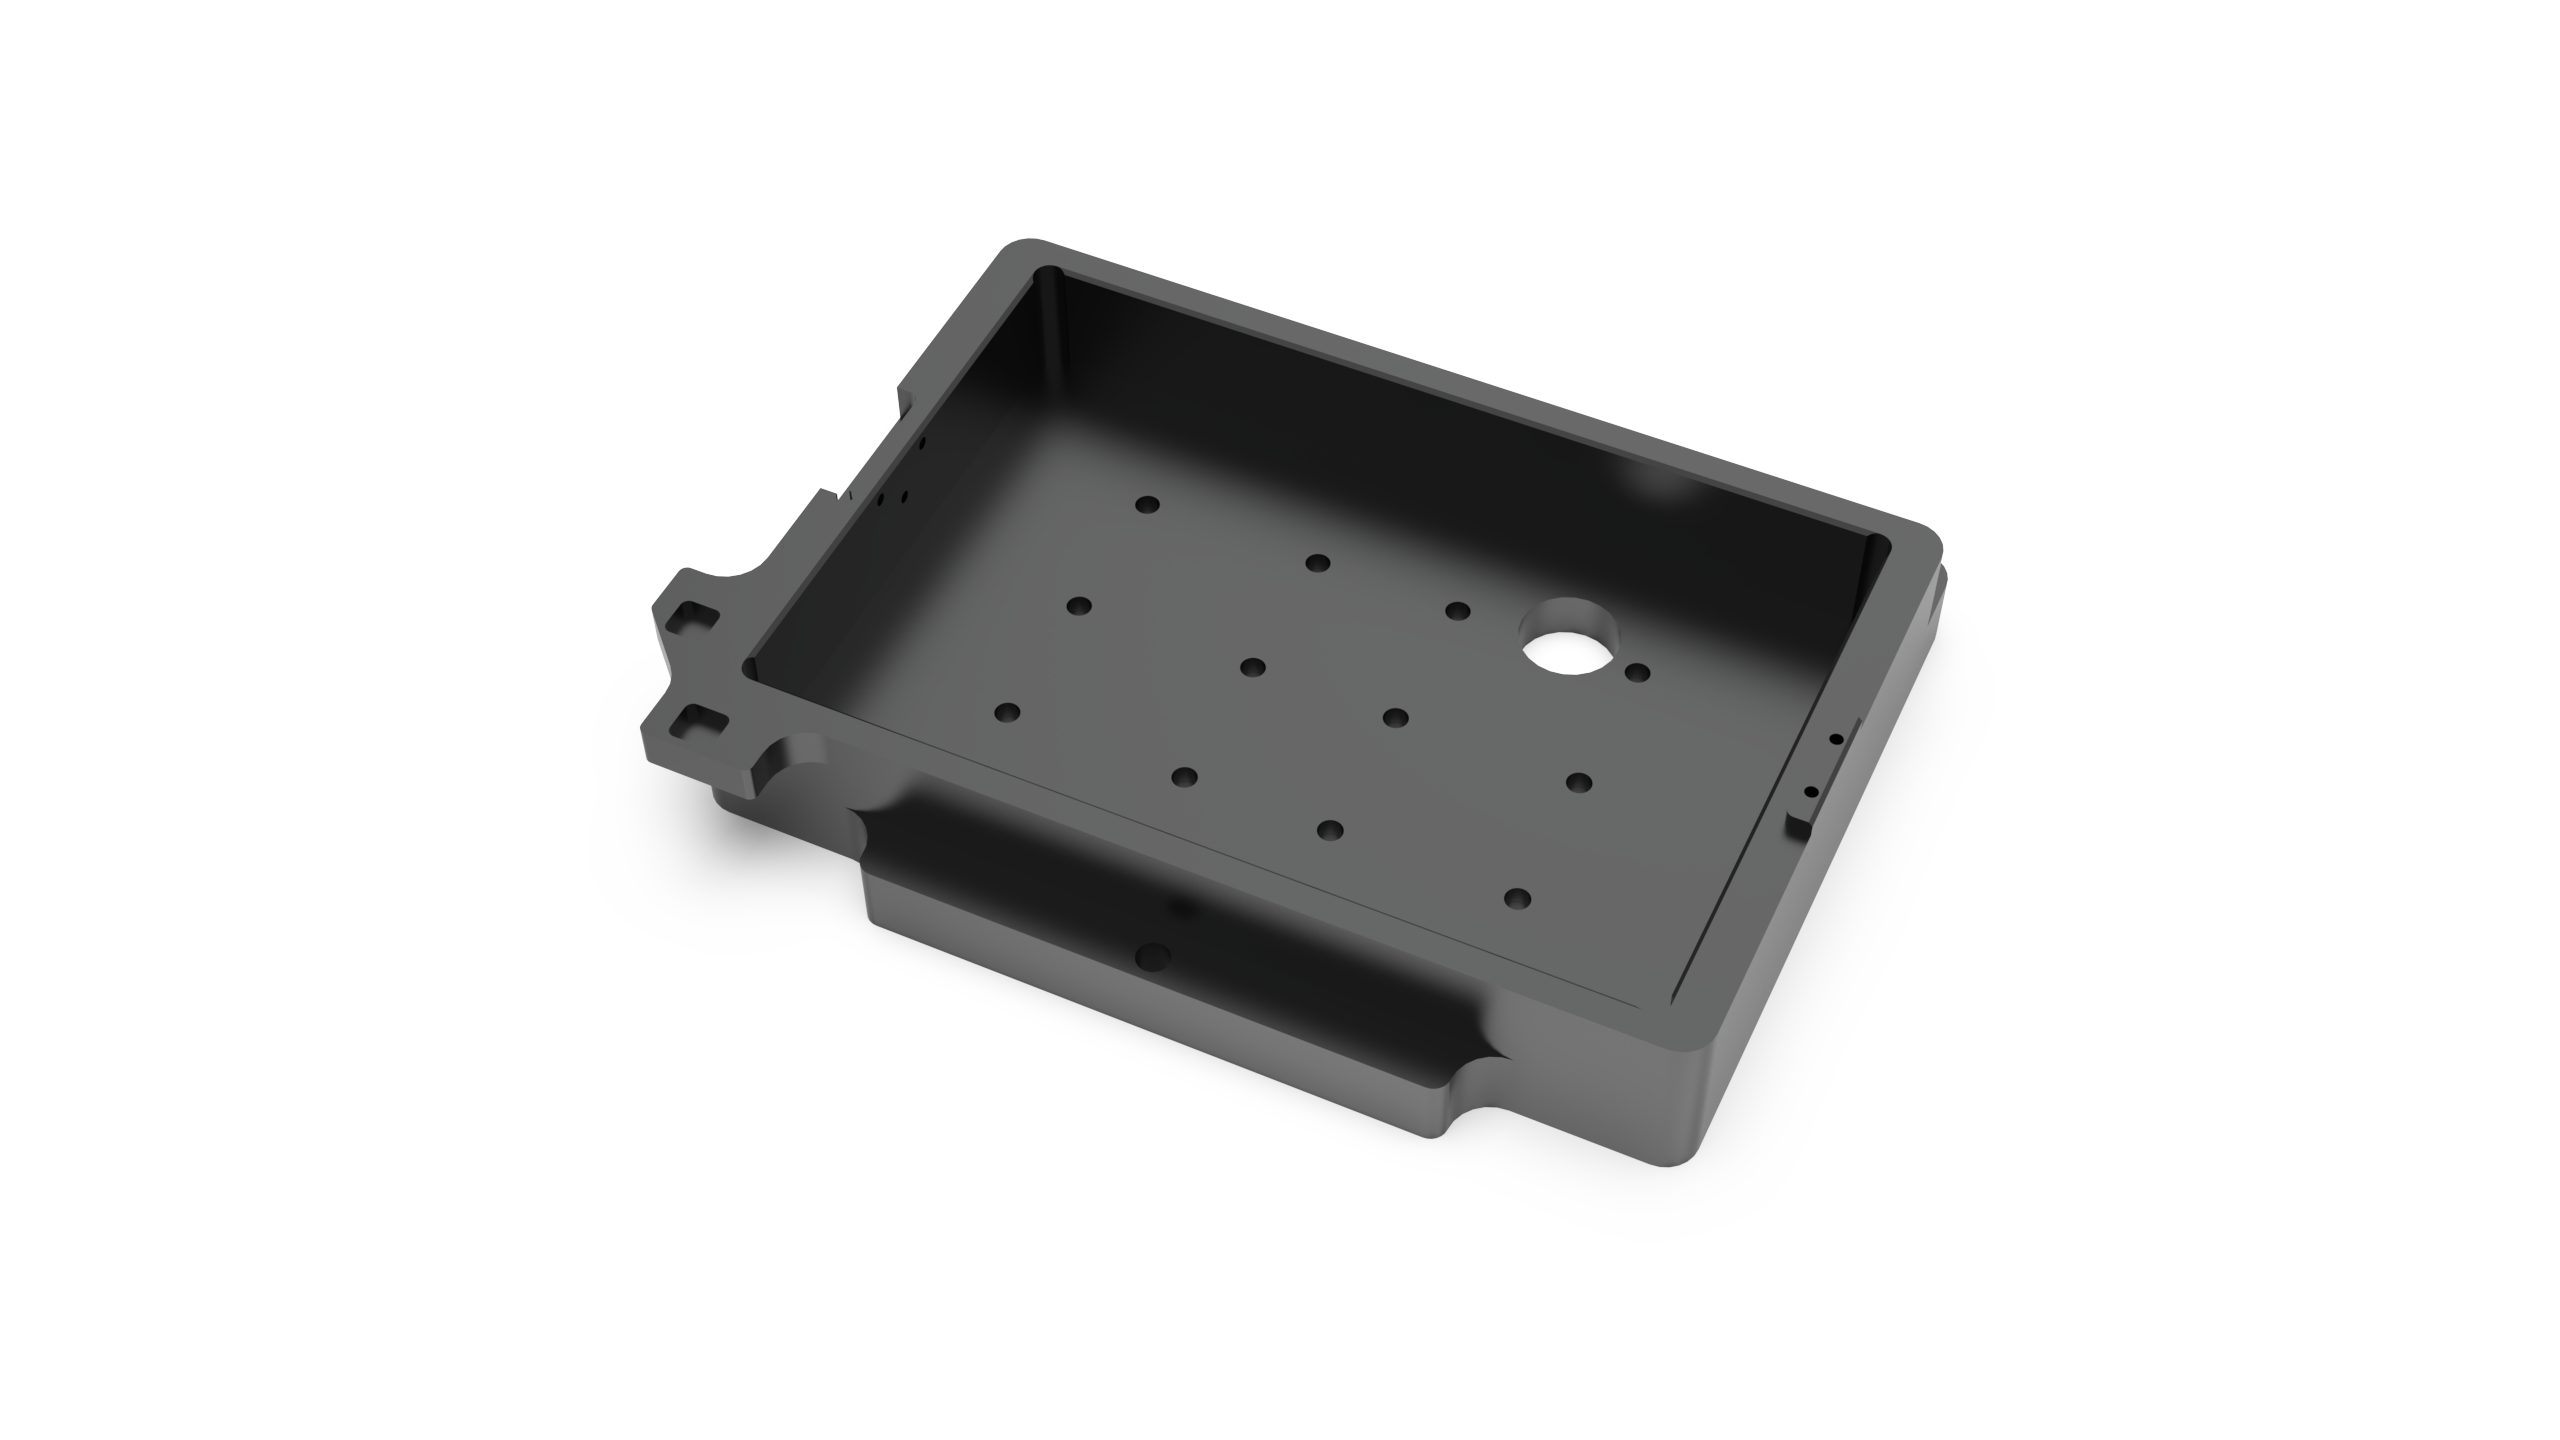
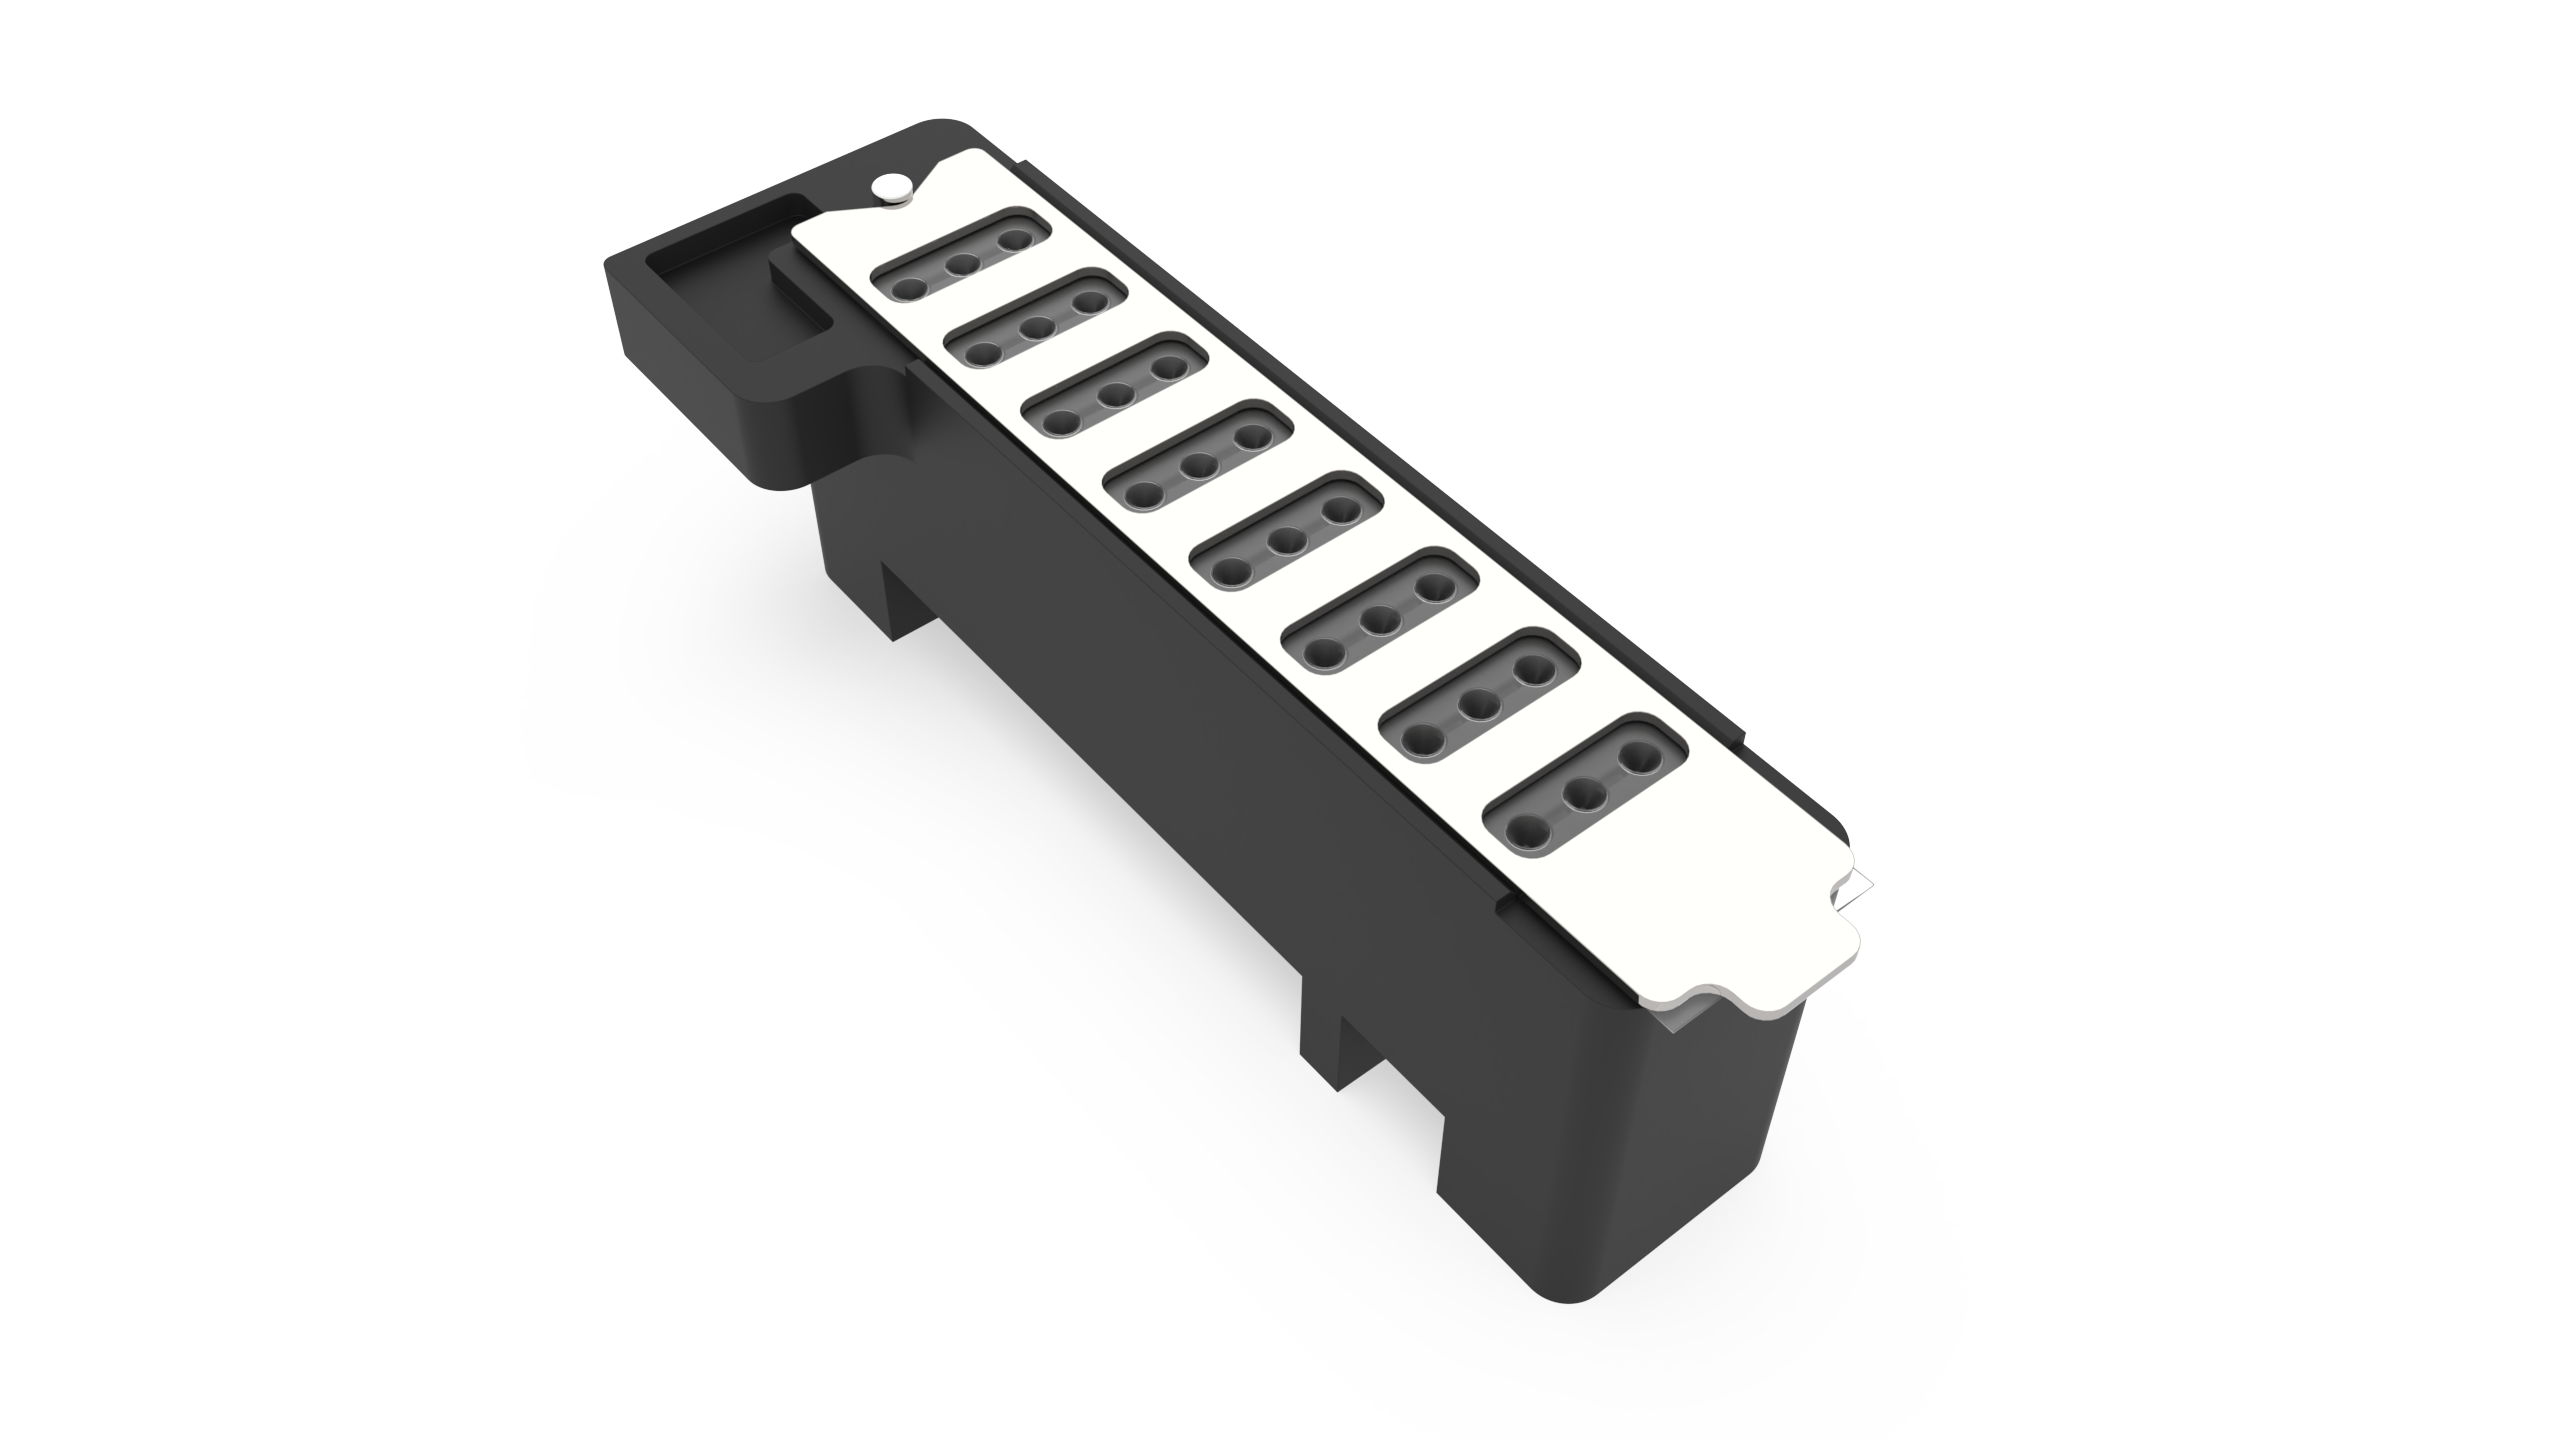
For more streamlined experiments, the waste station is redesigned to accommodate the 4-tip ejection process, which is a critical sequence in 24-well plate dispensing. Go to V4 Hardware Overview.
The Redesigned Waste Station Design
Watch the video below to see how to set up a 24 Well VDXm Hanging Drop Experiment Plate.
Watch the video below to see how to set up a 24 Well Sitting Drop Experiment Plate.
Software Improvements
NT8 Control Software Made More Versatile to Accommodate 24-Well Plate
Aside from the hardware, the NT8 Control Software has also been made more convenient to further support the use of 24-well plates. The software is improved in the following ways:
Optimized Plate Type Settings Following 24-well Plate Dispensing
The New Plate Type wizard has also been optimized so you can modify the Number of Rows and Number of Columns in order to create a new plate definition for a 24-well plate type. To find out more, go to Adding and Editing Plate Types.
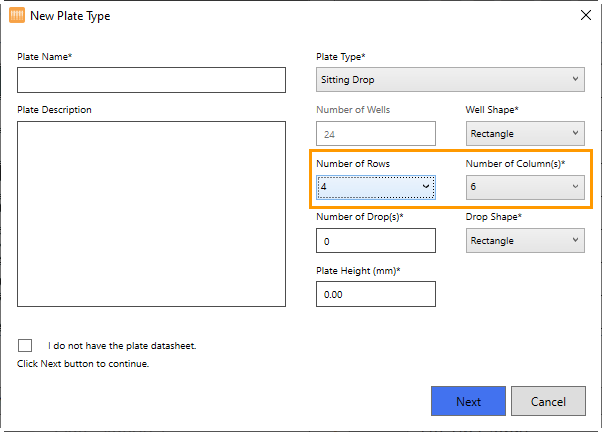
Setting Up the 24-well Plate in the New Plate Type Wizard
More Intuitive Waste Station Task
For better usability, the NT8 Control Software will now automatically add a Prepare Tips task to cater for an aspirate task from a 4-row plate. This behavior appears after you add an aspirate task from 24-well plate. For more information, see Waste Station.
Automatically Adding a Prepare Tips Task to Dispense to a 24-well Plate
Enhanced the Protein Source Interface
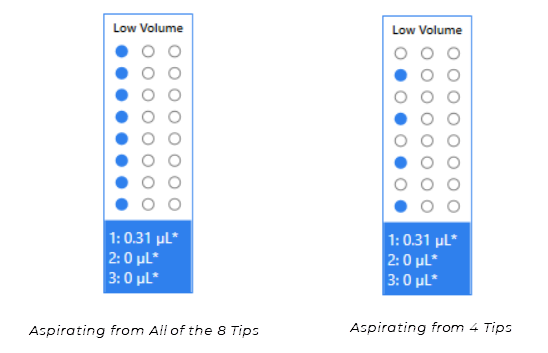
Every time you run an experiment using a 24-well plate, NT8 will show the confirmation message below to make sure you are only filling into the correct wells of the Protein Tray. This behavior also appears when you select this plate type for the first time on any Plate Stations. This helps prevent any protein loss. The Protein Source Station image on the software also has blue indicators to provide visual cues about which wells the tips are aspirating from.

A Confirmation Message to Make Sure that The Protein was Filled in the Suitable Protein Well
In the image below, the Protein Source on the right indicates only 4 tips attached for a dispense task into a 24-well plate.
Version 4.3
NT8 4.3 provides you with both software and hardware improvements to help you run experiments smoother. Here’s a quick look at the new developments for NT8 4.3.
Hardware Improvements
(NT8 V4 Only) Reference Plate, Protein Block, and LV Tip Caddy Redesigns for a More Accurate Auto-Calibration Result
In NT8 4.3, several hardware components have been significantly improved to ensure greater accuracy for Auto-Calibration. The hardware redesign includes the following:
Enhanced Reference Plate with Deeper Grooves for Better Laser Scanning
The Reference Plate enhancement includes simplifying the Auto-Calibration method. The shallow engraved lines which previously connected the A1, A12, H1, H12 points were replaced with deeper grooves to accommodate laser scanning for precise X, Y, and Z coordinates. This method ensures a more accurate reference point as it eliminates the offset calculation. Find out more in V4 Hardware Overview.

Revamped Reference Plate
LV Tip Caddy Station for Better Protein Sample Aspiration
Similar to the Reference Plate, the LV Tip Caddy has also been improved to ensure accurate Auto-Calibration results. The redesign includes two square grooves in the lower-left corner that provide direct reference points without having to use an offset calculation, thus ensuring calibration precision.
The New LV Tip Caddy Design
New Protein Block for More Precise Aspirate Experience
The Protein Block has also been optimized to provide a more precise aspiration. There is no longer an offset calculation between the wall and target point. The laser scanning process now provides a precise reference point. Go to V4 Hardware Overview for further details.
The New Protein Block Design
Software Improvements
New Sleek User Interface for Auto-Calibration
NT8 4.3 brings a powerful new Auto-Calibration wizard to make it even easier to set up your system. The new wizard walks users through hardware setup to help you quickly choose which station needs calibration. We strive to make this process as simple as possible with no need to modify configuration files and type key values. Ensuring a precise aspirate and dispense experience can now be achieved in just a few clicks within this wizard. To access it, click the Tools menu, point to Calibration and select your desired option.
Warning
Please do not attempt to calibrate your NT8 without assistance from FORMULATRIX support.
The Auto-Calibration Wizard
Added Protein Block Type Option in ROCK MAKER Integration (RMI)
Now, you can select the Protein Block type directly from the RMI view upon loading the first experiment barcode. This streamlines the process and helps you save time as you no longer need to switch to the Task List View first to do so. Read more about the ROCK MAKER Integration.
Selecting the Protein Block Type in ROCK MAKER Integration
Other Improvements
NT8 4.3 comes with several other improvements as follows:
You can now use all tips as the default in Auto-Calibration and Manual Calibration for more versatility.
Added a maximum capacity value of the chamber maximum capacity field to optimize the Calibration settings. This setting prevents water overflow during calibration.
Minor Software Changes
NT8 version 4.3 added several minor changes for better usability. The minor changes include the following:
(NT8 V4 Hardware Only) In NT8 4.3, the Wash Valve and Pump functions are integrated into one button in the Control Switches panel on the Script View. These features work simultaneously, thus using one button to activate them will boost your efficiency with the NT8.

Integrated Wash Pump and Valve Button in the Control Switch Panel
Improved the display of the Plate Stations while running the task list so that only the selected drops and/or wells show the teal indicator as they are dispensed.
Showing Teal Indicator in the Dispensed Wells