Adding and Editing Plate Types
Your plates must be defined on the NT8 Control Software before they can be used in an experiment. NT8 comes preloaded with the most common plate types in the Plate Type Library, but you can create new definitions for other types of plates that you want to use. Plate definitions represent actual information of the plate, such as the number of drops, reservoir wells, plate height, and column pitch. All of this information is important to ensure dispense accuracy and precision.
When you add a new plate to the plate type library, a wizard will guide you through the process and provide a common plate type as a starting point to help you define your new plate type. You can also edit existing plate types if you need to make any adjustments. Alternatively, you can request a new plate definition from support@formulatrix.com.
Prerequisites
You have placed your microplate on Plate Station 1.
You have attached a low volume (LV) tip to Low Volume (LV) Tip Attachments channel number 8.
If you do not have the plate datasheet ready, you have to connect the NT8 Control Software to the hardware.
Creating a New Plate Definition
Click the Tools menu and select Plate Type Library.
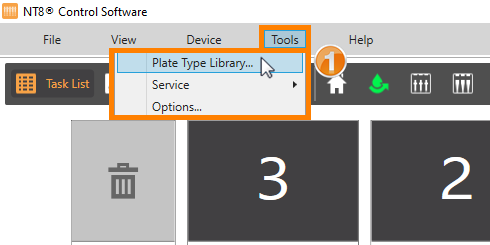
Selecting the Plate Type Library Option
Click the New button.
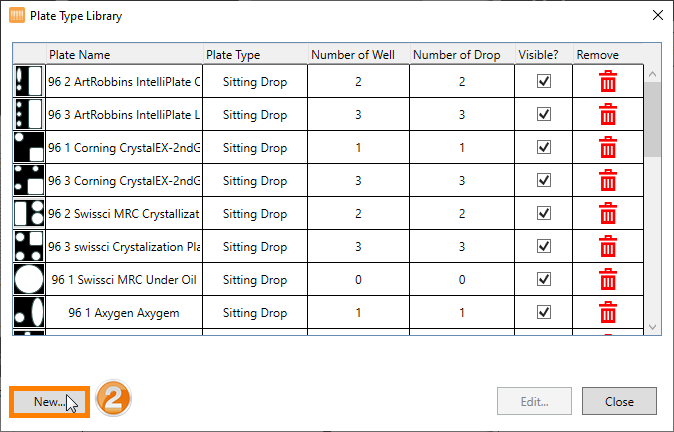
Selecting New in the Plate Type Library
On the New Plate Type wizard, fill in the information as needed. Use the table below as a guide.
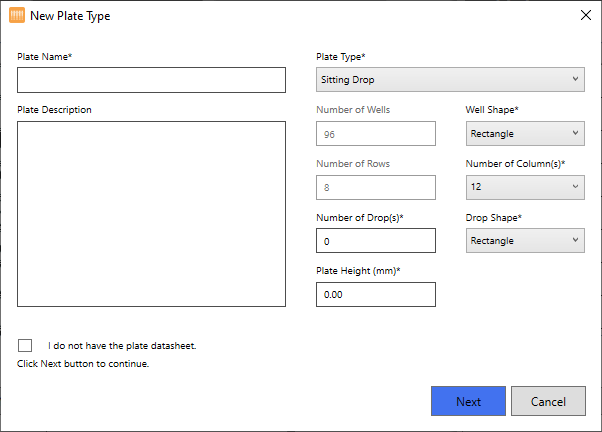
New Plate Type Wizard
Note
If you have the datasheet of the plate, simply copy the information to the respective fields on the New Plate Type wizard.
Area Description |
Information |
|---|---|
Plate Name* |
Type a descriptive name for the new plate. |
Plate Description |
Fill in this field with as much as information about the new plate, such as the brand, or its intended functions for your future experiments. |
Plate Type* |
Select the type of plate that you’re using from the Plate Type list. The plate type options include Sitting, Hanging, LCP, or Deep Well. Note The LCP head and Deep Well currently do not support 24-well plate type. |
Well Shape* |
Select the correct shape for your plate’s well from the dropdown list. There are three options available: Rectangle, Ellipse, or Circle. |
Number of Wells |
The field is automatically filled when you have already selected the Number of Column(s) and Number of Rows. |
Number of Column(s)* |
Select the number of columns of your plate from the list. This action will also automatically update the Number of Wells field. |
Number of Rows |
hows you the total row numbers of a plate. NT8 provides you with up to 8 rows when you create a new plate definition. To add more rows, simply add new drops on each well in the Number of Drop(s) field. |
Drop Shape* |
Select the correct drop shape that represents the plate from the dropdown list. There are three options available: Rectangle, Ellipse, or Circle. This option and the Number of Drop(s) field aren’t available for plate types without drops, such as Deep Well or LCP. |
Number of Drops* |
Type the actual number of drop(s) of your plate. |
Plate Height (mm)* |
Type the plate height in milimeters (mm). Then, proceed to step 4. OR If you do not know the height of your plate, select the I do not have the plate datasheet of the plate option in the lower-left corner. Then, click Next and proceed to step 3. |
To find the plate height, put the plate on Plate Station 1 and attach the LV tip on channel 8 of the LV tip attachments. Then, use the manual control buttons to move the LV tip to any area on the top of the plate. When you are done, click Next. For reference, see the table below.
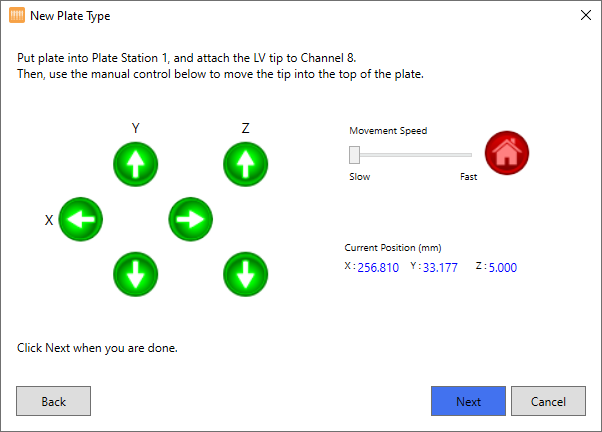
Using Manual Control Buttons to Find the Plate Height
Item |
Information |
|---|---|
|
Use the X, Y, and Z arrow buttons to move the NT8 head left, right, up, and down, and the NT8 deck back and forth. |
|
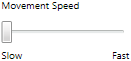
Controls the velocity of the NT8 hardware’s movement by dragging the button to the right or left. Drag the button to the right to increase the speed, or to the left to reduce the speed. Tip When refining the NT8 head position, it is recommended to use lower speeds for greater precision. |
|
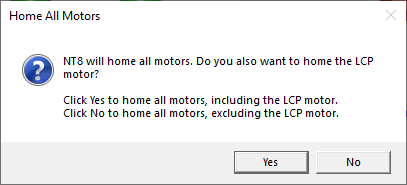
Sends the device arm to its default (home) position and fixes its position when the motor has skidded or skipped. When a confirmation message appears, click Yes to home all motors including the LCP motor, or click No to home all motors except the LCP motor.
|


Then, define the dimensions of the drop(s) and reservoir well, as follows:
Note
Most fields are automatically filled with default values if you have defined the Plate Height (mm)* field in step 2. Refer to your microplate datasheet to fill in the fields with accurate information that matches the actual dimensions of the plate. Fields marked in (*) are mandatory.
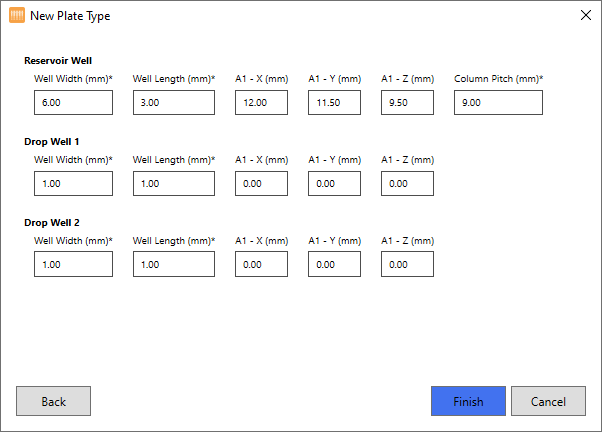
Define the Well and Drop Dimensions
Well Width (mm)*— Type the width of the well and drop in mm. The default value for Reservoir Well is 6.00 mm, while for a Drop Well the default value is 1.00 mm.
Well Length (mm)*— Type the length of the well and drop in mm. The default value for Reservoir Well is 3.00 mm, while for a Drop Well the default value is 1.00 mm.
Note
If you are creating a new LCP plate, you will not see the Drop Well section. Instead, you will need to define the dimensions for the LCP Pre-dispense process. This ensures the LCP syringe to perform pre-dispense cycles outside the plate wells, also prevents inaccurate dispense volume.
A1 - X (mm), A1 - Y (mm), and A1 - Z (mm)— Contain the X, Y, and Z offset position values of the A1 well of your plate.
Column Pitch (mm)*— Type the distance between two vertically adjacent wells
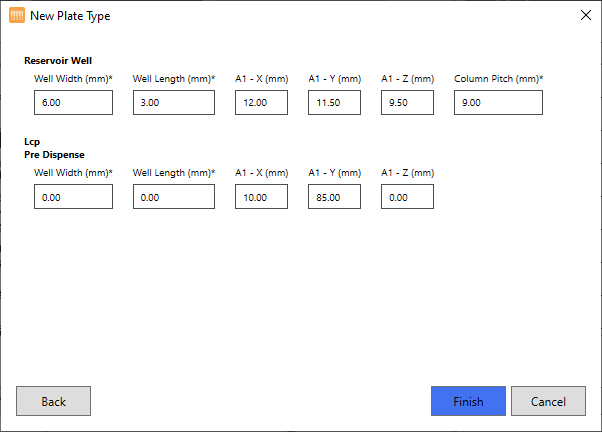
Defining Plate Dimensions for LCP Pre Dispense Process
When you are done, click Finish.
Type a descriptive name for your new plate in the Save Plate Definition dialog box to save it as a .PD file. For easier identification, the filename should be the same as the defined name in the Plate Name field in step 2.
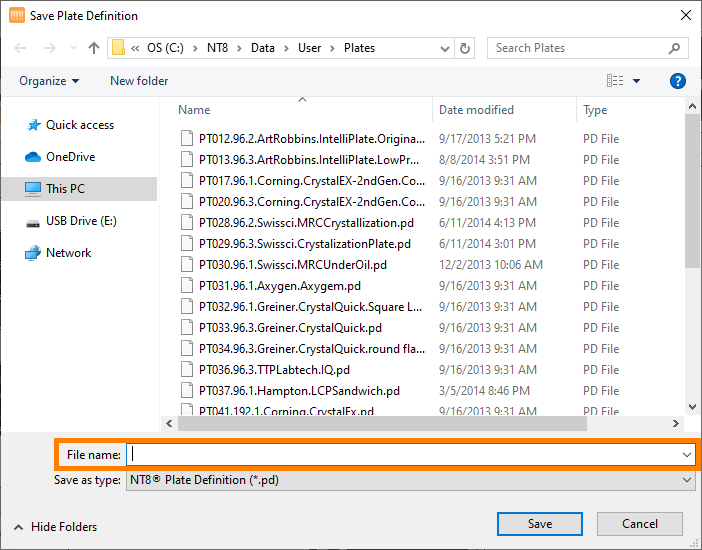
Saving the New Plate Definition
Then, click Save to save the settings. Your new plate should appear in the Plate Type Library wizard now.
Related Topics