Task List View (The Main View)
The Task List view is the main screen that is open by default when you first launch the NT8 Control Software. This is the main window in which you interact with the NT8 hardware to set up sitting drop, hanging drop, LCP, seeding, and/or plate copy experiments. The Task List view is divided into several areas as shown below.
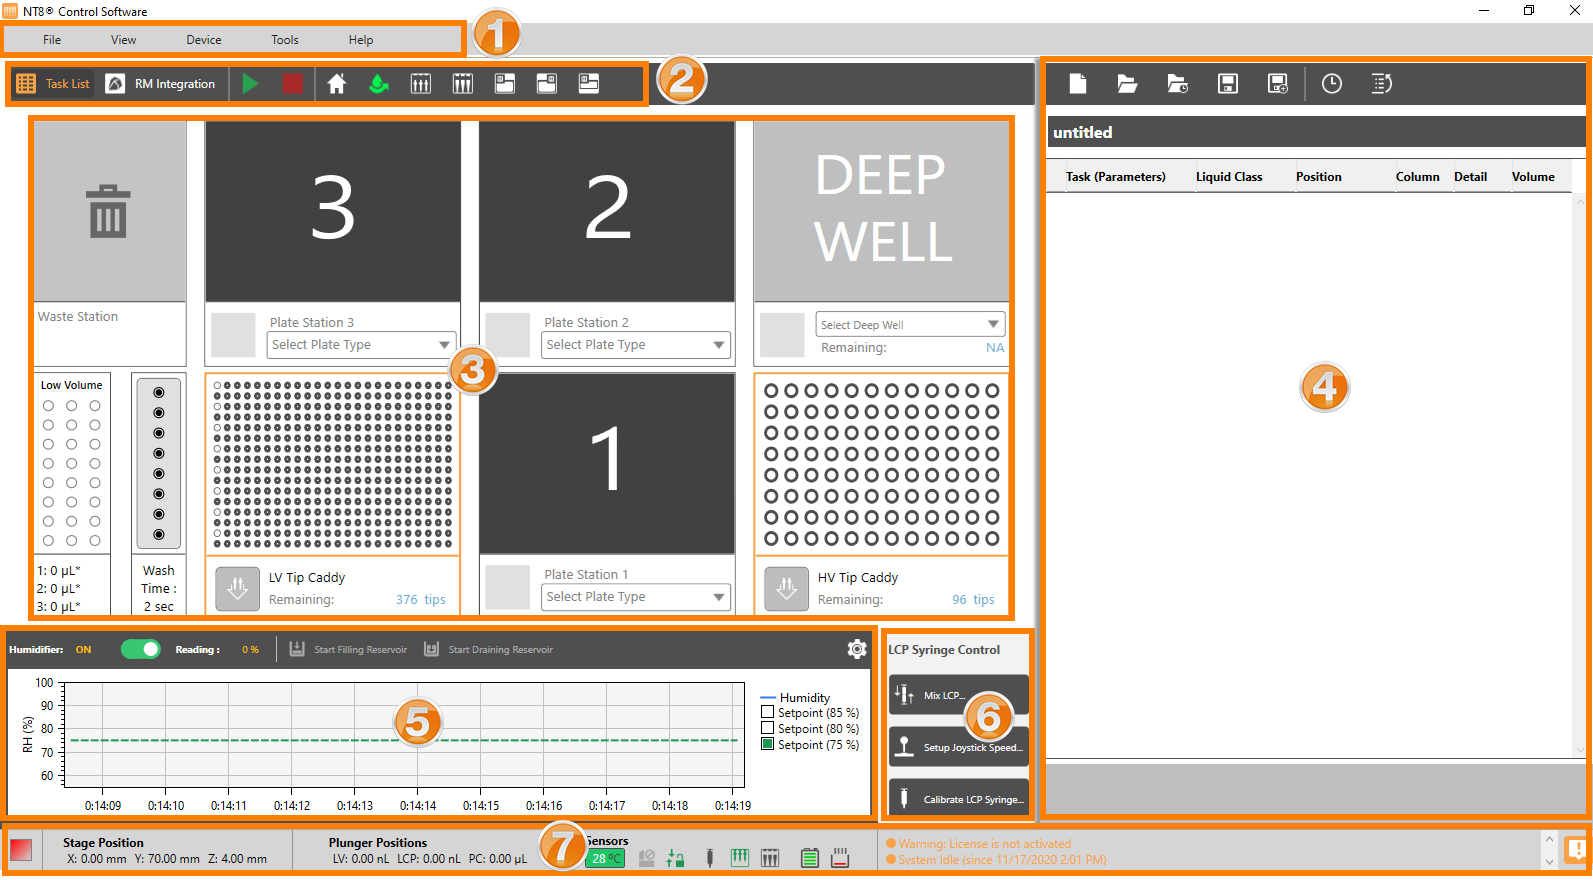
Task List View
 Menu Bar — Provides organized and quick access to various major commands. See Menu Bar for more information.
 Toolbar — Consists of buttons that enable you to run an experiment, open a task list, run the system priming, switch between views, and so on.

show me what the Toolbar consists of:
Task List view button
 — Displays the Task List view. The Task List page is open by default.
RM Integration view button
 — Switches to the ROCK MAKER Integration page.
Run Task List button
 — Starts running the task list. It will only be enabled if you have added a task list to the Task List table or paused the running sequence. This button changes to a pause button
  when clicked.
Stop button
 — Aborts the running sequence. It is only available when you are running a task list.
Home Motors button
 — Sends the device arm to its default (home) position and fixes its position when the motor has skidded or skipped.
Start System Priming button
 — Starts and stops the priming process. It is recommended to run a system priming when you first use the NT8 every day and after refilling the water carboy to ensure that there’s no air in the liquid lines.
Eject LV Tips button
 — Ejects the low volume (LV) tips attached to the hardware and dispose of them in the Waste Station.
Eject HV Tips button
 — Ejects the Plate Copy or high volume (HV) tips attached to the hardware and dispose of them.
Move to Park Location 1 button
 — Moves the NT8’s head to the waste station, so that you can load and unload plates and tip caddies, and interact with components on the right side of the stage.
Move to Park Location 2 button
 — Moves the NT8 head to the HV tip caddy, so that you can interact with the protein block or other components on the left side of the stage.
Move to Park Location 3 button
 — Moves the stage back into the NT8’s body so that you can slide an HV tip caddy into the HV tip caddy station.
 Device View — Device View, which makes up the majority of the Task List view, is a simulation of the various components on the NT8 deck.
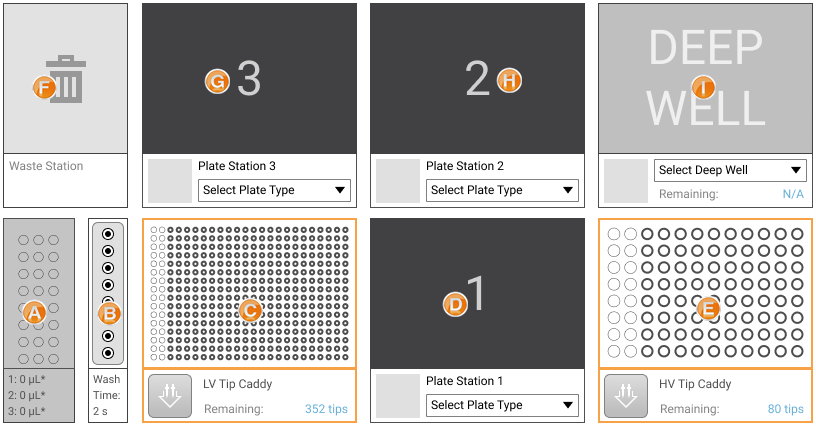
show me what the Device View consists of:
 Task List Panel — When you create a task list or open one from the predefined task list templates, the details of the task list(s) or sequences will be displayed in the Task List table (see H in the image below). See the example below for reference.
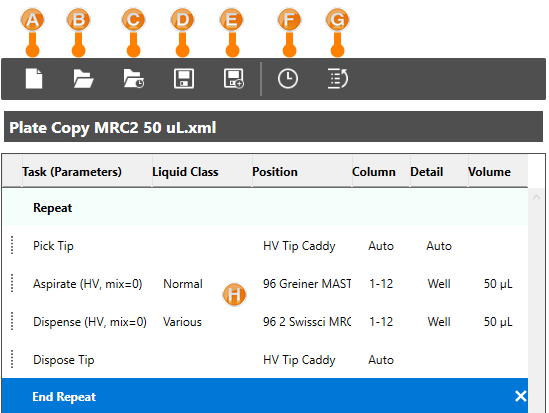
A progress bar will appear below the task list table to visually display the progress of the running dispense task.

show me what the Task List Panel consists of:
 — The New Task List button creates a new task list.
 — The Open Task List button opens an existing task list.
 — The Save Task List button saves changes made to your task list.
 — The Save Task List As button saves changes made in your task list as an extension .XML file.
Note
Functions A B D and E can also be accessed through the File menu.
 — The Add Delay Task button adds the desired delay time to your task list when you want the NT8 to pause at some points during the task list execution.
Delay Duration — NT8 pauses at the desired delay time and continues running the experiment automatically. If you select this option, set the delay time in second(s).
Wait for User’s Response — NT8 pauses and waits for your further action to continue or cancel the experiment.

 — The Repeat and End Repeat will appear on the task list when you click this button. Any tasks you place between these two commands will be repeated on each selected column of a plate.
Right-click Menu options
If you right-click on any items in the Task List table, you can:
Manually edit the selected task in the Task Details window by selecting Edit. You can also directly edit a task by double-clicking it.
Execute the normal copy, paste, cut and delete commands on all selected items at once. Press Ctrl + click to select non-consecutive items or press Shift + click to select consecutive items.
Delete a task by selecting Delete. You can also delete a task by clicking on the task, then pressing the Delete key on your keyboard or clicking the Delete button.
Change the order of execution by selecting Move Up or Move Down, to move the task up or down the list. You can also change the order by dragging the desired task to a different place in the list.
 Humidifier Control Panel — All Humidifier-related settings can be found in the Humidifier Control panel,
from activating the automatic humidifier feature to monitoring the humidity change history in real time.
Find out more about the Humidifier Control panel here
Humidifier Control Panel — All Humidifier-related settings can be found in the Humidifier Control panel,
from activating the automatic humidifier feature to monitoring the humidity change history in real time.
Find out more about the Humidifier Control panel here
 OPTIONAL: Liquid Cubic Phase (LCP) Syringe Control Panel — The LCP Syringe Control panel is only available if you purchase the NT8 with the LCP option.
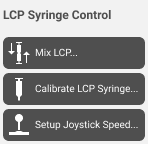
Mix LCP button — Displays the Mixing LCP wizard. For more information, read Preparing LCP Samples
Setup Joystick Speed button — Adjusts the LCP syringe movement speed when using the manual lever.
Calibrate LCP Syringe button — Calibrates the LCP syringe to ensure accurate dispense from the syringe. NT8 is equipped with a fully automated LCP syringe calibration feature. Contact FORMULATRIX support if you need with recalibration of the syringe.
 Status Bar — Located at the bottom of the NT8 window, the Status Bar provides at-a-glance information about all of the important operating parameters of the NT8. For more information, see Reading the Status Bar