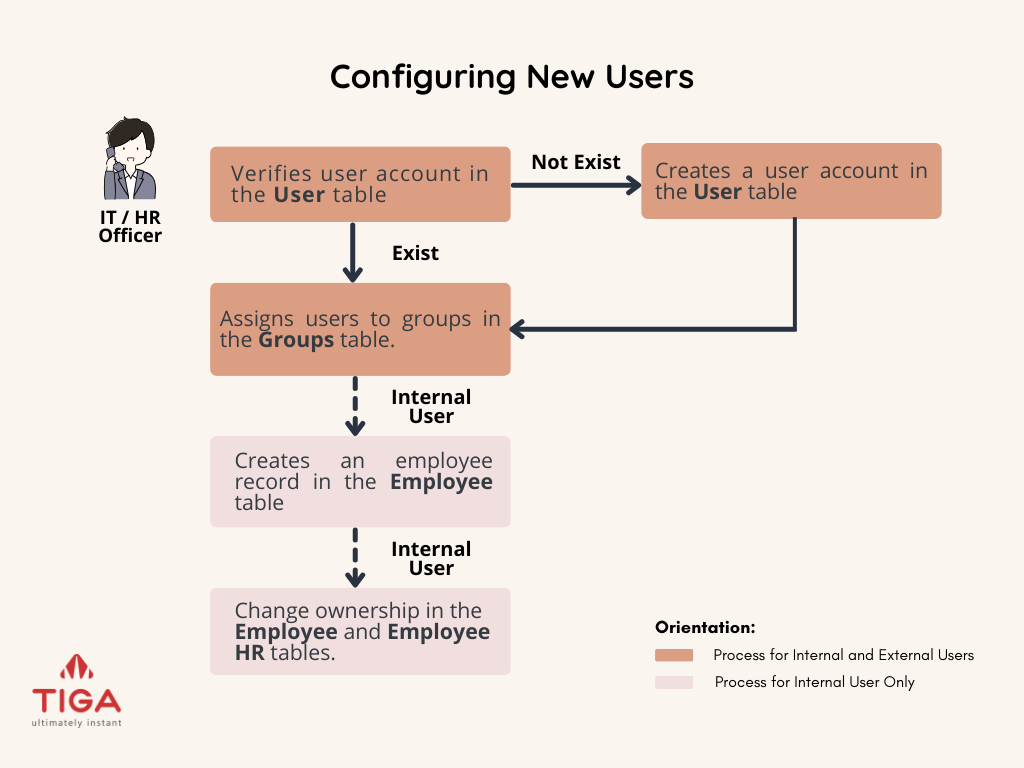
Configuring New Users
TIGA is designed to support multiple user types, ensuring each group has the appropriate permissions and restrictions. Internal users, such as employees, are granted full system access to perform their roles efficiently. Meanwhile, external users, including partners and clients, receive restricted access tailored to their specific business needs. This approach maintains security while allowing seamless collaboration.
Note
Be careful with external users. Please follow directions carefully
Formulatrix employees need to be part of specific groups. Most need both a user and an employee record. However, certain production staff only require an employee record for data purposes.
Configuring New Users
Verifying the Existence of Users
Before creating a new account, check whether the user already exists in TIGA.
If the account does not exist, or if the user has a @m3.formulatrix.com or external domain, then IT and HR officers need to create an account manually.
User accounts may be created manually via this process or automatically if someone with no TIGA account logs in using their Google @formulatrix account. In the latter case, the account will not be assigned to any groups and therefore the IT team needs to finish configuring those users.
Prerequisite:
You must be an administrator with the necessary access.
To verify TIGA’s user account:
In the applications menu, expand the Systems dropdown and select Security.
Select the User table and search for the user’s email address or full name.
Check the search results. If a record exists and Is Active checkbox is checked, the account is valid.

A User with Active Mark
Creating TIGA’s User Account
Once you have confirmed that the account does not exist or needs to be created manually, you can register the user in TIGA. This step ensures the user has a valid login and can be assigned access rights through group membership.
Prerequisites:
You must be an administrator with the necessary access.
You are in the Systems / Security application.
To create TIGA’s user account:
Select the User table and create a new record.
Complete the fields as follows:
Username: This is the username used to log in to the system. Enter the user’s email address.
Administrator: Assigning the administrator role grants full access to TIGA’s configuration, including critical settings and data. Only assign this role if necessary. Typically, this is reserved for the TIGA development team.
Is Active: This field is automatically checked to indicate an active user.
Full Name & Email: Enter the user’s full name and email address.
ID: Leave it empty. TIGA will automatically fill it.
Is Taggable: This field is automatically checked to allow a user to be mentioned using @ in comments. Uncheck it for internal accounts used by the development team that should not appear in the tag suggestion list.
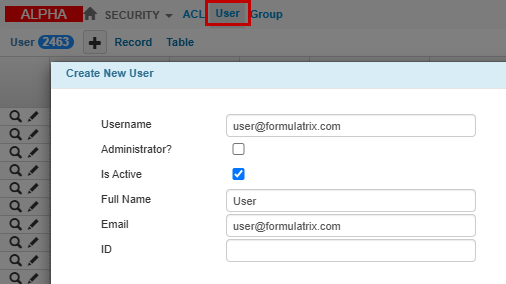
Creating a New User
Click Create to finish the process.
Post Condition:
The user will receive an email with a website address, username, and password to access TIGA.
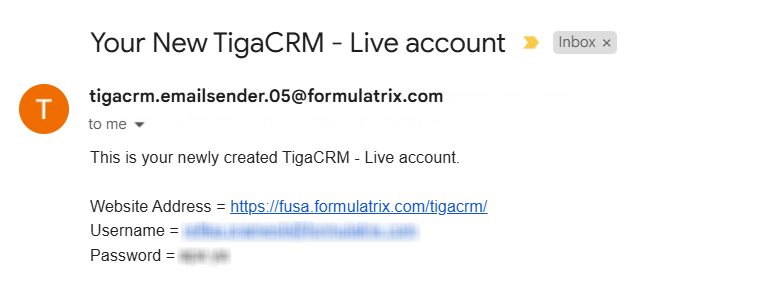
Notification Email of Newly Created User
Assigning Users to Groups
After creating the account, assign the user to one or more groups based on their role.
Group membership determines what applications and tables the user can access, and is configured through Access Control Lists (ACL). For step-by-step instructions on how to assign a user to a group, see Managing Groups and Access Rights.
Important
All Formulatrix employees must be added to the “FORMULATRIX” group and their respective team (e.g., “SOFTWARE ENGINEER”). Verify the employee’s manager is in the same group and marked as Leader to permit timesheet approval. This permits them to log hours in the Time Tracking table and access other relevant tables.
A User Marked as Leader
External users should be assigned to specific groups with limited table access based on business needs. For example, customs officials are assigned to the “Bonded Zone Report” group, which only allows access to Bonded Zone Reports to monitor inventory and transaction reports. DO NOT ADD THEM TO THE “FORMULATRIX” GROUP. There is a lot of sensitive information in TIGA which external users should not see. This group gives you access to everything.
For a list of available groups and their descriptions, refer to TIGA Users’ Permission.
Adding Employee Record and Changing the Ownership for Internal Users
Formulatrix employees must also be documented in the Employee table to properly track their data across TIGA.
Prerequisite:
You must be an administrator with the necessary access.
To add an employee record:
In the CRM application, open the Employee table and add a new record.
Important
Verify for existing employee accounts to avoid duplication. If an account is found, enter the new/updated information there.
Fill in the required fields marked with an asterisk (*).
Note
Verify the Join Date and Time Tracking Start Date fields have the same date for the new employees.
Click Create.
Post Condition:
TIGA creates an employee record and automatically generates a record in the Employee HR table.
To change employee record ownership:
Select the employee record you just created and click the Admin menu.
Click the Change Owner option.

Change Owner of the Employee Record
Find and select the related employee from the User table.

Set an Employee as the Record Owner
Important
This step is important to ensure the record is correctly set to the corresponding employee; otherwise, the manager cannot approve or view the submitted timesheets.
Repeat the steps above for the same employee in the Employee HR table.
Post Condition:
The manager can now view and approve submitted timesheets.