Importing Records
You can import data into a table from a .CSV file in order to accelerate your data entry tasks. This method of entering data allows you to create or update records easily without having to manually create or modify individual records in TIGA. The input .CSV file consists of tabular format data and can include headers, or not. A simple way of getting the correct template for your input file is to first export sample data from the table you’re importing to, and then update the data while keeping the headers. For more information about exporting data from TIGA, see Exporting Records.
TIGA will try to import as many records as possible, skipping records that are in error. If an error occurs during the import, TIGA will display an error message and will download the spreadsheet file to show you which items failed to import and for what reason. You can fix the errors by revising the data in the downloaded spreadsheet and then importing it again, if necessary.

Sample Errors in a Downloaded .CSV File
Here is an overview of the Import window:

The Import Window
1. Defining Your Input File in TIGA
When you upload a .CSV file into TIGA, you can control how TIGA reads the file to make sure your data is imported correctly.
File to upload — Enables you to browse and upload a .CSV file. After being uploaded, the file’s information will display in the Import window.
File name — Displays the name of the file that you have uploaded.
Upload Records — Determines how your records will be uploaded into TIGA. The As Fast as possible option enables you to upload multiple rows into a table at once. The Sequentially option enables you to add data row-by-row. Selecting Sequentially will result in longer upload times, but will also reduce the chance of errors occurring while the data is being uploaded.
Text delimiter — Enables you to select the type of text delimiter used in your spreadsheet.
Field separator — Enables you to select the type of separator used in your spreadsheet.
Has header line — Determines whether your spreadsheet has a header row.
Record Processing
Records can be uploaded in parallel, which will provide you with the fastest performance. However, sometimes there are dependencies within the records in the upload file that could cause errors if they are not uploaded in order, in which case you will need to upload them sequentially. When you upload records sequentially, only one record at a time will be processed in the order provided in the spreadsheet, which will prevent these types of errors from occurring. This option can be modified via the Upload Records field:
As Fast as possible — Enables you to upload multiple rows into a table at once.
Sequentially — Enables you to add data row-by-row.
2. Matching Records and Rules
Each row in the imported spreadsheet will be used to create a new record, or to update an existing record if a matching record already exists. Record matching is done via the key field options in the Key column in the field map area (see #3). If the key in an incoming record matches the same field in a record already on the database, then the records are matched. If you select many fields as key fields, then all of those keys must match for the records to match. You can set up different rules for what you want to happen as records are matched or not:
The If entry already exists drop down — Determines whether TIGA should Update or Skip records if the entry is found based on the key(s). If you select Update, the matched record will be updated. Update is the default selection. If you select Skip, TIGA will skip the imported record, and a new record for that row of information will not be created.
The If entry does not exist drop down — Determines whether TIGA should Create or Skip records if the entry does not exist. Create is the default selection. Select Create if you’d like TIGA to create a new record for that row of data, or Skip if you’d like TIGA to ignore the imported record and do nothing.
3. The Field Map
This section enables you to map the imported spreadsheet columns to the fields in TIGA. This table consists of the following columns:
File Column — Contains each field that appears in the .CSV file you are importing. For each File Column, select the corresponding Table Column in your spreadsheet.
Table Column — Shows the first row for each column in your imported data. It is strongly recommended that you have a header on your spreadsheet so that it is easier to match the column to the field. TIGA will automatically match the Table Column to the correct File Column if their names match.
Key — Determines whether the File Column is a key or not (see Matching Records above).
The Field Map section remains empty until a file is selected to upload.
To import a spreadsheet of data into TIGA:
Navigate to the table to which you would like to add records. In this tutorial, we’ve selected the Items Suppliers table as our example.
Go to the Table menu and click Import.
Next to File to upload, click the Browse button and select the spreadsheet you want to import.
Since we know that there are no dependencies between the incoming records, we can select As Fast As Possible in the Upload Records list to do this quickly.
Next to Text delimiter, select the type of text delimiter used in your spreadsheet if there is one. If you do not know, do not select any of the options.
Next to Field separator, select the type of separator used in your spreadsheet. If it’s a .CSV file, select Comma.
If your spreadsheet has a header row, select the check box next to Has header line. Otherwise, you must map the desired fields to the corresponding column manually in the File Column list next to the Field map option.
If you are reimporting an exported file, TIGA will use the default options that were previously applied to that file. In this case, no changes are required for steps 4 through 6 unless you have modified the file.
In the If entry already exists menu, select Update or Skip. In this tutorial, we’ll select Update.
In the If entry does not exist menu, select Create or Skip. In this tutorial, we’ll select Create.
Use the Field map to map the imported spreadsheet to the fields in TIGA (see the image below).
When done, click Import.
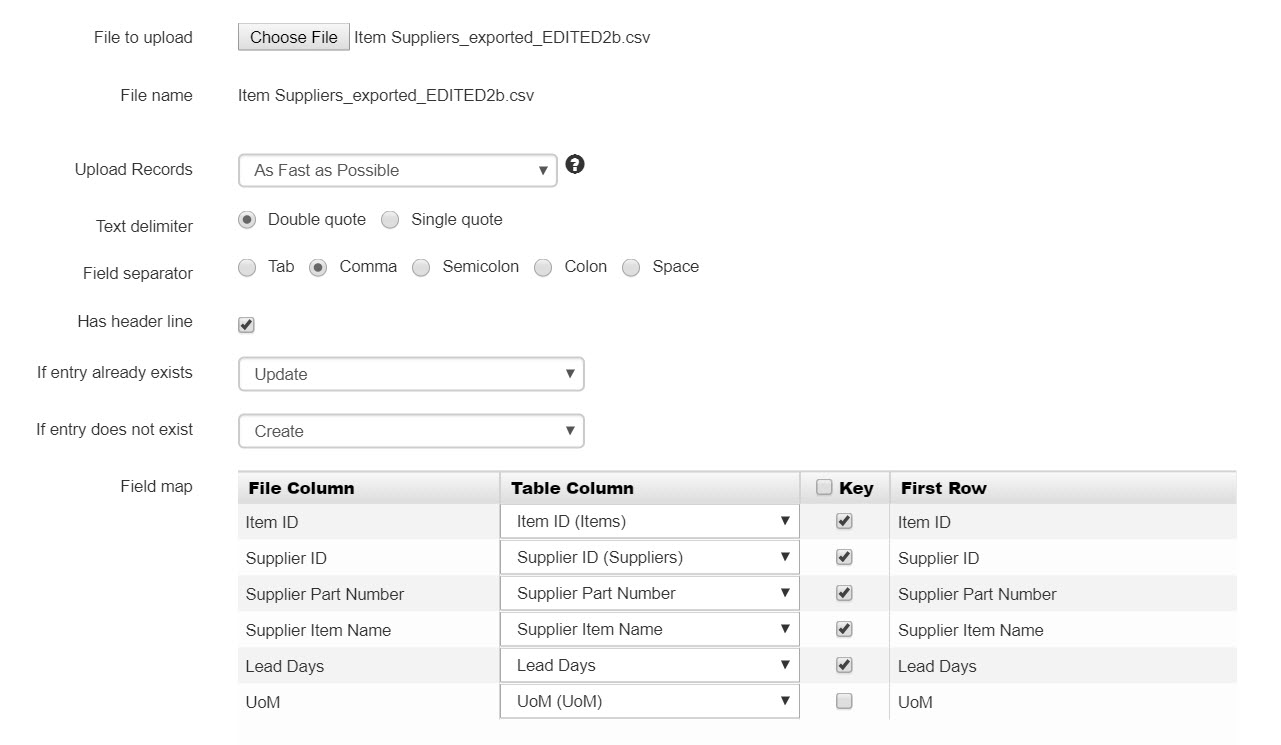
The Columns from the .CSV Source File are Mapped to the Columns inTIGA that have the Same Name
In the above screenshot, Item ID, Supplier ID, Supplier Part Number, Supplier Item Name, and Lead Days data fields are being mapped to the Item ID (Items), Supplier ID (Suppliers), Supplier Part Number, Supplier Item Name, and Lead Days columns, respectively.
Related Topics: