Document Control and Revision History
The Document Control table in TIGA is used as a repository of official documents (e.g., Standard Operating Procedures (SOPs), Work Instructions (WIs), checklists, templates, drawings, and other controlled documents). Each record defines the document by its control number, name, category, and the associated department (e.g., Warehouse, Purchasing, and Engineering), clarifying ownership, responsibility, and its intended use in daily operations. All documents follow a standardized numbering and naming format to ensure consistency, reliability, and traceability throughout the company.
Each Document Control record has a related Document Control Revision History that tracks every version of the document over time. When a new SOP is created, a drawing is updated, or a form is modified, a new record is added with its version number, change notes, the attached source file, and the published PDF. This allows users to monitor document evolution and identify the most current official version.
The controlled document goes through a workflow from creation to release, with each role having different responsibilities.
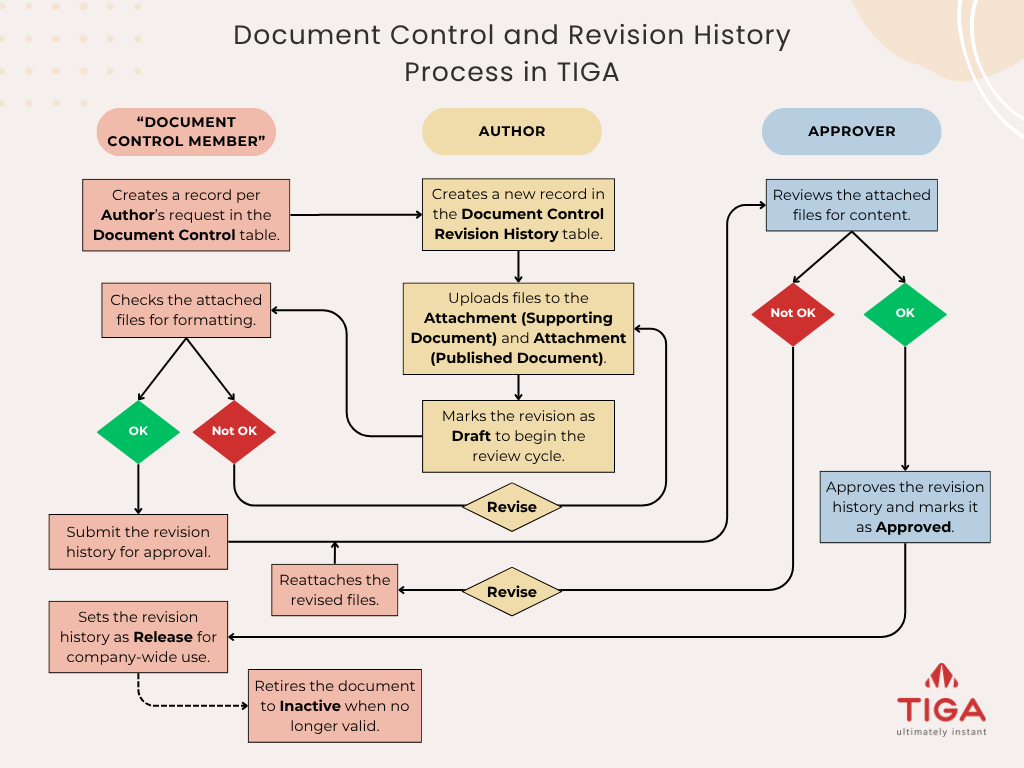
Document Control and Revision History Workflow
Document Control Member
Creates and maintains controlled documents per request, applying company standards for naming, numbering, formatting, and managing release or deactivation.
Author
Initiates the request, provides all information required to register a new controlled document, and develops the content by creating the revision history and attaching the required files.
Approver
Validates the document content and gives the final approval before release.
Within this workflow, each revision history advances through various statuses that reflect its progress.
Status |
Description |
|---|---|
Request for Revision / Initial Release |
This is the initial status when a document control revision history is created or cloned. |
Draft |
This status indicates that the Author has prepared the files for the “Document Control Member” to review for format and compliance. |
Submitted for Approval |
This means that the revision history has been submitted by “Document Control Member” for review by the Approver. |
Approved |
This status signifies that the Approver has confirmed that the document meets requirements. |
Release |
This indicates that the document is officially available for operational use across the company. Only one revision history per document control can be in Release status. |
Inactive |
This status means the revision history is no longer in use, typically because a newer revision has replaced it. |
Create Document Control
When a new controlled document is requested by the Author, the “Document Control Member” will register the record in TIGA using the Author’s information and apply the company’s standard numbering and naming formats for consistency.
Prerequisites:
You are a member of the “Document Control Member” group.
The appropriate numbering and naming format for the document has been identified and is available.
To create a document control record:
Open the Document Control table in the Production application.
Select Add to open the Create New Document Control form.

Add a New Document Control Record
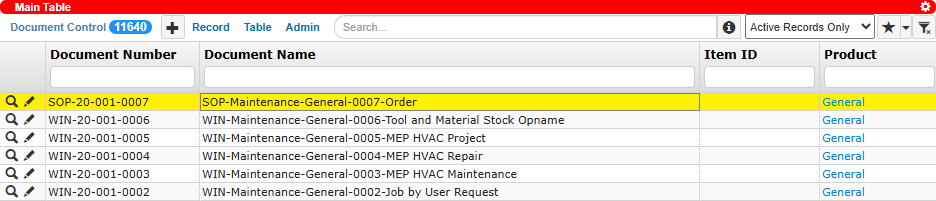
Create a new record and complete the provided fields, including Document Number and Document Name, following the rules.
For example: SOP-Maintenance-General-0007-Order.

Create a New Document Control
Post Condition:
A new record is created in the Document Control table. This record will serve as the base for all future revision histories of the document.
A Newly Created Record
Create Document Control Revision History
The Document Control Revision History keeps track of all updates made to a controlled document. Each time a document is created or revised, a new entry is added to the Document Control Revision History table. This entry outlines the changes made and the current status of the document in its lifecycle, and links to the document file.
Prerequisites:
A Document Control record must already exist.
You are the PIC (Person In Charge) responsible for the revision document.
To create a revision history record:
Open the Document Control table in the Production application.
Select a corresponding record and expand the Document Control Revision History table in the Related Tables.
Create a new revision history record and complete the provided fields.
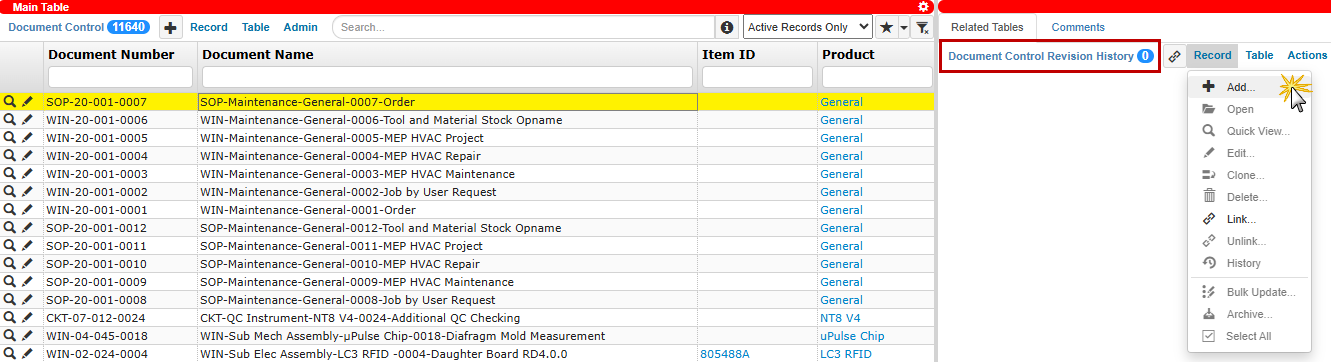
Add a New Document Control Revision History Record
Post Condition:
A new record is created in the Document Control Revision History table with Request for Revision / Initial Release status.

A Revision History Record with Request for Revision / Initial Release Status
Upload Attachment to Revision History
After creating the revision history, the Author must attach the document files. The attachments are linked to a specific revision of a controlled document. There are two attachment tables with different purposes:
Attachment (Supporting Document): This is where the editable source files, such as Word or Excel files, and any supporting materials (screenshots, reference notes) are placed. These help the “Document Control Member” check formatting and allow approvers to review the background of the content.
Attachment (Published Document): This is where the PDF version that will serve as the official reference once the revision is approved and released is placed. Users will always use this file as the final document.
Prerequisite:
A Document Control Revision History record must exist in the Request for Revision / Initial Release status.
To upload attachments:
Open the Document Control Revision History table in the Production application.
Select the record in Request for Revision / Initial Release status.
In the Attachment (Supporting Document) of the Related Tables, upload any draft or editable files that support the revision.

Add Supporting Documents
In the Attachment (Published Document) of the Related Tables, upload the PDF version of the document.

Add Published Documents
Note
If the PDF version is incomplete, it may be added later. Additionally, the “Document Control Member” can replace it during/after approval if required.
Only one file is allowed to be uploaded to this table.
Post Condition:
All uploaded files are linked to the selected revision history record.
Set Revision History to Draft
Once a revision history record is created and files are attached, the Author must mark it as Draft to alert the “Document Control Member”, who will check formatting, numbering, and adherence to company standards.
Prerequisites:
A Document Control Revision History record must exist in Request for Revision / Initial Release status.
You are the Author of the revision history.
At least one document file (Supporting or Published) has been uploaded.
To set the revision history to draft:
Open the Document Control Revision History table in the Production application.
Select the record that is in Request for Revision / Initial Release status.
From the Actions menu, choose Set to Draft.

Set to Draft Action
Select Yes to confirm.
Post Condition:
TIGA automatically:
Changes the status to Draft.
Sends an email notification to the “Document Control Member” group, informing them that a new draft document is ready for review.
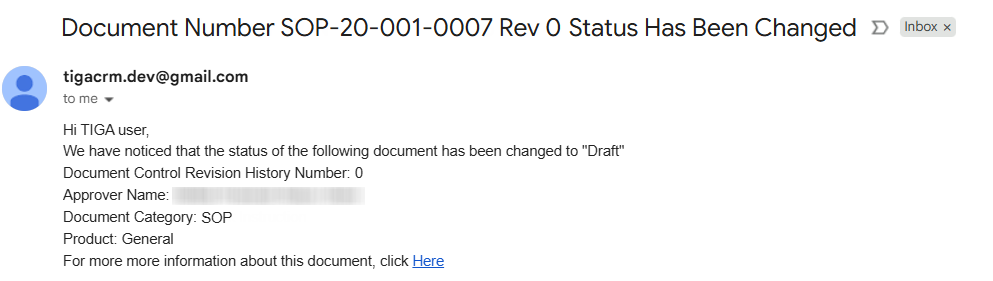
A Document Control Email Notification
Submit Revision History for Approval
Once the revision history record reaches Draft status and has been reviewed by the initial “Document Control Member”, it can be submitted for approval. This submission moves the document into the approval workflow, allowing designated Approvers to evaluate the content.
Note
Should any formatting or compliance issues exist at the Draft stage, the “Document Control Member” will have the Author (or the person who uploaded the attachments) correct and re-upload the files. The record may be resubmitted for approval only after all corrections are made, the revised files are uploaded, and validated.
Prerequisites:
You are a member of the “Document Control Member” group.
A Document Control Revision History record must exist in Draft status.
To submit revision history for approval:
Access a revision history record using one of the following methods:
Open the “Document Number Status Has Been Changed” email from TIGA and click the provided link to navigate to the corresponding record.

Document Number Status Has Been Changed Email Notification
Open the Document Control Revision History table in the Production application and select a revision history record currently in Draft status.
From the Actions menu, select Submit for Approval.

Submit for Approval Action
Select Submit to confirm the submission.
Post Condition:
TIGA automatically:
Updates the status to Submitted for Approval.
Sends an email to the listed Approvers, the Author, and the “Document Control Members” group. The email includes a direct link to the revision record in TIGA so Approvers can access it easily.

Document Control Approval Email Notification
Approve Revision History
Approvers are responsible for reviewing a submitted revision history and determining whether the document can proceed to release. Approval indicates that the document content, formatting, and compliance requirements are acceptable.
Important
The system does not have a “Reject” button. If an Approver identifies incorrect or incomplete content, the Approver must communicate the feedback directly to the Author and the “Document Control Member”. The document can then be revised and reattached by the “Document Control Member” on behalf of the Author.
Prerequisites:
A Document Control Revision History record must exist in Submitted for Approval status.
You are listed as the Approver in the revision history record.
To approve a revision history:
Access a revision history record using one of the following methods:
Open the “Document Needs Approval” email from TIGA and click the provided link to navigate to the corresponding record.

Document Needs Approval Email Notification
Open the Document Control Revision History table in the Production application and select a record with the Submitted for Approval status
Select the Quick Approval in the Actions menu.

Quick Approval Action
Select Approve to confirm.
Post Condition:
TIGA automatically:
Updates the status to Approved once all listed Approvers have completed their approval.
Note
The record remains in Submitted for Approval status until every Approver listed has approved the revision history.
Sends an email notification to the “Document Control Members” group, informing them that the document has been fully approved.

Approved Document Control Email Notification
Note
TIGA sends a reminder every Monday to the pending approvers if a revision history remains in Submitted for Approval for more than 5 days. The email includes a list of revision history records awaiting their action.

Document Pending Approval Email Notification
Release the Approved Revision History
After all required approvals are obtained, the “Document Control Member” finalizes the release. This step makes the new revision history the official version for company use. Once a revision history is released, users should always refer to the Attachment (Published Document) linked to that revision history for daily operations.
Important
Only one revision history can be active at a time, so the previously released revision must first be set to Inactive. Read more about deactivating a revision history.
Prerequisites:
A Document Control Revision History record must exist in Approved status.
You are a member of the “Document Control Member” group.
To release the approved revision history:
Open the Document Control Revision History table in the Production application.
Select a record with an Approved status.
From the Actions menu, select the Release.

Release Action
In the Release dialog box, fill in the release date.

Release Dialog Box
Select Release to indicate when the document becomes effective for use.
Post Condition:
TIGA automatically:
Updates the status to Release. The “Document Control Member” is responsible for manually informing relevant users that the new revision is now active and must be used going forward.
Fills in the Release Date field based on the selection.
Deactivate Revision History
When a document is replaced or no longer applies due to design changes, end-of-life products, or a newer version release, the old revision history must be deactivated. Deactivation ensures users cannot use outdated information. Only the “Document Control Member” can perform the deactivation, but a request must first be submitted by authorized roles such as QA Analyst, PE, or Admin, and approved by management.
Prerequisites:
A Document Control Revision History record must exist in Release status.
You are a member of the “Document Control Member” group.
To deactivate revision history:
Open the Document Control Revision History table in the Production application.
Select a corresponding record with the Release status.
From the Actions menu, select Deactivate Document Revision.

Deactivate Document Revision Action
Confirm the action by selecting Deactivate.
Post Condition:
TIGA automatically changes the revision history status to Inactive.