Creating Custom Reports in TIGA
TIGA provides a flexible and powerful reporting system that enables users and administrators to create custom reports. These reports allow users to extract data from any table, filter the results using specific criteria, and automatically distribute them to any user or group through scheduled emails.
Each custom report is composed of two components that work together to collect and deliver the intended information:
Reports — Define data collection, filtering, and output formatting. Outputs can be delivered as an email body, an attachment, or an external file.
Schedules — Define when the report runs and how recipient email addresses are determined. Recipients can be defined through the following methods:
dynamically by selecting an email column from the report data,
by combining both methods within a single schedule.
A single report can be associated with multiple schedules. For example, a report from the Employee table may send a daily report to each employee and deliver a weekly summary to the manager.
Creating Reports
Creating a report involves defining the data source, filtering rules, output format, and email metadata required to deliver the report. Once created, this report becomes the foundation for any number of schedules that may run at different times or be sent to different recipients.
To create a report:
Open the Reports table from the table bar and create a new report.
In the Create New Reports window, fill in the following fields:
Name — Enter a title of the report to distinguish it from others.
Table — Select the TIGA table that contains the data to extract. All report queries and output will reference this table.
Type — Select how the report will be delivered to recipients:
HTML — Displays the report directly inside the email body as a formatted table.
Attachment - CSV — Delivers the result as a CSV file attachment.
Attachment - HTML — Sends an email containing an HTML file. The file can be opened in a browser.
Google Spreadsheet — Distributes an email containing a link to the generated CSV file. The CSV file is also stored in the Google Drive folder specified in the Google Folder ID field.
Condition — Enter the filter criteria for selecting which records appear in the report. For example, if you want to display cases that only have an Open status, you will need to type “Case Status” is Open. Read more about using advanced search language.
Note
If left blank, the report includes all records from the selected table.
Description — Enter a clear explanation of what the report is used for.
Email From — Enter the email address that will appear as the sender in the delivered email.
Email Subject — Enter the subject line that will appear in the recipient’s inbox. A clear subject makes it easier for recipients to identify the content at a glance.
Email Body — Enter the message included in the email. It can explain the report content or provide any additional context.
Condition Included — Select this to display the filter condition in the email, helping recipients understand why certain records appear.
Owner Username — This field is automatically populated based on the user who created the report.
Google Folder ID — Enter the Google Drive folder ID to store the exported CSV file. This field is mandatory if the Type is Google Spreadsheet.
Note
Only the folder ID portion of the URL should be entered. For example, from the URL: https://drive.google.com/drive/u/0/folders/123abc, enter only: 123abc.
Ensure the folder permissions allow TIGA to create files inside it. Otherwise, the export will fail.
Date Created — Leave this field blank. It will be automatically populated based on the report’s creation date and time.
Date Modified — Leave this field blank. It will be automatically populated based on the date and time the report was last saved or updated.

Create a New Report
Select Create to save the report.
Post Condition:
TIGA automatically:
Creates the new report record in the Reports table.
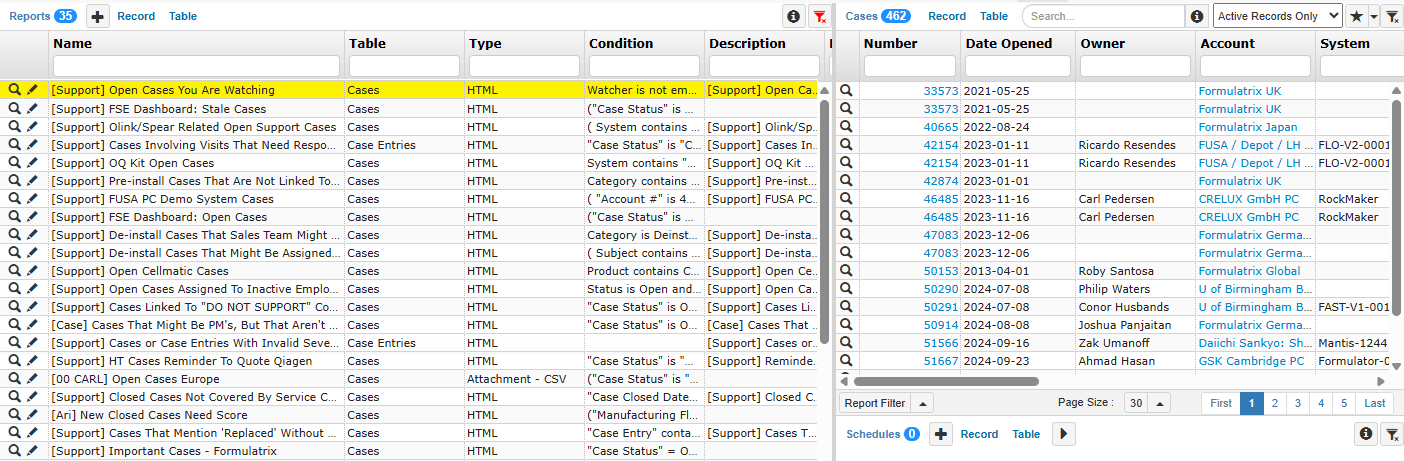
Displays the selected table in the top right panel, showing a live preview of fields and filtered results. This helps confirm that the Condition retrieves the correct records.
Note
If certain columns appear in the preview but should not appear in the report, contact the TIGA team at tigacrm.sw@formulatrix.com. Only administrators can add or remove fields through the View Designer.
Report Created
You can now create one or more schedules to automate report delivery.
Scheduling Reports and Defining Recipients
Schedules determine when the report runs, its frequency, and its recipients. A single report may have multiple schedules with different frequencies or different recipient logic.
Important
All time-related settings follow the FUSA timezone (Eastern Standard Time).
Prerequisites:
The report must already exist in the Reports table.
All recipients must have valid email addresses.
To schedule reports and define recipients:
Select the report you created in the Reports table.
Add a new record in the Schedules at the bottom right panel.
Fill in the following fields in the Create New Schedules window:
Active — Select this to activate the report’s schedule to receive the report’s email. Disable this to stop emails without deleting the schedule.
Name — Enter a name to identify the schedule, especially if the report has multiple schedules.
Description — Enter the information describing this schedule.
Preset — Select a predefined schedule pattern. When a preset is selected, TIGA automatically fills the related time fields (Days, Months, Dates, Hours, and Minutes) with default values based on the selected pattern. You may adjust these fields manually after selecting a preset to match your scheduling needs better.
Daily — Runs every day at the selected Hours and Minutes.
Weekly — Runs on selected Days of the week.
Monthly — Runs on the specified Dates each month.
Quarterly — Runs once every 3 months on the selected Months and Dates.
Half-Yearly — Runs twice per year (every 6 months) on the selected Months and Dates.
Yearly — Runs once a year on the selected Months and Dates.
Note
Changing the preset will override any previously entered time-related values.
Days — Days field defines which day(s) of the week the schedule runs. Use one of the following options:
Enter specific values 1 - 7, where 1 is Sunday, 2 is Monday, and so on. You may also enter day names such as Mon, Tue, or Wed.
Enter * to run the schedule on all days of the week.
Enter ? to indicate that Days field is intentionally not used to specify this schedule.
Months — Months field defines which month(s) the schedule runs. Use one of the following options:
Enter specific values 1 - 12, where 1 is January, 2 is February, and so on.
Enter * to run the schedule in all months.
Enter ? to indicate that Months field is intentionally not used for this schedule.
Dates — Dates field defines which date(s) of the month the schedule runs. Use one of the following options:
Enter specific values 1 - 31 based on the calendar date.
Enter * to run the schedule on all dates of the month.
Enter ? to indicate that Dates field is intentionally not used for this schedule.
Important
Do not use * in both Days and Dates at the same time. If one field uses *, the other must either contain a specific value or be set to ? if it is intentionally not used.
Hours — Enter the hours using a 24-hour format. Multiple values are supported if the report must run several times per day.
Minutes — Enter the minutes within the hour when the schedule runs.
Don’t Send Empty Report — Select this to prevent TIGA from sending the report if the report result is empty. Use this to prevent unnecessary emails.
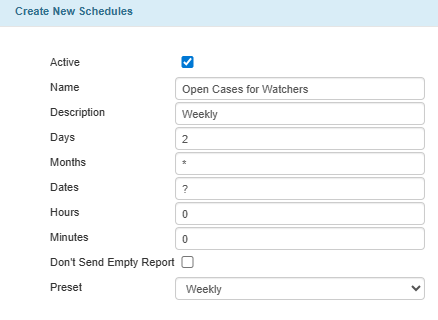
The following image illustrates that the “Open Cases for Watchers” report will be sent every Monday (2) of each month (*) at 12 AM FUSA time.
Create a New Schedule
Choose the method appropriate for defining recipients. A schedule can:
Use Filter By and Send To, or
The Filter By and Send To method allows a report schedule to automatically send emails to the addresses listed in an email column within the report. Instead of manually entering email addresses, you select a report column that contains email values. TIGA then groups the report results by that column and sends each recipient a report containing only the rows relevant to them.
This makes the recipient list dynamic, as it follows the report data rather than static email entries.
Prerequisite:
At least one column in the report must be marked as Email Related in Application Manager.
Note
To enable more fields as Email Related, contact the TIGA team at tigacrm.sw@formulatrix.com.
To use filter by and send to:
Open the report schedule and locate the Filter By and Send To section.
In the Filter By And Send To field, select the report column that contains the recipient email address.
Note
The dropdown only displays fields marked as Email Related in Application Manager.
TIGA groups all report rows by this field and sends one email per unique email address. Each recipient receives only the rows associated with them.
(Optional) Select a report column whose value should be appended to the email subject and used as a second grouping level in the Dynamic Label field. The email subject format will be: Email Subject / Dynamic Label.
Note
When selected, TIGA first groups records by Filter By And Send To, then groups each result again by the Dynamic Label value. This causes recipients to receive multiple separate emails if they have records with different label values.
(Optional) Select a report field that contains email addresses to be included as CC recipients in the Filter By And Cc.
Note
TIGA applies the same grouping logic and includes the corresponding CC addresses for each resulting email.
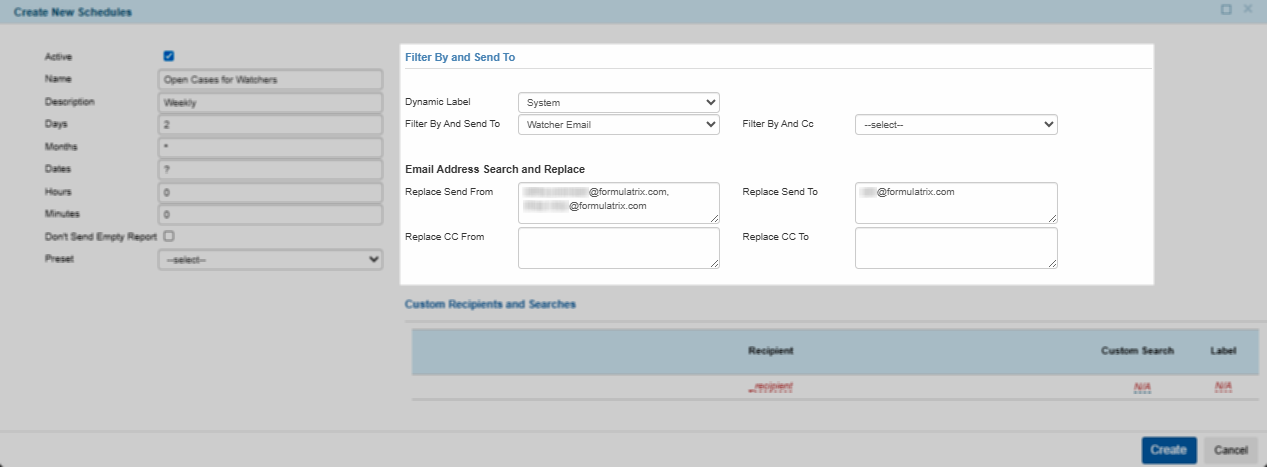
(Optional) Use Email Address Search and Replace to override email recipients generated from report data, without modifying the report itself.
Replace Send From — Enter the original recipient email address generated from the Filter By And Send To field that you want to replace.
Replace Send To — Enter the new email that will receive the report instead.
Replace CC From — Enter the original CC email address generated from the Filter By And Cc field that you want to replace.
Replace CC To — Enter the new email address that will replace the original CC recipient.
Note
You can add multiple emails by separating them with commas.
Example: a@gmail.com, b@formulatrix.com, c@gmail.com, etc.
Remove the recipients from receiving an email by leaving the “To” field empty.
Each field supports up to 255 characters.
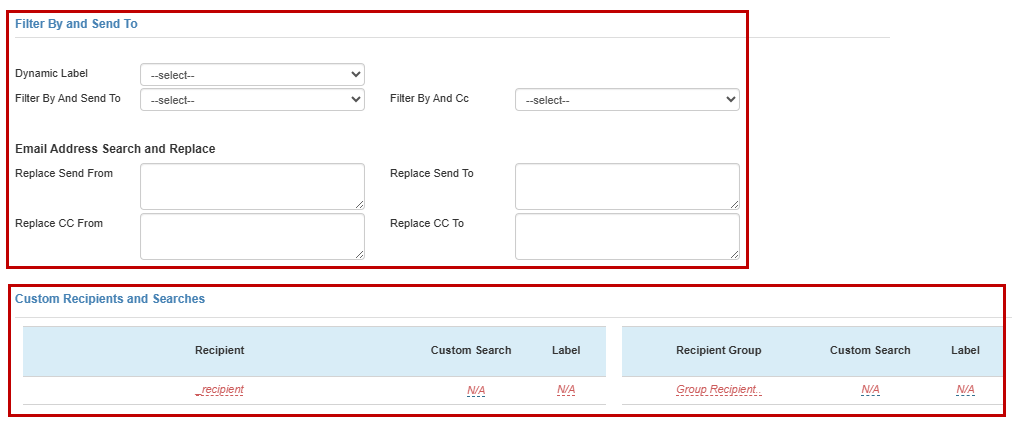
Filter By and Send To
Once done, select Create.
Post Condition:
TIGA automatically sends the report according to the defined schedule. Recipients are determined dynamically from the selected Filter By and Send To fields. Each recipient receives a separate email containing only the report rows associated with them.
Note
If a Dynamic Label is configured, the label value is appended to the email subject and used to group the report results further.
If Filter By and CC is configured, CC recipients are added based on the report data.
If Email Address Search and Replace rules are configured, the final recipient list is adjusted before the email is sent.

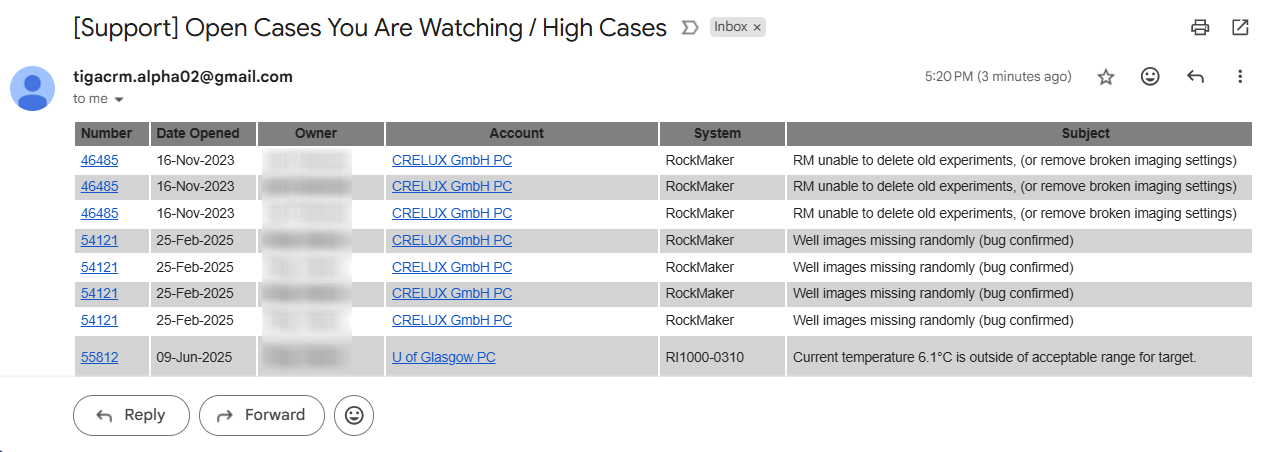
Report Email
Example of Using Filter By and Send To
This example illustrates how a single schedule configuration can result in multiple separate emails, each containing different data and recipients, based on report values.
In this scenario, each case has an Owner (the person who creates the case) and a Watcher (the person monitoring the case). Both roles include email fields that determine the recipients.
Report Data
Cases
Status
Owner
Owner Email
Watcher
Watcher Email
2001
Open
Support Asia
Support Lead
2002
Open
Support Asia
Support Lead
2003
Open
Support Europe
Support Manager
2004
Open
Support USA
Support Lead
Schedules Configuration
Email Subject: Support Cases with status Open
Filter By And Send To: Owner Email
Dynamic Label: Owner
Filter By And Cc: Watcher Email
Email Address Search and Replace:
Replace Send To
Replace CC

Schedules Configuration
Resulting Emails
Email 1Subject: Support Cases with status Open / Support AsiaCases
Status
Owner
Owner Email
Watcher
Watcher Email
2001
Open
Support Asia
Support Lead
2002
Open
Support Asia
Support Lead
Email 2Subject: Support Cases with status Open / Support EuropeCases
Status
Owner
Owner Email
Watcher
Watcher Email
2003
Open
Support Europe
Support Manager
Email 3Subject: Support Cases with status Open / Support USACases
Status
Owner
Owner Email
Watcher
Watcher Email
2004
Open
Support USA
Support Lead
Use Custom Recipients and Searches, or
The Custom Recipients and Searches method provides full manual control over report delivery. You explicitly define who receives the report and, optionally, which subset of data each recipient receives and how the email subject is labeled.
This method is suitable when recipients do not depend on report data and must be controlled manually.
To use custom recipients and searches:
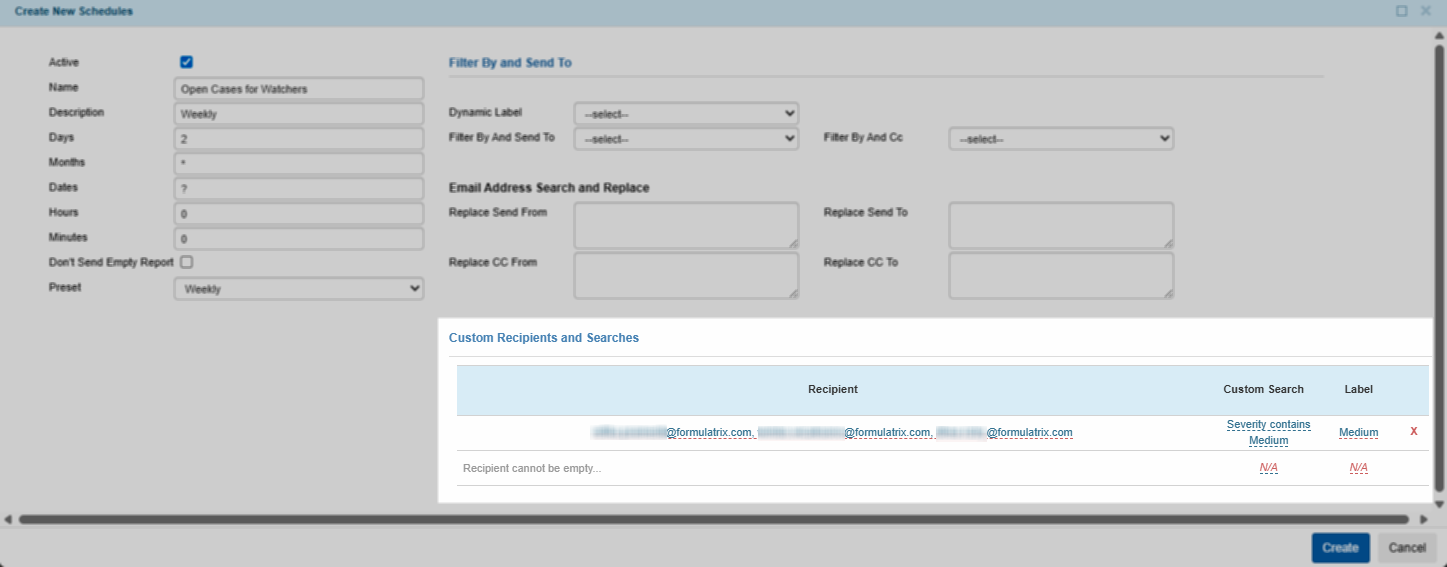
Open the schedule and go to the Custom Recipients and Searches section.
In the Recipient column, enter the email address of the person who should receive the report.
Tip
You can add multiple emails by separating them with commas.(Optional) Enter a Custom Search to restrict the data sent to this recipient only. For example, if you want to filter out the report based on a certain owner name, you can type “Owner contains [name]” where [name] is the desired owner.
(Optional) Add a Label as an additional identifier to the email subject. This helps differentiate multiple outputs but does not affect the data.
Custom Recipients and Searches
Add multiple rows if different recipients require different filters or labels.
Once done, select Create.
Note
Administrators can also define recipients based on Groups in TIGA using the Recipient Group, such as a department group (e.g., Software Engineer), provided these groups are visible in the admin view.

Recipient Group
Post Conditions:
TIGA automatically sends the email to all specified Recipients at the scheduled time.
Note
If a Custom Search is defined, only the filtered report data for that row is included in the email.
If a Label is provided, it is appended to the email subject.
Report Email
▶ Combine both methods.
Method for Defining Recipients