Confirming Items Using Scan Barcode
In TIGA, any item movement in the warehouse, whether issued, received, adjusted, or transferred, must be recorded in a Transaction record. The specific items involved are listed in the Transaction Line Items (TLI).
However, creating a transaction does not immediately affect inventory. The transaction must be Confirmed. This confirmation ensures that the items listed in the transaction have been physically processed and that the recorded quantities match the actual movement. One of the methods used to confirm transactions is Scan Barcode.
Scan Barcode is an action used by the Warehouse, Exim, or Accounting teams to confirm the movement of items in the warehouse, either by scanning a barcode or manually entering item details. Once submitted, TIGA reflects the updated stock in real time.
Important Notes
The following scenarios should be considered when using the Scan Barcode action:
The Scan Barcode window cannot be opened if a Transaction Line Item is already linked to a Storage (Bin). The bin must be unlinked from the record before proceeding.
The Scan Barcode window cannot be opened if the Transaction contains multiple Transaction Line Items with the same Item ID without distinguishing attributes.
For “OUT” transactions, items can only be processed from bins with available stock. If no bin has stock for the selected item, the process cannot continue.
For “IN” transactions, the system may suggest a Default Bin , but users are responsible for selecting the correct storage location.
If the confirmed quantity is less than the required quantity (Under Match), the remaining quantity stays Unconfirmed and must be processed separately.
If the confirmed quantity exceeds the required quantity (Over Match), the system blocks the process for “OUT” transaction, but allows it for “IN” transaction to accommodate excess shipment.
Prerequisites:
Transaction status must be Open.
At least one Transaction Line Item (TLI) is in Unconfirmed status.
To confirm the transaction using the scan barcode:
Open the Transactions table in the Bonded Zone application.
Select the relevant record with an Open status.
Open the Transaction Line Items table from the Related Tables section.
From the Actions menu, select Scan Barcode.

Scan Barcode Action
Important
An error may appear when opening Scan Barcode in either of the following situations:
The TLI is linked to a Storage (Bin). Unlink the Storage from the record first, then try again.
The TLI contains duplicate Item IDs without distinguishing attributes, as the system cannot determine which one to confirm. Remove one of the duplicate rows from the TLI.
If the same item needs to be processed from multiple bins, do not create multiple Transaction Line Items with the same Item ID. Instead, enter the item multiple times during the Scan Barcode process using different bins.
In the Scan Barcode tab, input the following information or scan using a barcode scanner for each item being processed:
Select the method to identify the item in the Scan By:
Item ID — Use this when scanning items by their FORMULATRIX (internal) part number.
Eng. PN (Engineering Part Number) — Use this when scanning items by the vendor’s part number.
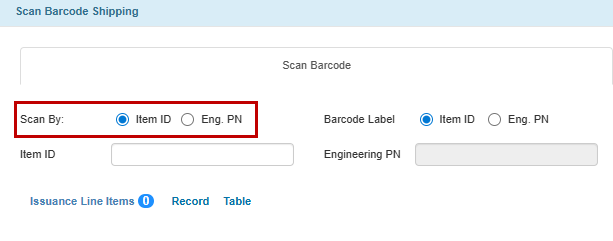
Scan By Field
Based on your Scan By selection, enter the Item ID or the Engineering PN. Only one field is active at a time.
Enter the actual Quantity of items being processed.
Select the storage Bin where the item is stored or taken from.

Entering Item ID, Quantity, and Bin Information
Note
The Bin field behaves differently depending on whether the transaction is an “IN” or “OUT” type.
“OUT” Transactions
“OUT” transactions, such as Shipment Out, Shipment Request Out, Issued Out, remove items from the warehouse. Therefore, the bin must have actual stock available.
Only bins with available stock are shown as suggestions and can be selected.
If only one bin is available, the Bin field is auto-populated after entering the Item ID or Engineering PN.
If no bin has available stock, no suggestion appears, and the system returns an error when you press Enter.
If the Item ID does not exist in the TLI, the system cannot assign a bin and returns an error when you press Enter.
“IN” Transactions
“IN” transactions, such as Shipment In, Transfer In, Issued In, add items to the warehouse. The bin indicates where the item will be stored.
If the selected item has a Default Bin configured for the receiving warehouse, the Bin field is auto-populated with that default location.
If no Default Bin is set, the Bin field is left empty, and you can manually select any active bin in that warehouse.
Members of the “Storage Administrator” group can also select Set As Default to assign the entered Bin as the new default location for the item in the warehouse.
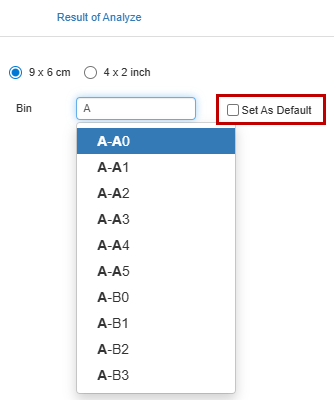
Set As Default
Press Enter in the Bin field to confirm the input. The system will create a new row for the entry to the Issuance Line Items section.
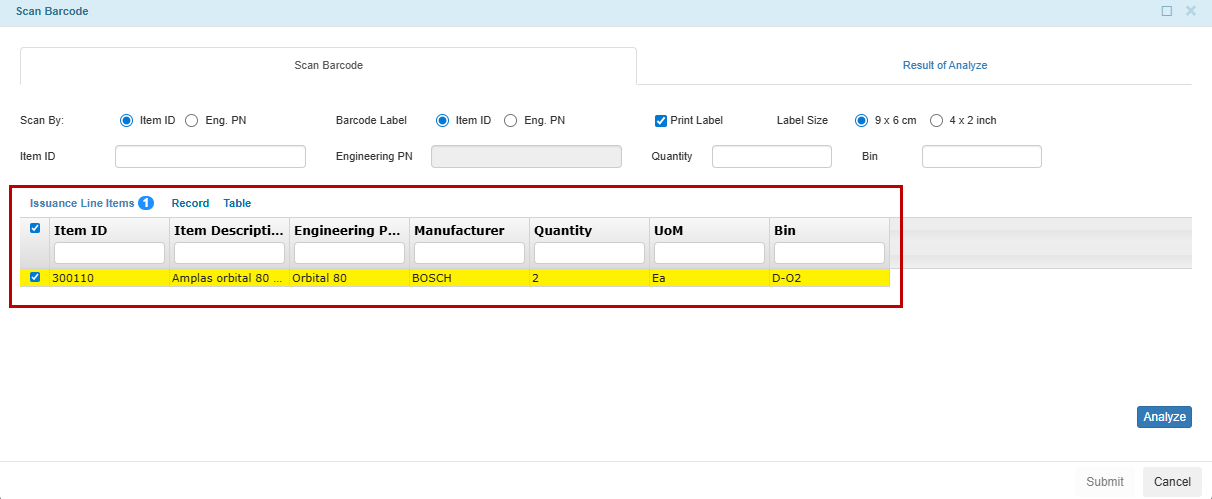
Line Item in the Issuance Line Items Section
Note
Repeat this step for each item.
If the same Item ID and Bin already exist, the system does not create a new row. Instead, it adds the new quantity to the existing row.
If the same Item ID but a different Bin exists, the system creates a new row.
Select the scanned records to be processed.
Note
If the transaction or issuance type requires a batch number for tracking, select the Link
 icon next to the checkbox. For detailed instructions on linking batch numbers,
see Linking Items with Batch Numbers.
icon next to the checkbox. For detailed instructions on linking batch numbers,
see Linking Items with Batch Numbers.Select Analyze to review the results. The system checks whether the quantities you have scanned match the unconfirmed TLI quantities.
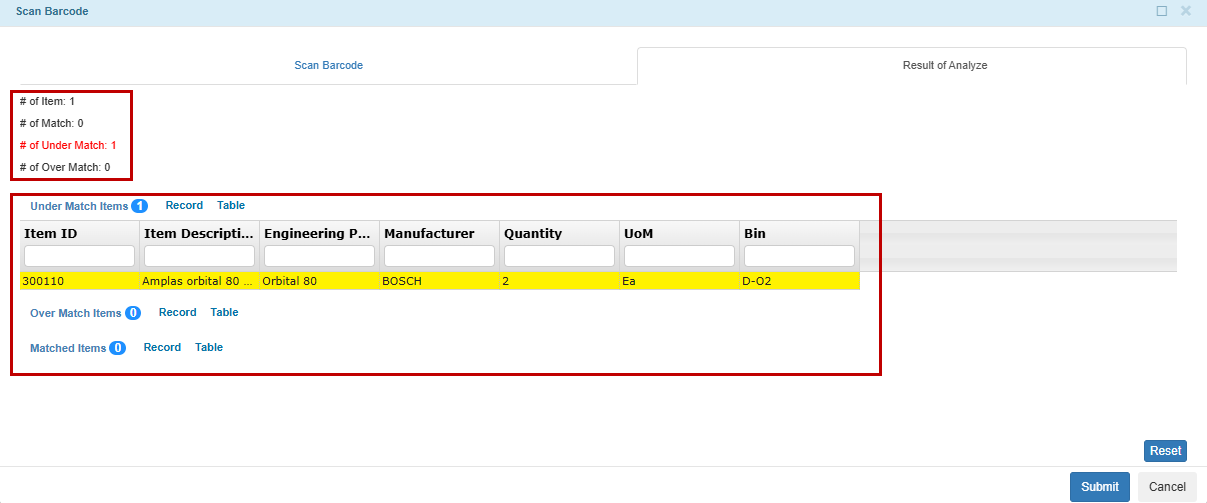
Result of Analyze Tab
Note
The Result of Analyze tab shows a summary of scanned items and displays the match status.
Under Match Items means that the scanned quantity is less than the TLI quantity. You are allowed to submit. The system will create a new TLI for the remaining quantity with status Unconfirmed.
Over Match Items means that the scanned quantity exceeds the required quantity.
“IN” transaction: You are allowed to submit. The system will create a new TLI for the excess quantity with status Confirmed and a Correction Type note indicating “Excess Shipment”.
“OUT” transaction: You are not allowed to submit. The system will throw an error. Reduce the quantity before submitting.
Matched Items means that the scanned quantity equals the unconfirmed TLI quantity. You are allowed to submit the confirmation.
Proceed to Submit to confirm the transaction line items.
Post Conditions:
TIGA automatically updates:
The Confirmation Date, Bin information, In Stock Before, In Stock After, and the Status to Confirmed in the Transaction Line Items table.

Confirmed Items
The In Stock value in the Item Inventories table.
The Available and In Stock values in the Item Inventory Summaries table.
The Quantity value in the Bin Inventories table.
Note
For Under Match Items, a new TLI row is created with Unconfirmed status, an empty Confirmation Date, and the remaining unconfirmed Quantity.
For Over Match Items, a new TLI row is created with Confirmed status, Confirmation Date, the excess confirmed Quantity, and a Correction Type note indicating “Excess Shipment”.
Linking Batch Number (Serial Number)
Some transaction or issuance types in certain companies, such as FUSA, FPAK, or FEUL, allow users to link batch numbers (also referred to as serial numbers) when confirming items via the Scan Barcode action. This process records the serial number label printed on each unit’s packaging to facilitate traceability of consumables.
Prerequisites:
Transaction status must be Open, with at least one Transaction Line Item (TLI) in Unconfirmed status.
The Company in the transaction must not be any of the following:
PSL - (PT Promanufacture - Salatiga)
PRO - (PT Promanufacture)
FOR - (PT Formulatrix Indonesia)
FORB - (PT Formulatrix Indonesia - Bandung)
Issuance Type must be one of the following:
Shipment Out
Shipment Out Consumable
Support Request Out
Support Part Shipment Out
To link batch numbers:
In the Scan Barcode tab, select the Link
icon beside the item row to open the Scan Barcode > Add Serial Number pop-up.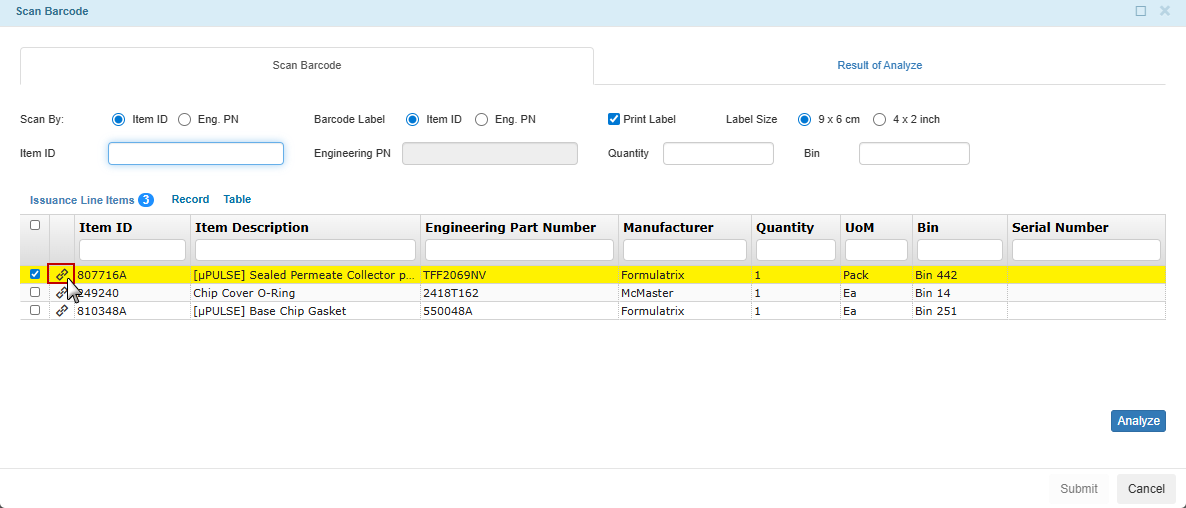
Link Icon to Add Batch Number
Enter the Serial Number printed on the packaging. This value functions as the batch number in TIGA.
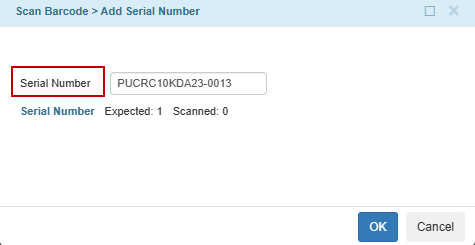
Add Serial Number
Press Enter to add it to the list. Each scanned serial number corresponds to a quantity of 1.
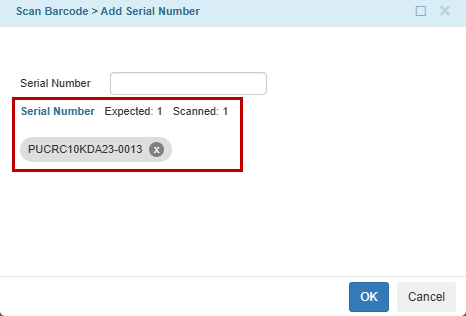
Scanned Serial Number
Note
Repeat this step for each unit being shipped.
The counter in the pop-up shows Expected (the total required quantity) and Scanned (the number of entries added). If the number of entries exceeds the expected quantity, remove the extra entries before continuing.
Select OK to confirm. The row in the Issuance Line Items section splits into multiple rows, one per serial number entered.
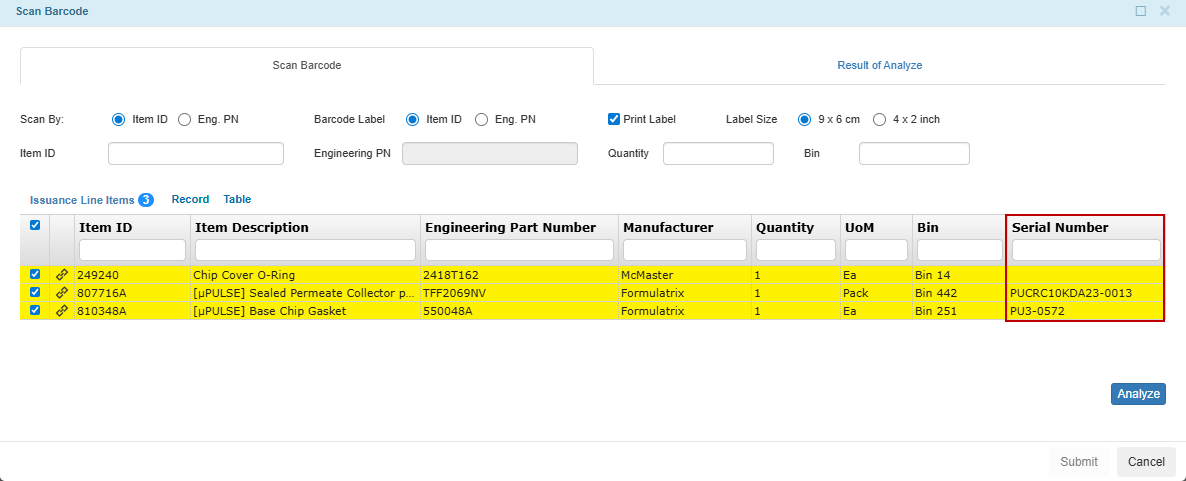
Line Item with Serial Number
Note
Any remaining quantity without a serial number stays as a separate row with the Serial Number column left empty.
Select Analyze to verify the matched quantities.
Review the results in the Result of Analyze tab, then select Submit to confirm.

Result of Analyze Tab
Post Condition:
TIGA automatically:
Updates the Confirmation Date, Bin information, In Stock Before, In Stock After, and the Status to Confirmed in the Transaction Line Items table.

Confirmed Items
Updates the In Stock value in the Item Inventories table.
Updates the Available and In Stock values in the Item Inventory Summaries table.
Updates the Quantity value in the Bin Inventories table.
Generates records in the Batch Number table for each confirmed quantity and entered label, linking the transaction Sequence ID, Item ID, Issuance Type, and destination account.
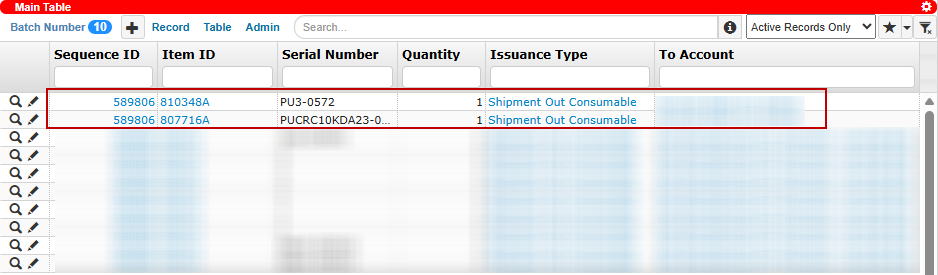
Records in the Batch Number Table