Adding the ROCK IMAGER as the Main Product
In this tutorial you’ll configure a very simple ROCK IMAGER and make it available for sale. This particular product in this case will have no options, we’ll add them later. You can use this methodology to add any product to the catalog, from a simple case of tips to a ROCK IMAGER.
Prerequisites
You are authorized to create and/or modify product information for quotes in the Quote - Products table. Please contact the TIGA team to receive authorization.
An item has been created for the RI1000LCP.
You have collected all marketing information about it, including description, price, etc.
To add a ROCK IMAGER:
In the Quote - Products table, create a new record (as shown below) by clicking Add in the Record dropdown menu. See also a general tutorial on how to specify the task fields and options in the Product_Catalog_Entries_Overview section.
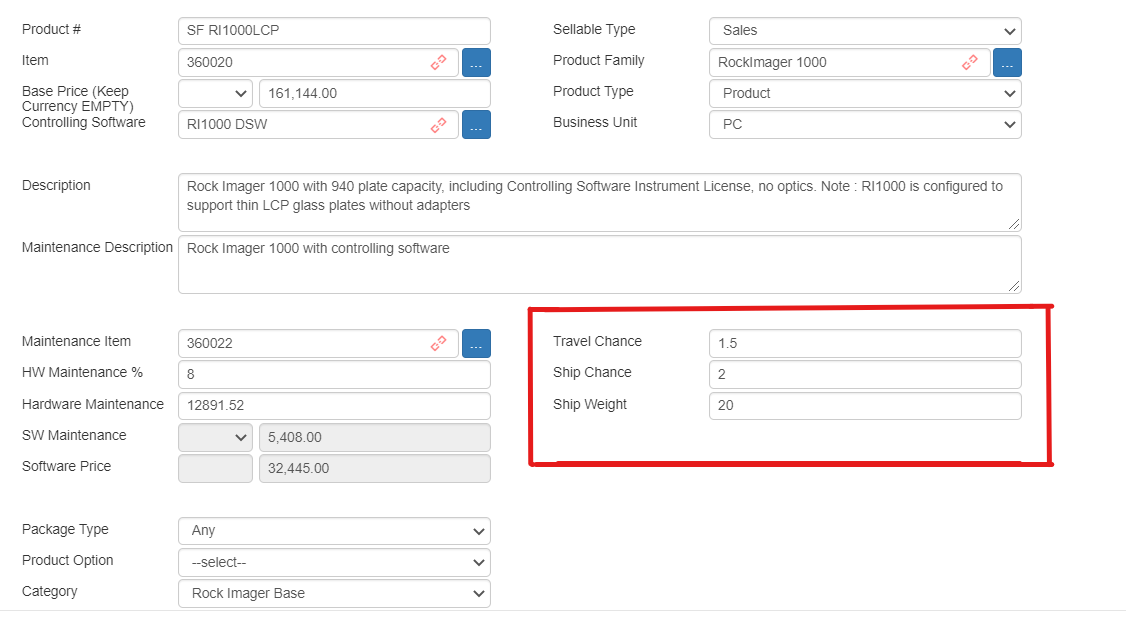
Task Fields in the Product Window with ROCK IMAGER Example
Important: The three fields indicated by the red box above dictate the shipping and travel cost (S&TC) for the product as it will appear when creating a quote.
Post Conditions
When the user is creating a quote, the ROCK IMAGER will be available in the Quote Line Items section of the Configure window. They can search for it by any value, e.g. Item #. But, at this point, it will still be missing product options and suggestions.
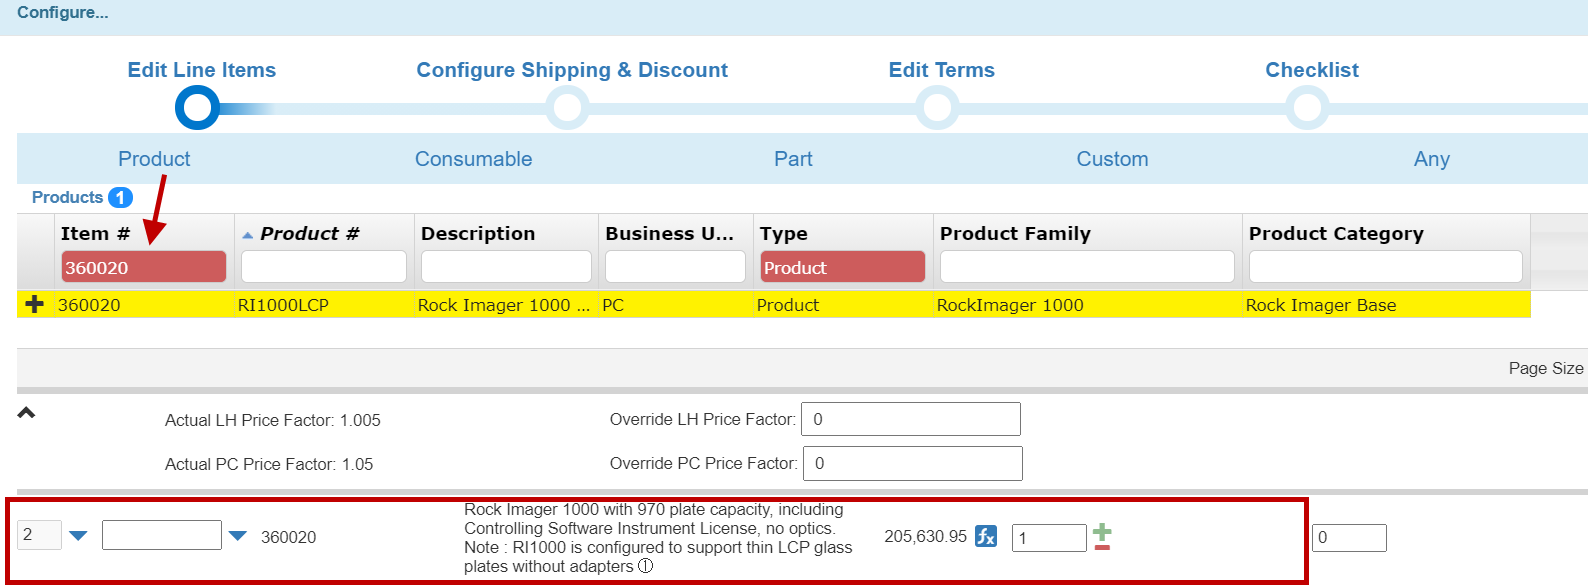
The ROCK IMAGER in the Quote Line Items Section
You can continue adding these options related to the ROCK IMAGER in the Quote - Product Options table. Please read the next tutorial to learn more.
Important: The price of the ROCK IMAGER that appears in the Configure window will include the base price, the software price, and the S&TC. It will also be affected by the price factor of the zone you’re shipping to.
Include a computer with the ROCK IMAGER
When configuring the ROCK IMAGER for a quote, it’s price includes a computer. This same computer can be sold separately at a price of $2,488.00. We can configure the catalog so that the computer’s real price is overridden and is included as part of the ROCK IMAGER’s price. We will show you how to do this in the following tutorial:
Prerequisites
A product has been created for the computer, as seen in the screenshot below. As you can see, it has its original price of $2,488.00.

A Computer for the ROCK IMAGER
ROCK IMAGER has been configured as a Main Product, as seen in the prior tutorial.
To include a computer with the ROCK IMAGER:
In the Quote - Products table, select the ROCK IMAGER product you just configured above. In the related tables section on the right side of the screen, create a record on the Quote - Product Options table.
Check off the Override Price box. Set the Price Override field to 0, so that the computer is quoted at no cost.
Select the computer in the Single Product section. You can find it by the product number 366140 (as seen in the screenshots below).

The Single Product Section
Post Conditions
When a user is creating a quote, TIGA will add the computer to the Quotes Line Items section of the Configure Quote window. Notice how it has a price of zero!

A Computer for the ROCK IMAGER
Add a drop down of ROCK MAKER license options as a suggested product to the ROCK IMAGER
We usually suggest ROCK MAKER software be sold with the ROCK IMAGER (especially for new customers). We’ll show you how to define a dropdown that enables the salesperson to select a ROCK MAKER License to sell as a suggested product (e.g. Site, Seat, & Concurrent). Before adding the dropdown, you need to define it first, which we will demonstrate below. In the next tutorial, you’ll learn how to add a ROCK MAKER to ROCK IMAGER as a suggested product.
Prerequisites
A product has been created for the ROCK IMAGER 1000.
ROCK MAKER Licenses have been created as products, three of which can be seen in the screenshot below.

Suggested Products
To make the dropdown options of ROCK MAKER licenses for the catalog:
In the CRM application, go to the Quote-Products table and create a new Record.
Fill in the task fields with all of the relevant information for the option you are trying to add to the dropdown. In the Production Option Type task field, select Suggested Product. Below is an example using the ROCK MAKER Commercial Option as the new dropdown option.

Quote - Product Options Window
When you have finished filling in the required fields, click Create.
After you have created this new record, select your new product, then click on Quote-Product Options from the list of options that appears on the related section of the screen. The related Product Options table will appear.
Repeat step 4 for all other options you want to add to the dropdown.
Post Conditions
An option drop down for ROCK MAKER license would’ve been created. It is still not attached to any main products. Read on to learn how to do that.
Add ROCK MAKER as a suggested product and/or product option on a quote
In the previous section you defined a drop down that shows all the license options for ROCK MAKER. In this tutorial, we’ll show you how to add it so it shows as a suggested product during the quoting process.
Prerequisites
A product exists for ROCK MAKER license dropdown as defined in the previous tutorial.
Your list of ROCK MAKER licenses has been defined as dropdown options.
To add the ROCK MAKER software as a suggested product:
Find the ROCK IMAGER record in the Quote - Products main table.
Go to the Quote - Product Options related section of the Quote - Products table, click Record, then click Plus button.
In the Quote - Product Options window, select ROCK MAKER Commercial Option in the Product Option field under the Dropdown Option section. You have to set the minimum required and maximum possible in order for the product option to be added (see below).

The ROCK MAKER Commercial Option as the New Dropdown Option
Click Create in the lower-right corner of the window.
Post Conditions
The specified product options will be available in the Quote Line Items section of the Configure window, when you are making a quote. Click here to learn more about creating a quote.
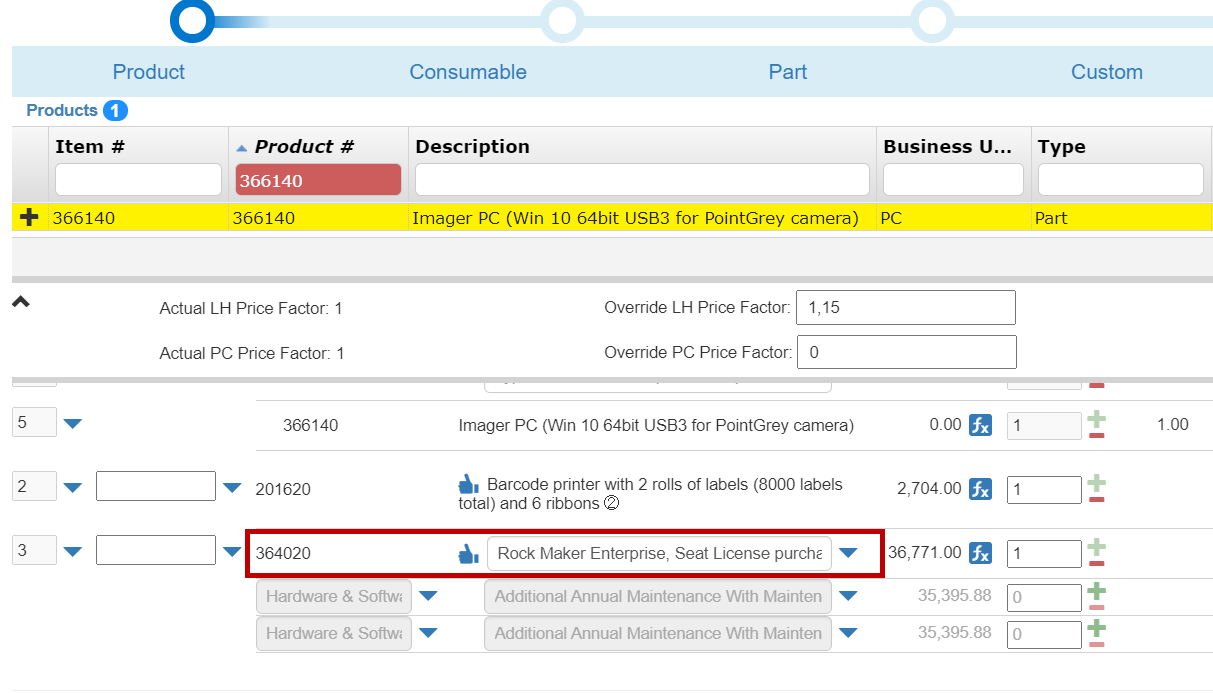
The Quote Line Items Section
Create sale terms for the ROCK IMAGER
In this tutorial, we will show you how to add Sale Terms to a quote, still using the example of the ROCK IMAGER 1000 being shipped to Australia.
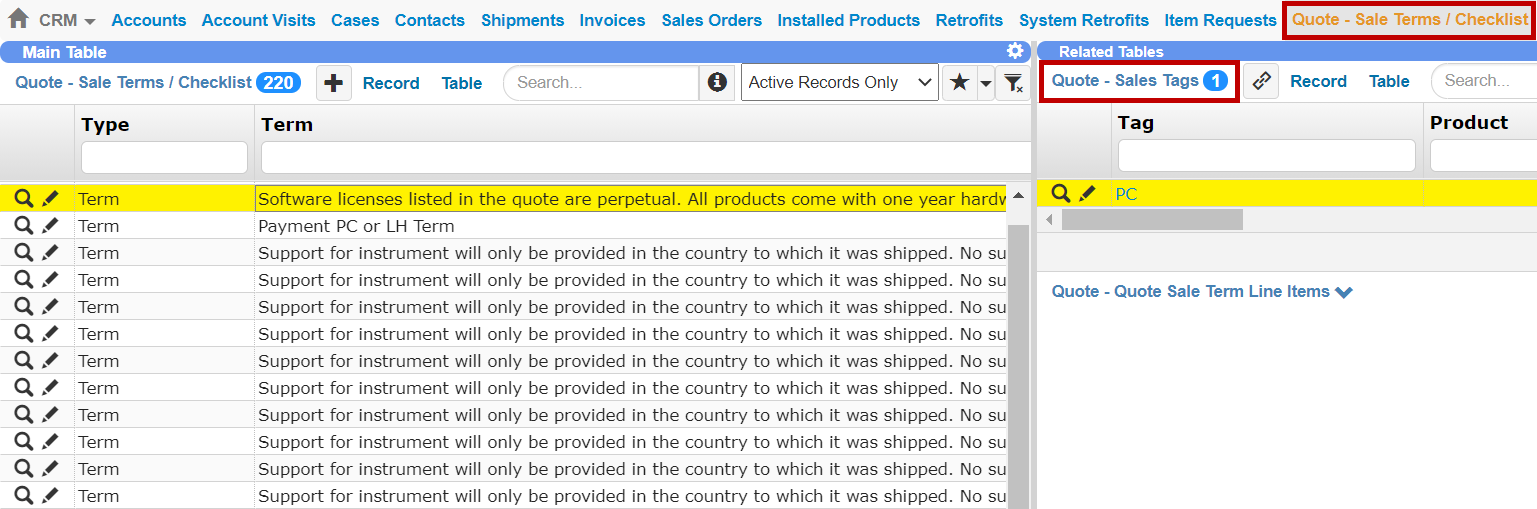
Sale Terms That Are Created in the Quote - Sale Terms/Checklist Table
Prerequisites
You are in the Quote Tool Administrators group. If you are not currently in this group, please contact the TIGA team in order to join.
To create Sale Terms:
In the CRM application, open the Quote - Sale Terms/Checklist table.
Click the Plus button on the table bar.
Fill in all of the fields in the Quote - Sale Terms/Checklists window (see the table above for definitions of each of the task fields).
Click Create. At this point, the Sale Term that you’ve already defined will be available in the main table and in the Quote wizard. You can then apply Sales Tags to Sale Terms via the Quote - Sales Tags related section, as needed.
Post Conditions
The first image below illustrates some sample Term settings in the Quote - Sale Terms/Checklists window, while the second image shows you how all of the recorded Terms appear in the Quote Wizard as you create a quote.
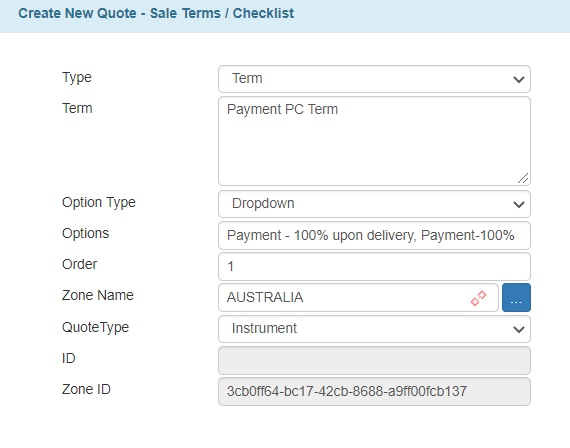
Sample Sale Term Settings
Recorded Sale Terms in the Edit Terms Section of the Quote Wizard
Create quote checklists for the ROCK IMAGER
Prerequisites
You are in the Quote Tool Administrators group. If you are not currently in this group, please contact the TIGA team in order to join.
To create a checklist:
The method for creating Quote Checklists and Sales Terms is exactly the same, except you select Checklist as the Type, instead of Term (see above table for Checklist Task Field definitions/actions).
Note
What you have entered into the Term field will appear as an item in the checklist.
Repeat this process for each Checklist item that you want to add.
Post Conditions
The first image below illustrates the sample Term settings in the Quote - Sale Terms/Checklists window, while the second image shows you how all of the recorded Terms will appear in the Quote Wizard as you create a quote.
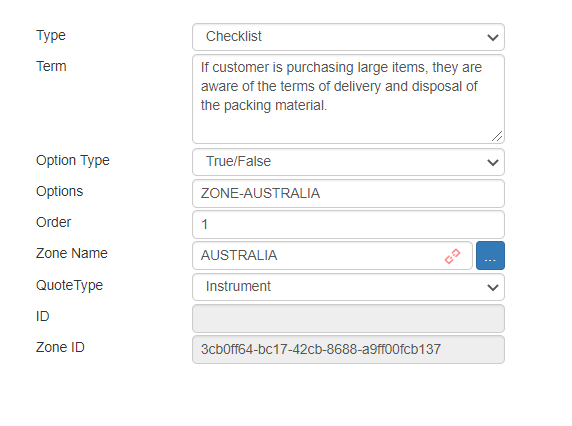
Sample Checklist Settings
Checklist Samples in the Edit Terms Section of the Quote Wizard
Add Shipping Cost for ROCK IMAGER
In this tutorial, you’ll learn to set the cost to ship an RI1000LCP to different regions.
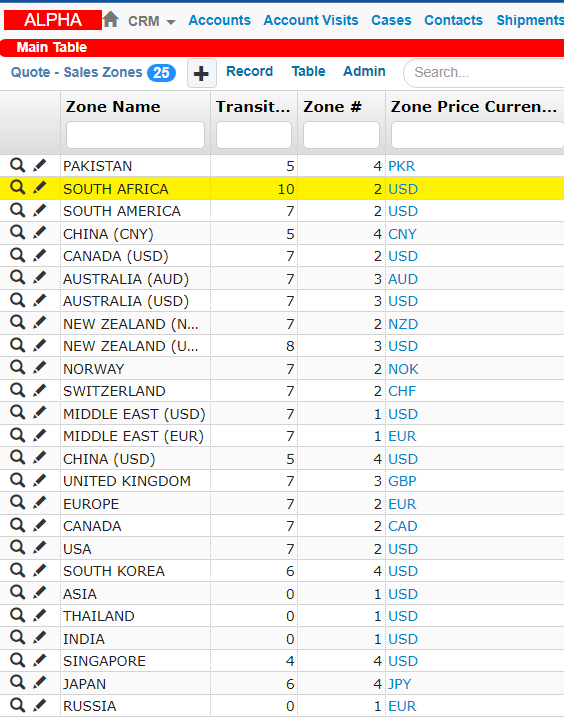
Quote - Sales Zones table
Prerequisites
You are a member of the “Quote Catalog Administrators“ group.
You have worked out the shipment cost for each of the shipping zones with sales management. A note about shipping cost - this price includes not only the actual shipping cost, but also the labor needed for packing, and any margin we want on top of it.
Note
You can find and update product family information in the Quote - Products table.
To add shipping cost for Rock Imager:
Open the Quote - Sales Zones table and select a record.
Important
Create a new record to add a new region. You must update the eStore region if you add a new region.
Create a new Quote - Shipping Zone Cost record in the Related Tables.
Repeat the steps above to add shipping costs to other regions.
Post Conditions
TIGA automatically adds the Quote - Shipping Zone Cost record to the Related Tables of the selected record.

Quote - Shipping Zone Cost Record
New and updated quotes will Include the shipping cost to the delivery area.

Rock Imager 1000 Shipping Cost