Exporting Records
You can quickly export records from any TIGA table to a CSV, HTML, or Google Spreadsheets file. An exported file can help you generate files for import, create reports to process with external tools such as Excel, upload data into a different system, or simply keep an offline copy of your data. If you work on the Sales team, for example, you may be asked to export your sales pipeline for tracking your progress.
Note
If you export records to an HTML file, you can only view the exported data. If you want to import the updated data back into TIGA, you must export to a CSV file.
Export Window
The following sections describe the available options in the Export window.
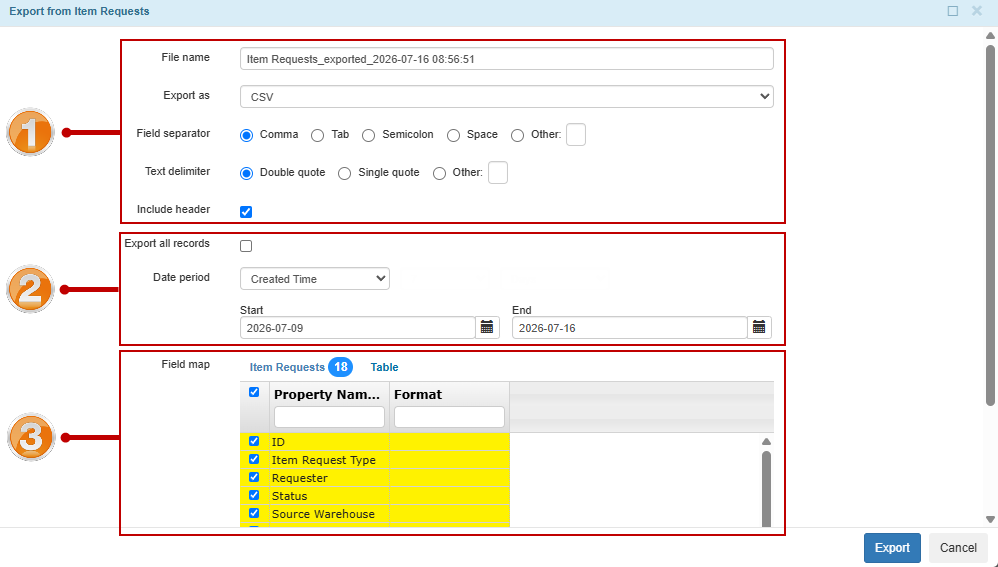
The Export Window
1. The Export Format
Here you can control how your TIGA exported data will be organized.
Field |
Function |
|---|---|
File name |
Defines the name of the exported file. You can use the default name provided by TIGA or enter your own. |
Export as |
Sets the output format: CSV, HTML, and Google Spreadsheets. |
Field separator |
Specifies the character used to separate fields (columns) in exported CSV and Google Spreadsheets files. You can use a separator compatible with the application or system where the exported file will be opened or imported. This setting does not affect HTML exports.
|
Text delimiter |
Specifies the character used to enclose text values in exported CSV and Google Spreadsheets files so that values containing the field separator are interpreted correctly. You can use a delimiter compatible with the application or system where the exported file will be opened or imported. This setting does not affect HTML exports.
|
Include header |
Determines whether or not column names will be included as the first row in the exported file. |
2. The Export Filter
Here you determine whether all records are exported or only records within a specific date range.
Field |
Function |
|---|---|
Export all records |
Determines whether all records in the current table are exported without applying a date filter.
|
Date period |
Defines the date range for the exported records. This is available only when the Export all records option is not selected.
|
Start |
Defines the earliest date of the records to be exported. |
End |
Defines the latest date of the records to be exported. |
3. The Field Map
This section enables you to select the columns to include in the exported file. By default, all columns in the current table view are selected. Clear the checkbox next to a column to exclude it from the export.
Exporting Records as CSV or HTML
Export records from a table in either CSV or HTML format, depending on how you plan to use the exported data. CSV files are suitable for editing the data in a spreadsheet application and importing back into TIGA, whereas HTML files are intended for viewing only.
To export records as CSV or HTML:
Navigate to the table containing the records you want to export.
Note
You can filter the records you want to export using the Search Box or Column Filter. Read more about using advanced search language for filtering records.
Go to the Table menu and select Export.
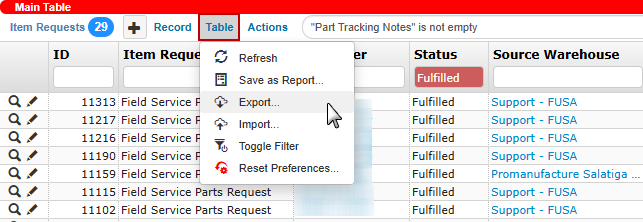
Exporting Records With Custom Filtering
Enter the File name if you have a preferred name instead of using the one from TIGA.
Select CSV or HTML in the Export as list.
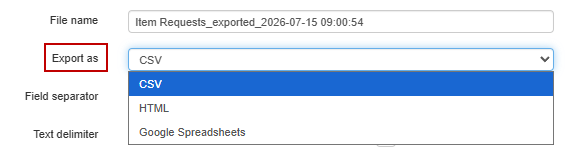
Export As Field
If you selected CSV, configure the Field separator and Text delimiter settings to match the requirements of the application or system that will use the exported file.
Tip
If you are unsure which options to choose, keep the default values.
The header will be included in the default output file. Clear the Include header checkbox if you do not want to include the header.
Choose which records to export based on your filtering needs:
Select Export all records to export all records in the current table.
OR
Select Created Time or Last Modified Time and specify the Start and End dates in the Date period.
Note
The Date period is applied in addition to any filters already configured in the main table. It does not replace existing table filters.
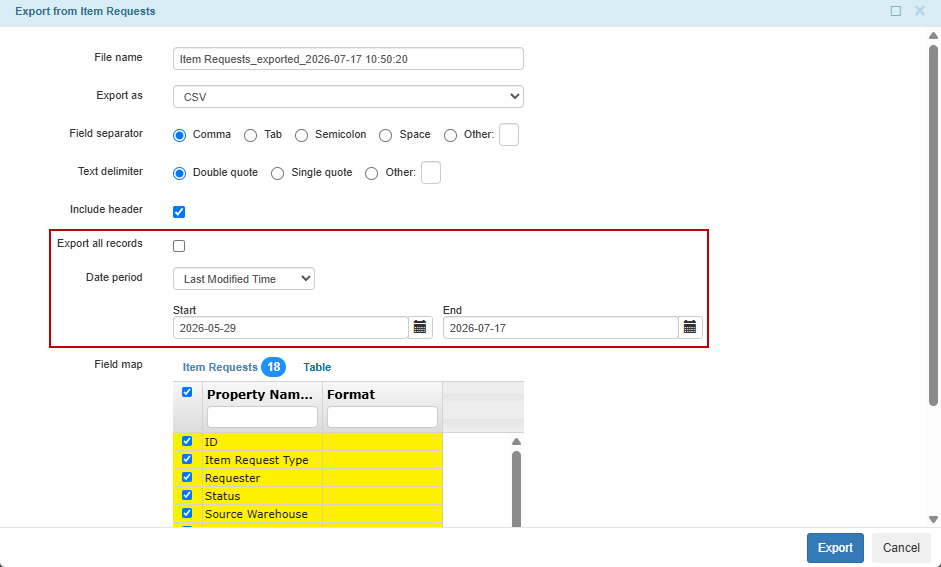
Export All Records and Date Period Fields
In the Field map, select or clear the columns to include or exclude in the exported file.
Select Export to process the export.
Post Condition:
The exported file is downloaded to your computer.
Exporting Records as Google Spreadsheets
Export records from a table directly to a Google Spreadsheet in a shared Google Drive folder. This option enables you to keep exported data in Google Drive for easy access and collaboration.
Prerequisites:
You have authorized TIGA to access a folder in your Google Drive.
Note
To authorize TIGA to export files to your drive:
Sign in to your Formulatrix Google account and open Google Drive.
Create a new folder or select an existing folder for exported spreadsheets.
Right-click on the folder and share it with the following TIGA service account: tigaserviceaccount@tiga-338704.iam.gserviceaccount.com
Tip
The Export window also displays the proper email address of the TIGA service account.
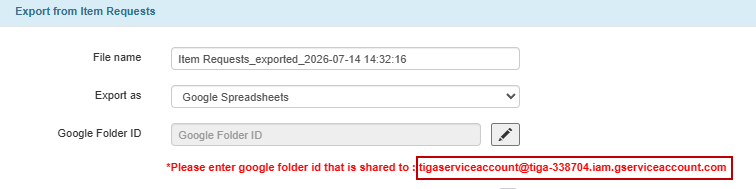
TIGA Service Account
Grant the Editor access to the TIGA service account and select Send or Share.
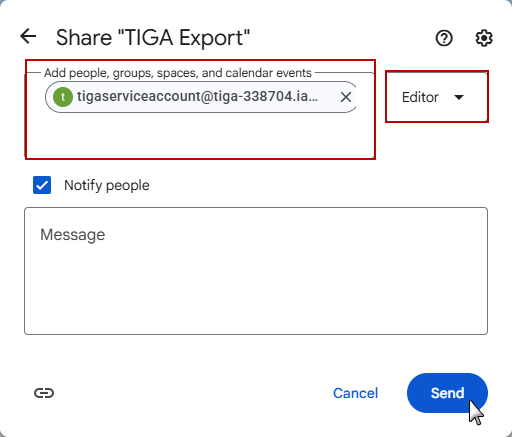
Share a Folder for TIGA Service Account
Select Share anyway if a prompt appears.
You have the Google Folder ID of the shared folder.
Note
Open the shared folder and copy its Google Folder ID from the browser address bar.
For example, from the URL https://drive.google.com/drive/folders/123abc, the Google Folder ID is “123abc”.
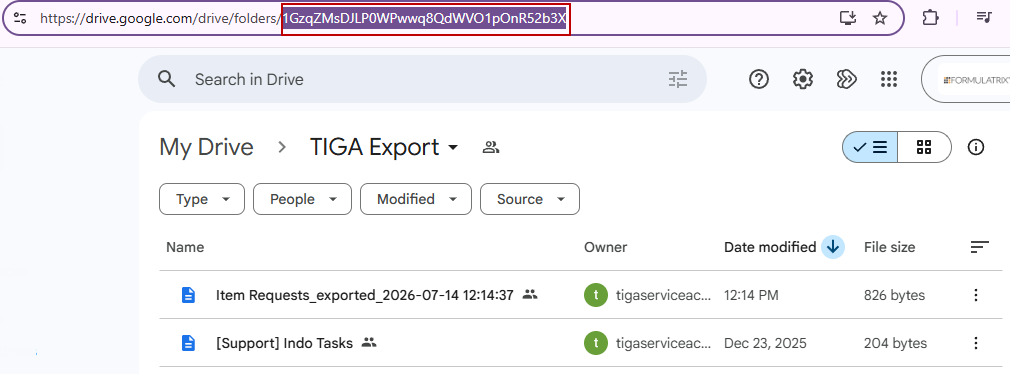
The ID of a Google Drive Folder
To export records as Google Spreadsheets:
Navigate to the table containing the records you want to export.
Note
You can filter the records you want to export using the Search Box or Column Filter. Read more about using advanced search language for filtering records.
Go to the Table menu and select Export.
Exporting Records With Custom Filtering
Enter the File name if you have a preferred name instead of using the one from TIGA.
Select Google Spreadsheets in the Export as list.
In the Google Folder ID field, select the pencil icon
 and enter the folder ID.
Select the check mark icon
 to save the value. TIGA will store this ID for future use.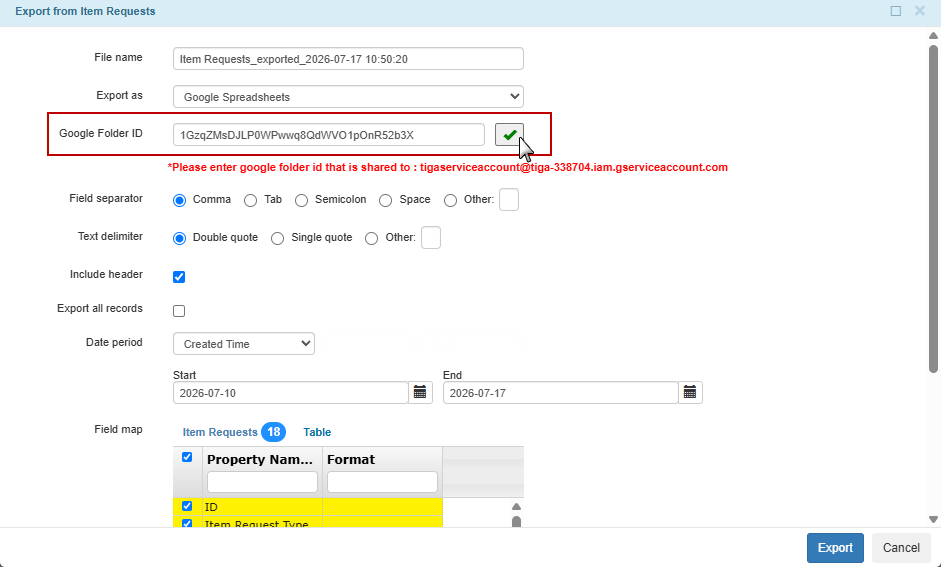
Entering the ID in the Google Folder ID
Configure the Field separator and Text delimiter settings to match the requirements of the application or system that will use the exported file.
Tip
If you are unsure which options to choose, keep the default values.
The header will be included in the default output file. Clear the Include header checkbox if you do not want to include the header.
Choose which records to export based on your filtering needs:
Select Export all records to export all records in the current table.
OR
Select Created Time or Last Modified Time and specify the Start and End dates in the Date period.
Note
The Date period is applied in addition to any filters already configured in the main table. It does not replace existing table filters.
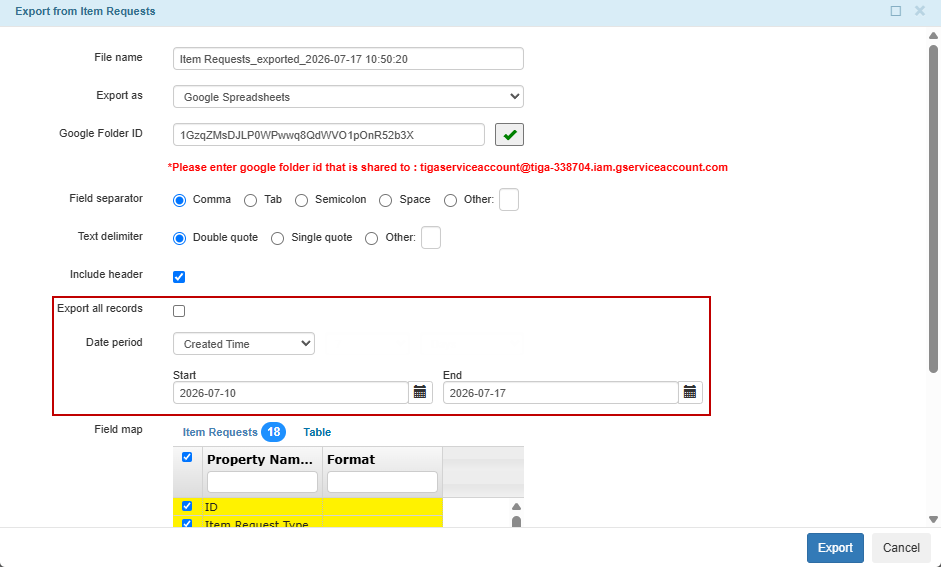
Export All Records and Date Period Fields
In the Field map, select or clear the columns to include or exclude in the exported file.
Select Export to process the export.
Post Condition:
TIGA automatically:
Opens the exported file in a new tab.
Generates a new Google Spreadsheet in the specified Google Drive folder, containing the exported records based on the selected date range and field selections.