Setting Up a Global Imaging Schedule
Imaging schedules are defined at three levels. The uppermost or global level is located on the Scheduling node of the Explorer.
A schedule can also be specified at the project level and then be both specified and adjusted at the experiment level. These schedules define how often a plate is imaged and what imaging settings are used.
For example, a weekly imaging schedule may specify that a plate should be imaged seven days after dispensing using Visible (Default) imaging, 14 days after dispensing using 5 MP imaging, and so on.
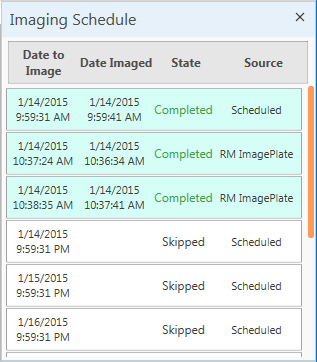
To see the Imaging Schedule, on the View tab in the Experiment contextual tab set, click Imaging Schedule. The Imaging Schedule dialog box shows exact times when a plate was imaged, as well as future times when the plate should be imaged next.

Imaging Schedule
Note
You may define multiple global imaging schedules on the Scheduling page, but you may specify only one imaging schedule at the project level, and only one at the experiment level.
To Create a Global Imaging Schedule:
On the Explorer, click the Imaging folder, then double-click Scheduling.
Right-click the left hand table in the Imaging Schedules area at the bottom of the page and select Add.
Click in the new row and type a descriptive name for the schedule.
Right-click the table next to it on the right and select Add.
Use the following descriptions to fill in the columns in the new row:
Column
Description
Days
This refers to the number of days between the dispensing of the plate and the imaging of the plate. For example, for a weekly imaging schedule, enter the number 7.
Hours
If you would like to be more specific with the imaging times, you can enter a number less than or equal to 23 in the Hours column.
Notify
Leave this check box selected if you would like ROCK MAKER to notify you when the plate is due for imaging. ROCK MAKER does this by placing the plate in the Plates to Image area at the top of the Scheduling screen. This feature is especially useful if you do not have an automated imaging system.
Priority
You can adjust the priority of the imaging schedule.
Imaging Setting ColumnS
There will be a column for each Imaging Setting defined in your system. Select the check box for each imaging setting that you want to be imaged at the time of imaging.
Repeat steps 4 and 5 to add additional imaging times to the schedule. You can select or unselect an imaging setting for all imaging times simultaneously by using the check box above the imaging setting column name.
Related Topics