Creating an Experiment
Once you have created a project, you can create an experiment.
When you create an experiment, you are shown the experiment page and asked to complete the following tasks:
Fill in basic experiment info,
specify an imaging schedule, and
modify dispensing properties if appropriate.
Once you are done defining the experiment parameters, you can add buffers and proteins via layers and/or drag-and-drop optimization.
This topic explains how to create an experiment and fill in required information on the Experiment page, set the imaging schedule, and modify dispensing properties.
At the end of this tutorial, we explain how to unlock dispensed experiments.
To create an experiment:
- From the Explorer, right-click a project or a folder within a project and select New Experiment.ORSelect a project in the Explorer, then click the New Experiment button
 on the Home ribbon.
 Rename the experiment by typing over the default name on the Explorer. Try to be as descriptive as possible.
Fill in the fields on the Experiment tab.
More about Experiment Fields
Field |
Description |
|---|---|
ID |
ROCK MAKER automatically assigns an ID number to each new experiment you create. This ID is used for tracking purposes and may not be edited. |
Seeding |
Select this checkbox to label the experiment as a seeding experiment. |
Date Created |
ROCK MAKER automatically assigns the current date to this field. You may not edit this information. |
Plate Type |
This is the type of microplate that you will use in the experiment. Click this box to select a plate type from the list. Container types are maintained in the Containers setup. |
Plate Rows |
The number of rows of plates in the experiment’s canvas. To change this number, click the down arrow and select a different value. You can change this value only if the experiment has not yet been dispensed. |
Plate Columns |
The number of columns of plates in the experiment’s canvas. To change this number, click the down arrow and select a different value. You can change this value only if the experiment canvas is blank. |
Setup Temp (degrees C) |
This is the temperature at which the plate was set up. Click this box to select a temperature from the list. For instructions on how to define the temperatures that appear on this list, see Experiment Temperature Configuration. |
Incubation Temp (degrees C) |
This is the temperature at which the plate is stored in order to grow crystals. Click this box to select a temperature from the list. |
Reducing Agent Volume |
The amount of reducing agent to add to the well when setting up the experiment, if necessary. |
Notebook Page # |
In this box, you may type a reference to notes you have in your own notebook. This field accepts any type of text, not just numeric. For example, you may type something like “Notebook 17, page 43.” |
Owner |
The owner is the user who is creating this experiment. This list contains all people who are set up as users of ROCK MAKER. |
Save your changes by clicking the Save button
 or by
pressing Ctrl+S on your keyboard.
or by
pressing Ctrl+S on your keyboard.OPTIONAL: If you plan to dispense your experiment design with a robot, click the Dispensing Properties button and select your dispensing robot.
In the Imaging Schedule and Imaging Settings area, select or customize an imaging schedule.
More about Imaging Schedules
By default, the imaging schedule from the project settings is selected. Each imaging schedule comes with its own set of imaging settings specified per day of schedule. Once imaging is done, you can override the selected imaging settings for each drop and region of interest.
You can specify an imaging schedule in one of the following two ways:
Select one of the global imaging schedules that already appear on the list. To do this, click the Imaging Schedule box and select a schedule from the list. Global Imaging Schedules along with their imaging settings are defined in Scheduling setup. You cannot modify days or imaging settings of a global imaging schedule.
- Customize a schedule for this particular experiment. First, select a global imaging schedule from the list. Select any box on the imaging schedule table and click Yes when the Customize Schedule dialog box appears. Alternatively, right-click the schedule table and select Customize. A new imaging schedule named “Custom” will be created and added to the list.You may now edit the values in the Days and Hours columns. You can also change values in the columns representing each Imaging Setting to specify which image settings to use on each particular day. You may also add and delete days by right-clicking and selecting the appropriate command.
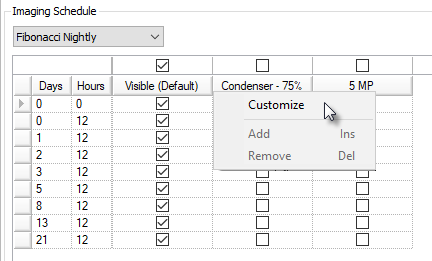
Imaging Schedule
Congratulations! You have created an experiment. The next step is to add ingredients to your plate design using the layertools.
Related Topics