Setup Users and Groups
ROCK MAKER allows you to add a new user, change the user’s password, switch accounts, add a new group, or manage the Access Rights for each user.
In this topic, you can learn about:
To add a new user:
Click the Application Menu button and select Setup.
Point to Users.
Click the New User button.
OR
Right-click anywhere on the Users panel and select New User.

Right-click to Create a New User
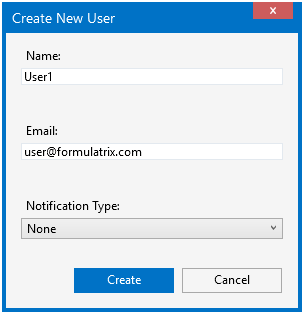
Create New User Dialog Box
Type a user’s name in the Name box.
Type a user’s Email Address in the Email box. If the Email address has already been registered, ROCK MAKER will automatically detect it.
Click the Notification Type column and select the appropriate notification type.
ROCK IMAGER will notify the user of certain imager events based on the selected notification type. The following values can be set for notification types:
None: No notifications are sent. (default)
Immediate: Notifications are sent as soon as possible.
Digest: Notifications are aggregated and sent in a single email at the end of the day.
Click Create.
Note
You can delete a user by right-clicking and selecting Delete User, or by clicking the Delete button  . This can be done only for users who do not own any projects or experiments.
Note
If you are a ROCK MAKER administrator, you can activate and deactivate user(s) through the Active column. Deactivating a user prevents them from accessing all ROCK MAKER applications, including ROCK MAKER Web.
Note
Should the administrator need to copy all registered user email addresses, simply select Copy All Email IDs from the right-click option. This helps you save time when you need to send important emails to all users.
User Passwords
ROCK MAKER allows you to assign a password to each user of ROCK MAKER. By default, a new user does not have an assigned password.
To change a user’s password:
In the Name column, right-click the user and select Change Password.
OR
Click the Login menu on the top-right of your screen and select Change Password.
To prevent others from seeing the passwords as you type them, make sure Mask Password is selected. The characters that you enter will appear as asterisks (*).
- Next to Old Password, type the user’s current password.
Note
If the user does not already have a password, the Old Password box will be unavailable, and you will only need to enter a new password.
Next to New Password, type the user’s new password.
- Save your changes by selecting Save from the Application Menu button.
To reset a user’s password:
In the Name column, right-click the user and select Reset Password.
Click Yes. The user’s password is now blank.
To switch users:
Click the Login Menu button on the top-right of your screen and select Switch User.
Enter the new user name and password and click OK. You are now logged in as the new user.
Note
If you select Stay signed in in the Login menu box, ROCK MAKER will remember user preferences based on user login.
Note
If you are a ROCK MAKER administrator, you can adjust the behavior of the Stay signed in option from the Global Preferences menu. Go to the General tab, select Advanced, and select Show Stay Signed In to always show the Stay signed in check box whenever you start ROCK MAKER.
Note
If you are a ROCK MAKER administrator, you can adjust the ROCK MAKER behavior to remember which user was previously logged in by selecting Show Last username logged in in the login options in Global Preferences.
Adding a Group
If the ROCK MAKER software’s access-control feature is turned on, you will see two default groups: Administrators and AllRockMakerUsers. You can add additional groups if necessary.
To add a new group:
Click the Application Menu button and select Setup.
Point to Groups.
Click the New Group button.
OR
Right-click anywhere on the Group panel and select New Group.

Right-click to Create a New Group

Create New Group Dialog Box
Type group name in the Group Name box.
Click Create.
Note
You can delete a group that you have created by right-clicking and selecting Delete Group or by clicking the Delete button
. You cannot delete either of the two default groups.
Assigning a User to a Group
When you assign a user to a group, the user’s access privileges will be restricted to the rights assigned to that group.
To assign a user to a group:
Click the Application Menu button and select Setup.
Point to Users.
Select which user(s) you want to add.
Click the Add to Group button.
In the Join Group dialog box, select which existing group(s) you want the user(s) to join.
Click Update.

Users Setup Menu
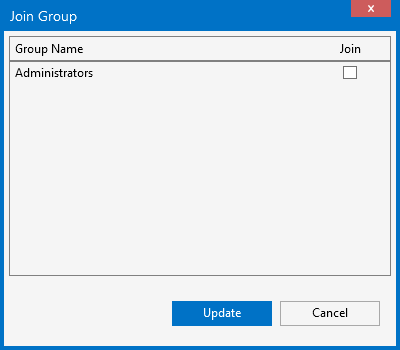
Join Group Dialog Box
Managing Access Rights
Access rights are managed in the Manage Access Rights dialog box, which you can open by right-clicking a node on the tree and selecting Manage Access Rights.
The Manage Access Rights dialog box is divided into two main areas:
Manage Rights. In this area, you see the list of groups and users who have access to the tree node. When you select a user or group, its access rights are displayed in the table below.
Groups / Users with No Direct Rights. This area list all users and groups who do not have direct access rights to the node.
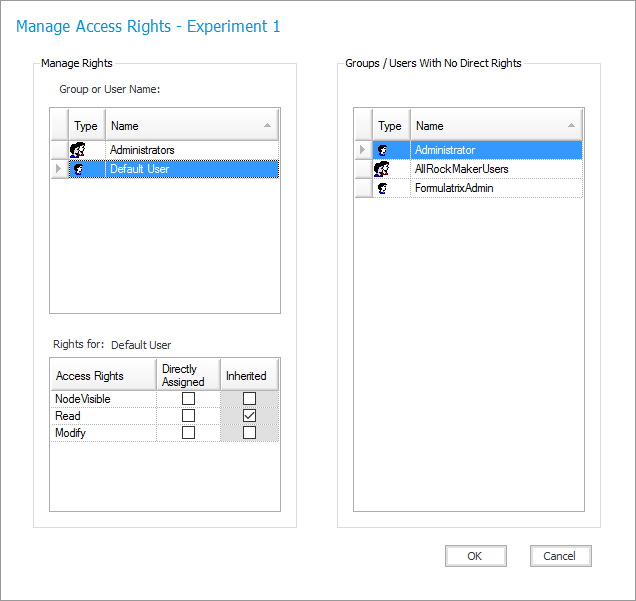
Manage Access Rights
Related Topics