Harvesting Crystals
Once you find an experiment hit, you can virtually harvest your crystals and assign them to a Synchrotron Trip.
To harvest crystals:
Open an experiment with crystals.
Then, go to the Drop(s) tab in the Images tab set.
Double-click on a well that contains the crystal you want to harvest in Canvas view to open that well in Drop view.
Click the Harvest Crystal button
 and draw a rectangle
around the crystal location within the drop.
and draw a rectangle
around the crystal location within the drop.Once you have drawn a box around the crystal, the Crystal Definition window will appear. Here, you will need to define the following:
Note
You can see the drop from the Image Preview on the right side of the Crystal Definition panel.
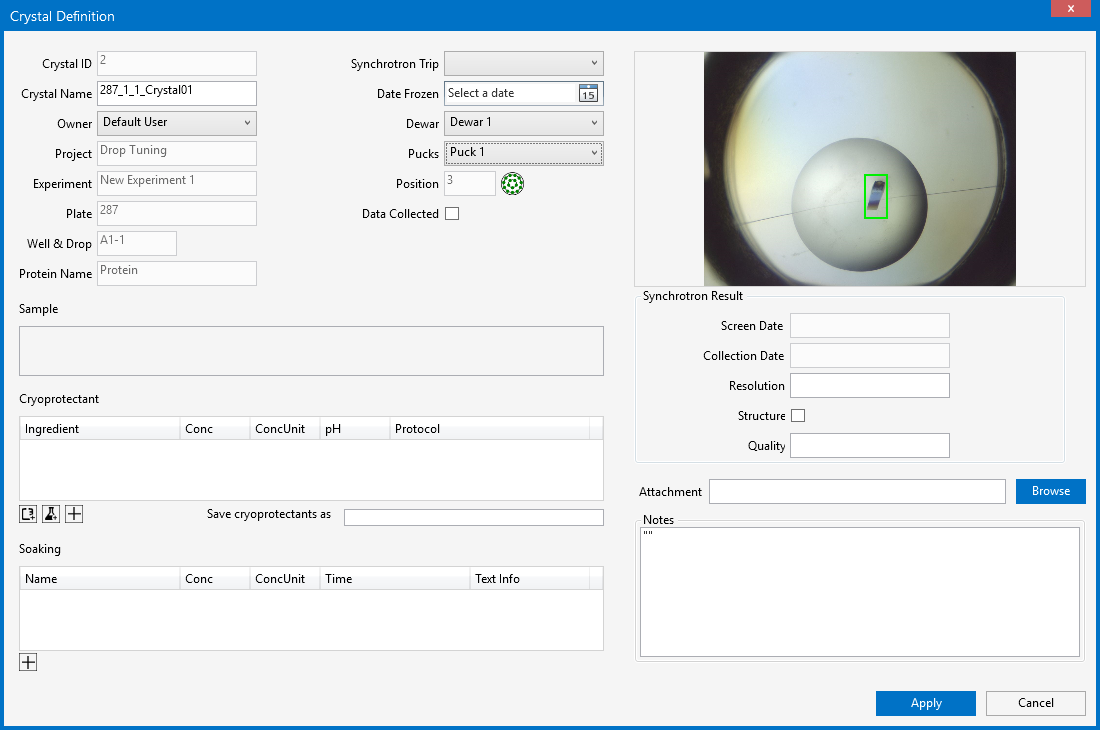
The Crystal Definition Window
Crystal ID. This field is automatically populated by ROCK MAKER.
Crystal Name. Type a name for your crystal in the Crystal Name box, if you do not want to use the default name provided.
Note
You can change the format of the default crystal name in ROCK MAKER Global Preferences. For more information, read System Properties.
Owner. Select the owner of the harvested crystal from the user list.
Plate. Shows which plate you harvested the crystal from.
Well & Drop. Shows which well and drop you harvested the crystal from.
Protein Name. Shows the name of the protein that the crystal is made of.
Protein. Shows the name of the protein/sample that the crystal is made of.
Synchrotron Trip. The Synchrotron Trip definition will be updated automatically after you have selected a Dewar for your harvested crystal.
Date Frozen. Select when the crystal was frozen.
Dewar. Select the Dewar where the crystal is located from the dropdown list.
Pucks. Select the Puck where the crystal is located from the dropdown list.
Position. ROCK MAKER will automatically assign the pin position for your crystal in the selected puck. For better visualization, you can also see and select another position by clicking the Position button
 next to the
Position field. Available pins are shown in green and red
indicates that a pin already contains a crystal. Orange is the
current pin selection for your crystal position. After you have
finished, click
next to the
Position field. Available pins are shown in green and red
indicates that a pin already contains a crystal. Orange is the
current pin selection for your crystal position. After you have
finished, click  .
.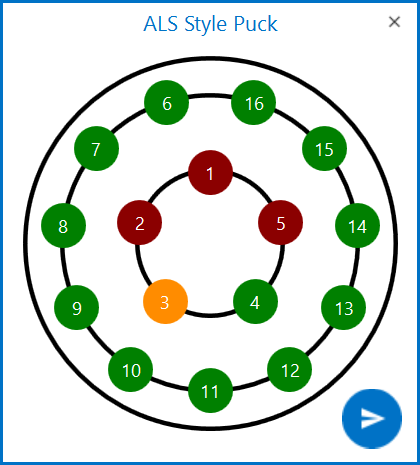
Graphic for ALS Style Puck Displaying Crystal Positions
Data Collected. Select the checkbox if diffraction data has been collected on the crystal.
Note
Data Collected can only be selected if the Data Collection Date is in the past.
Structure. Select this checkbox after you have resolved the structure of your protein from the data collected.
Note
Structure can only be selected if the Data Collection Date is in the past.
Resolution. Type the resolution at which the structure was finally refined.
In the Cryoprotectant panel, define the cryoprotectant you used prior to freezing your crystal:
Note
You are required to fill in the cryoprotectant information.
Click the Load Saved Cryoprotectant button
 to choose
from existing cryoprotectants that have been used before.
to choose
from existing cryoprotectants that have been used before.Click the Load from Sample button
 to use the
crystal’s source well ingredients as the cryoprotectant. Select
Yes when the dialog window appears to confirm your selection.
to use the
crystal’s source well ingredients as the cryoprotectant. Select
Yes when the dialog window appears to confirm your selection.Click the Add new cryoprotectant row
 button to
manually add the cryoprotectant by defining these fields:
button to
manually add the cryoprotectant by defining these fields:Ingredient. Required field. Type the name of the ingredient that you are going to use.
Conc. Required field. Type the concentration of the ingredient that you are going to use.
Conc. Unit. Required field. Select the concentration unit of the ingredient that you are going to use.
pH. Required field. Type the pH of the ingredient that you are going to use.
Note
If you want to save your current cryoprotectant selections for future use, type a descriptive name for your cryoprotectants in the Save Cryoprotectant as box. Your selections will be saved when you click Apply after you are finished inputting your data in the Crystal Definition window.
In the Soaking panel, you will define the name of any compound (or ligand) that you soaked your crystal in, as follows:
Click the Add new soaking row button
to add a new
soaking compound, and then define the following fields:Name. Type the name of the compound used.
Conc. Type the concentration of the compound.
Conc. Unit. Select the concentration unit of the compound.
Time. Type the duration of time for which the crystals were soaked.
In the Synchrotron Result panel, you can define the crystal data as received from the synchrotron facility.
Screen Date. Type the date when the crystal was screened at the synchrotron facility.
Collection Date. Type the date when you collected the crystal data. Usually this date is the same as the Screen date.
Resolution. Type the maximum resolution to which the crystal has diffracted. This should be in a decimal value.
Structure. Add the hyperlink that corresponds to the website or local database where you have uploaded the refined structure of the crystal diffraction data.
Quality. Describe the quality of your crystal.
Browse a document from a directory and attach it in the Attachment box of this crystal record, if desired.
Type any additional information regarding the crystal in the Notes field, if desired.
When you are finished defining your crystal, click Apply to mark the crystal as harvested. A harvested crystal icon will appear on the experiment plate icon.
Note
Harvested crystals that do not have their synchrotron trip, puck, and dewar defined can be found by opening the project the crystal came from. Crystals with their synchrotron trip, puck, and dewar already defined can be found in the relevant Synchrotron Trip in the Synchrotron Trips node on the Explorer.
Related Topics