Creating Protein Formulations
This topic explains how to first create a protein formulation, and then how to add ingredients to your protein formulation.
Note
You can learn how to create Protein Formulations using ROCK MAKER University! At the end of the tutorial, you will have a protein formulation that you can use in an experiment.
Creating a Protein Formulation
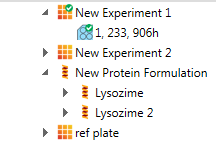
Before using a protein formulation in an experiment, you must enter a few details regarding its preparation and storage, and also define its ingredients. You can create protein formulations at both the project level and the protein-formulation level on the Explorer.
To create a new protein formulation:
From the Explorer, right-click a project, a folder within a project, or a protein formulation, and then select New Protein Formulation
OR
Click a project, folder, or protein formulation, and then click the New Protein Formulation button
 on the Home ribbon.
Rename the protein formulation by typing over the default name in the Explorer. Try to be as descriptive as possible.
Use the following table as a guide for completing the general information in the upper portion of the Protein Formulation page.
Field
Description
ID
ROCK MAKER automatically assigns this number to the protein formulation.
Protein Lot ID
The number of the lot from which the protein formulation was taken.
Class
The class of the formulation, e.g. its protein family name or compound series name.
Date Prepared
The date the protein formulation was prepared. Click the down arrow and select the proper date from the drop-down calendar.
Liquid Class
The liquid class of the formulation. You can click the list to select the liquid class such as Unassigned, Normal, Medium, High, Very High, and Volatile.
Volume (μL)
The volume of the protein formulation. This box is optional.
Storage Temp.
The temperature at which the protein formulation is stored. This box is optional.
Extinction Coefficient
The extinction coefficient of the protein. This box is optional.
Notebook Page #
In this box, you may type a reference to notes you have in your own notebook. This field accepts any type of text, not just numeric. For example, you may type something similar to “Notebook 17, page 43.”
Now you are ready to add ingredients.
Adding Ingredients
The Protein Formulation screen contains two tables for recording ingredients of a protein formulation:
Ingredients table – This table is for keeping track of ingredients that you want to co-crystallize with the protein.
Standard Ingredients table – This table is for recording standard ROCK MAKER ingredients that are used in the protein formulation. Standard ingredients are managed in the Ingredient Setup.
To add a new ingredient:
Right-click the Protein Formulation Ingredients table and select New Ingredient. A new row will be inserted.
Use the table below as a guide for entering information about the new ingredient:
Field
Description
Type
Click in this box and select a type to assign to the ingredient. Protein formulation ingredient types are managed via the Ingredient Types option on the right-click menu.
Name
Type the name of the ingredient here.
ID
You may assign any type of ID to the ingredient. This is useful for assigning an ingredient tracking number that you are using in a database external to ROCK MAKER.
Lot
You also may type any value in the Lot box. This is useful for tracking an ingredient lot number that is stored in a database external to ROCK MAKER.
MW (kDa)
In this box, enter the appropriate molecular weight of the ingredient in kilodaltons.
Note
The ingredient’s molecular weight, concentration in mg/ML, and concentration in mM are interrelated. When you enter any two of these values for a protein formulation, you can press Enter while in the third box to have ROCK MAKER automatically compute its value.
Conc. (mg/mL)
In this box, enter the concentration of the ingredient in milligrams per milliliter.
Conc. (mM)
In this box, enter the concentration of the ingredient in millimoles.
Repeat steps 1 – 2 to add more ingredients to the protein formulation.
To add a Standard ROCK MAKER Ingredient:
Right-click the Standard Ingredients table and select New Ingredient. A new row is inserted.
Use the following table as a guide for entering information about the new ingredient:
Field
Description
Type
Select an ingredient type from the list of possible types.
Name
Select an ingredient from the list of ingredients for the selected type.
Stock Conc.
Click in the Stock Concentration column and select the appropriate ingredient stock from the list.
Conc. Units
This is the concentration units of the selected stock. You cannot edit this value.
Stock Low pH
This is the lowest stock pH available for the ingredient. This column applies only to buffers. You cannot edit this value.
Stock High pH
If you are adding a buffer ingredient and desire a pH higher than the stock low pH, click in the Stock High pH column and select a stock that has a pH higher than the desired pH. Only stocks that have the same concentration and concentration units will be shown in this list.
Conc.
In the Conc. column, enter the desired concentration of the ingredient.
Note
The concentration you enter cannot be greater than the stock concentration of the ingredient stock.
pH
If you are adding a buffer to the condition, click in the pH column and type a value for the pH. This value must fall between the Stock Low pH and Stock High pH values. To achieve the desired pH, ROCK MAKER will mix the low-pH stock and the high-pH stock.
Repeat steps 1 – 2 to add more standard ingredients to the protein formulation.
All other steps on this page are optional.
Adding New Protein Formulation Ingredient Types
Protein formulation ingredient types provide a way to organize the ingredients that make up your protein formulations.
Right-click the Protein Formulation Ingredients table and select Ingredient Types.
Right-click the Protein Formulation Ingredient Types table and select New Ingredient Type.
Click in the new row and type the name of the new ingredient type.
Click OK.
Save your changes.
Note
To delete an ingredient type, right-click it and select Delete Ingredient Type. You cannot delete an ingredient type that is in use.
Attaching Documents to Protein Formulations
In the Attachments area, you can attach files related to the protein formulation, such as a document or spreadsheet that contains information on how the protein was prepared. ROCK MAKER allows you to attach any type of file.
When you attach a file, it is copied to the ROCK MAKER data server, which allows you to open and edit the document from within ROCK MAKER.
In the Attachments area, right-click and select Add Attachment.
Navigate to the file that you wish to attach in the Add Attachments dialog box.
- Select the file and click OK. The attachment is inserted into the Attachments area.You may open this attached file by double-clicking it or by right-clicking it and selecting Open Attachment.To remove an attached file, right-click it and select Delete Attachment.
Creating Multiple Protein Formulations
The Protein Formulation Wizard lets you generate a series of formulations from a protein, multiple compounds and standard ingredients.
Creating Multiple Protein Formulations
To open the wizard, from the Explorer, right-click a project or a protein formulation and select Protein Formulation Wizard.
Note
If you invoke the wizard from a protein formulation, that formulation’s compounds and standard ingredients will be copied into the wizard. You may edit these as you wish.
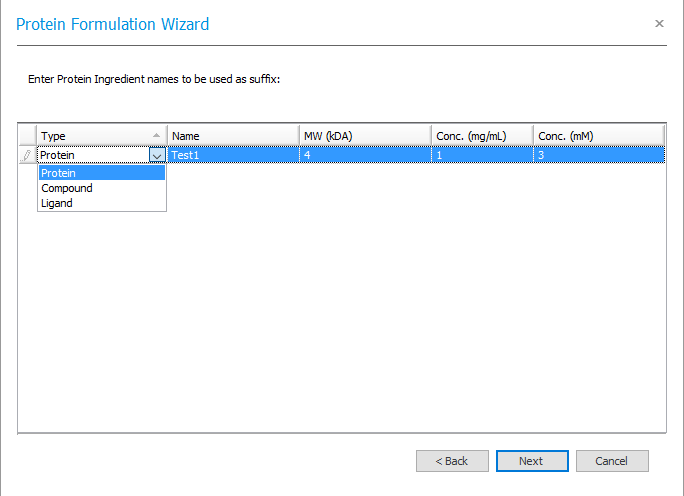
Enter a name and a class for the protein formulation.
Click Next to display the compounds table.
Note
You can return to a previous screen of the wizard at any time by clicking Back.
Right-click the compounds table and select New Compound. A new row will be inserted.
Note
These instructions are for manually adding compounds. You can also add compounds by importing a text file.
Use the following table as a guide for entering information about the compound:
Type
Click in this box and select a type to assign to the ingredient. Protein formulation ingredient types are managed via the Ingredient Types option on the right-click menu.
Name
Type the name of the ingredient here.
MW (kDa)
In this box, enter the appropriate molecular weight of the ingredient in kilodaltons.
Note
The ingredient’s molecular weight, concentration in mg/ML and concentration in mM are interrelated. When you enter any two of these values for a protein formulation, you can press Enter while in the third box to have ROCK MAKER automatically compute its value.
Conc. (mg/mL)
In this box, enter the concentration of the ingredient in milligrams per milliliter.
Conc. (mM)
In this box, enter the concentration of the ingredient in millimoles.
Repeat steps 4 and 5 to add additional compounds.
Add Additional Compounds
Click Next.
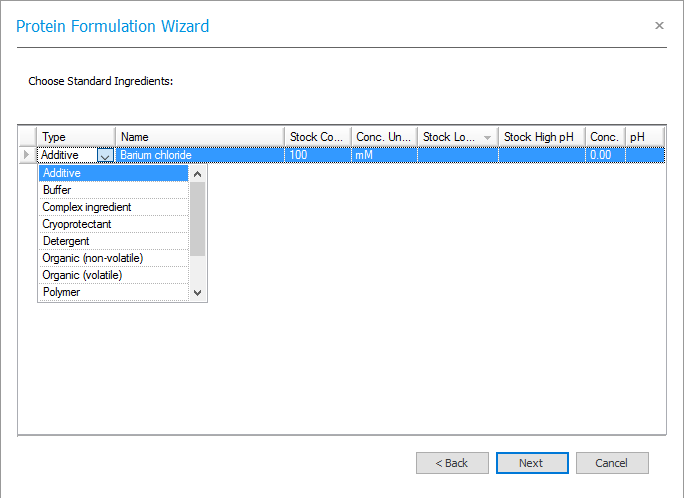
Right-click the standard ingredients table and select New Ingredient.
Use the following table as a guide for entering information about the ingredient:
Type
Select an ingredient type from the list of possible types.
Name
Select an ingredient from the list of ingredients for the selected type.
Stock Conc.
Click in the Stock Concentration column and select the appropriate ingredient stock from the list.
Conc. Units
This is the concentration unit of the selected stock. You cannot edit this value.
Stock Low pH
This is the lowest stock pH available for the ingredient. This column applies only to buffers. You cannot edit this value.
Stock High pH
If you are adding a buffer ingredient and desire a pH higher than the stock low pH, click in the Stock High pH column and select a stock that has a pH higher than the desired pH. Only stocks that have the same concentration and concentration units will be shown in this list.
Conc.
In the Conc. column, enter the desired concentration of the ingredient.
Note
The concentration you enter cannot be greater than the stock concentration of the ingredient stock. Also, keep in mind the dispense volume when entering concentrations so that you do not enter values that will result in a volume greater than the dispense volume.
pH
If you are adding a buffer to the condition, click in the pH column and type a value for the pH. This value must fall between the Stock Low pH and Stock High pH values. To achieve the desired pH, ROCK MAKER will mix the low-pH stock and the high-pH stock.
Repeat steps 8 and 9 to enter additional standard ingredients.
Enter Additional Standard Ingredients
Click Next.
Click Finish. ROCK MAKER will generate the protein formulations and display them on the Explorer.
Importing Compound Protein Formulations from a Text File
The Protein Formulation Wizard allows you to import conditions from a text file instead of entering them individually. Before you import the file, make sure it is in the proper format.
All data for each ingredient must be contained on a single line.
For each ingredient, values for the following columns from the compounds table should be included: Type, Name, MW (kDA), Conc. (mg/mL) and Conc. (mM).
On each line of the file, data items must be separated by tabs.
Right-click the compounds table and select Import from Text File.
In the Open dialog box, select a text file to import.
Click Open. The compounds from the text file will be inserted into the table.
Related Topics