Images Contextual Tab
You can manage and organize your images in ROCK MAKER using the Images contextual tab set. The Images contextual tab set is displayed once you open an experiment that has images, and it includes five tabs: the Imaging, Drop(s), Scores, Import/Export, and Tools tabs.

Images Contextual Tab
Imaging Tab
The Imaging tab includes three button groups: Tasks, Image Settings, and Show. Each group contains different tools that you can use to work with your images.
In the Tasks group, the Image Now button opens the Image Now Options panel, from where you can send your experiment to be imaged using whatever imaging settings you choose. See Creating On-Demand Imaging Sessions for more information about the Image Now feature.
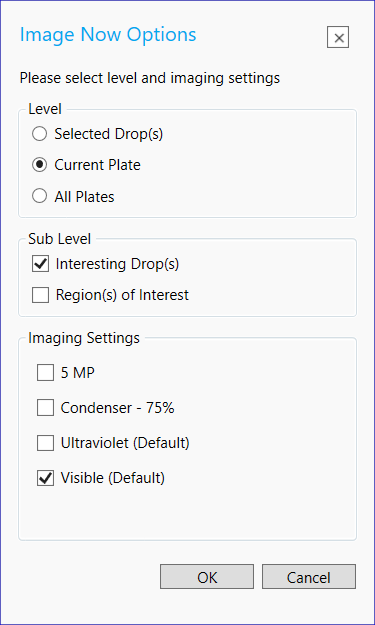
The Image Now Options Window
The Level panel is where you can select if you want to image the drops or plates.
The Sub Level panel includes options to image drops that have been marked as Interesting, or the ones that have at least one Region of Interest.
The Imaging Settings panel shows you the available imaging settings for the selected experiment and can be used to select multiple imaging settings.
The Disable Imaging button in the Tasks group enable you to disable imaging for drops or plates. You can use the Refresh Canvas button to refresh the canvas during imaging, so that you can view the new images as they’re added to ROCK MAKER.
Clicking the Manage Images button enables you to display the Edit Grid Layer panel to edit the ingredients used in your experiment (see Grid Layer), and the Image Management panel where you can delete focus level images from clear drops and the images from the expired plates. Use the Select All button to select all wells at once, and use the Select Wells by Name button if you want to select specific wells. The selected well will be automatically highlighted in orange.
The Custom Drop Imaging Settings group provides you with options to adjust the imaging settings for future inspections for a specific Drop or for a whole Region.
The Show group contains only a single button, which provides the information about the drop location and imaging mode when viewing a drop in Drop view. For more information about the different views in ROCK MAKER, see Well, Drop, and Compare Tabs.
Drop(s) Tab
The Drop(s) tab contains several tools to work with individual drops in your experiment and view focus level images.

Drop(s) Tab
From the Tasks group you can save a drop image, begin a slideshow of all of the drop images from your experiment, or harvest a crystal in order to send it on a Synchrotron Trip. You can also enable the import of Focus Level (FL) images for a drop or manually set the drop location of a well if a drop is not located within the overview image.
If you use ROCK IMAGER to image your experiments, the Focus group allows you to view a particular focus level image. Focus level images are various single slice images taken at different ‘z’ levels within the drop. These images are combined to create a more focused Extended Focus Image. For more information, see Focus Level Selection in Using the Plate Type Editor in the ROCK IMAGER web help.
Scores Tab
The Scores tab is where you can manually assign scores to your images. See Scoring Overview for more information.

Scores Tab
In the Scores group, you can manually score your drops based on the scoring values assigned in the General Setup.
In the Options group, you can enable the Auto Select Next Well option to automatically move to the next well after you have scored the current well. You can also mark a drop as interesting or filter which scores are visible on each drop image. If you want to hide the auto scores from the Canvas, click the Hide AutoScores button.
In the Auto Score group, you can click the Send to MARCO button to manually send all Visible images in an inspection to be scored by the MARCO scoring service. If you want to allow your images to be used to help train MARCO to better score images, click the Send for Training button. Click the Dispute button if you disagree with the score that MARCO has given any of your images. This feedback is important to help improve MARCO’s scoring ability. See Scoring Visible Images Using MARCO for more information.
In the Canvas group, the Highlight button enables you to automatically highlight the image margins: yellow is used for images with a hit in any score group, green is used for those that contain hits in all score groups, and red is used for those that have no hit in any score group.

Filter the Images Using the Highlight Button
Note
Enabling the Highlight button will highlight the images for all view modes, including Canvas, Well, Drop, and Compare views.
In the Filters group, you can use the Any Hit button to only display drop images that contain at least one hit in one of the scoring modes, or use the All Hits button to only display images that contain hits in all scoring modes. You can filter the hit images based on a specific Scoring Mode, including All Scores, Auto Scores, or Manual Scores. You can also select single or all Scoring Group you desired to filter in each scoring mode. See Filtering Hits Based on Scores. for more information.

Images Filtered by Hit
The Score Group Threshold button allows you to adjust
the thresholds of a positive hit for each image. You can make the hit
range smaller or larger, allowing more or fewer drops to be
classified as hits. You can also select the Save value for next
inspection checkbox if you want to save the adjusted threshold for
use with future inspections.
allows you to adjust
the thresholds of a positive hit for each image. You can make the hit
range smaller or larger, allowing more or fewer drops to be
classified as hits. You can also select the Save value for next
inspection checkbox if you want to save the adjusted threshold for
use with future inspections.
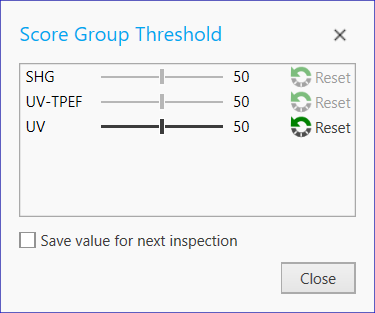
Score Group Threshold Window
Import/Export Tab
The Import/Export tab contains tools that enable you to import, export, or delete image inspections.
From the Inspection group, you can create a new inspection or delete an inspection you’ve created. Creating a new inspection before importing images helps you ensure that your old images aren’t overwritten. In ROCK MAKER, image inspections can only include one image taken with particular imaging settings, and if more than one image with identical imaging settings are assigned to the same inspection, only the newest images will be kept. To prevent older images from being lost, it is recommended to create a new inspection before importing any images. The Create New and Delete buttons are only enabled in Canvas view.
The Inspection Package group allows you to work with inspection packages, which are ZIP files containing images and data from imaging sessions that can easily be shared between colleagues. Here you have tools that help you create new inspection packages, add images to an existing inspection package, save your inspection package as a ZIP file for easy sharing, or import images and data from an inspection package you’ve received. The Import option is only available when viewing your experiment in Canvas view.

Import/Export Tab
Tools Tab
The Tools tab provides several tools you can use to manipulate your images, such as a ruler to measure crystals and the ROI tool to select regions of interest that can be focused on in future imaging sessions. The Tools tab also includes options related to image tuning, to help you get the clearest possible view of your images. See Image Tools and Image Tuning for more information.

Tools Tab
Related Topics: